


34 Modern Kitchen Island Ideas for a Sleek New Look
The island is the kitchen. Not the tile, not the range — the island is what people walk toward first, sit at longest, and photograph every time they entertain. Here’s the thing: most...

The island is the kitchen. Not the tile, not the range — the island is what people walk toward first, sit at longest, and photograph every time they entertain.
Here’s the thing: most inspiration content shows you what looks beautiful in professional shoots. It doesn’t explain what works at 7 a.m. when you’re making three different breakfasts, or on a Saturday night when the island needs to be a prep station, a bar, and a place for the kids to sit — all at the same time.
You’ve probably already saved a few dozen pins. Maybe more, across several boards. The 34 ideas below are built to replace that scroll with something more useful: visually specific options that are real-world practical and directly relevant to a modern kitchen renovation. Each one includes the design reasoning and at least one practical detail — a dimension, a material name, or a cost range — so it’s actually usable, not just pretty.
According to NKBA’s 2024 Kitchen Trends Report, 57% of kitchen designers expect islands to replace formal dining rooms as the primary eat-in space. If that’s the direction your kitchen is heading, what’s below will help you decide exactly what it looks like in your home.
What Makes a Kitchen Island “Modern”?
Modern kitchen islands combine clean-line cabinetry, durable countertop surfaces, and purposeful storage into a single unit that serves as both a workspace and a gathering point. Unlike older built-in designs, modern islands use minimalist hardware, material contrasts — such as a dark painted base with a light stone top — or integrated appliances to give the island its own distinct visual identity within the kitchen.
That’s the design version. The practical version: a modern island is one that doesn’t look like it came with the house.
Modern kitchen islands have become the dominant focal feature in open-plan renovation projects. According to NKBA’s 2024 Kitchen Trends Report — drawing on surveys of 630 designers, remodelers, architects, and specifiers — more than half of respondents said they planned to add a kitchen island or increase the size of one already in place. The island isn’t a secondary detail anymore.
To plan a modern kitchen island that functions and photographs well:
- Measure the available floor space and mark 42-inch walkway clearance on every open side.
- Choose island depth: 24 inches for galley or narrow kitchens; 36 inches for standard layouts.
- Select countertop material based on daily use — quartz for low maintenance, butcher block for warmth, quartzite for natural stone durability without marble’s fragility.
- Add a 12-to-15-inch seating overhang on one long side if stools are part of the plan.
- Confirm plumbing and electrical rough-in locations before the countertop is templated — not after.
Modern Kitchen Island Style and Finish Ideas
Most of what you’re pinning and saving lives in this section. Style and material choices — the base color, the countertop edge profile, the surface texture — are what determine how the island looks before anyone sits down or opens a single drawer.
The most widely repinned modern island styles share one pattern: a single bold material or finish decision, executed well, with everything else kept intentional. Quartz with marble-like veining remains the most-specified island countertop in North American kitchen renovations, according to Caesarstone’s 2024 design trend data — followed by quartzite slabs and wood-surface alternatives for warmer kitchen palettes.
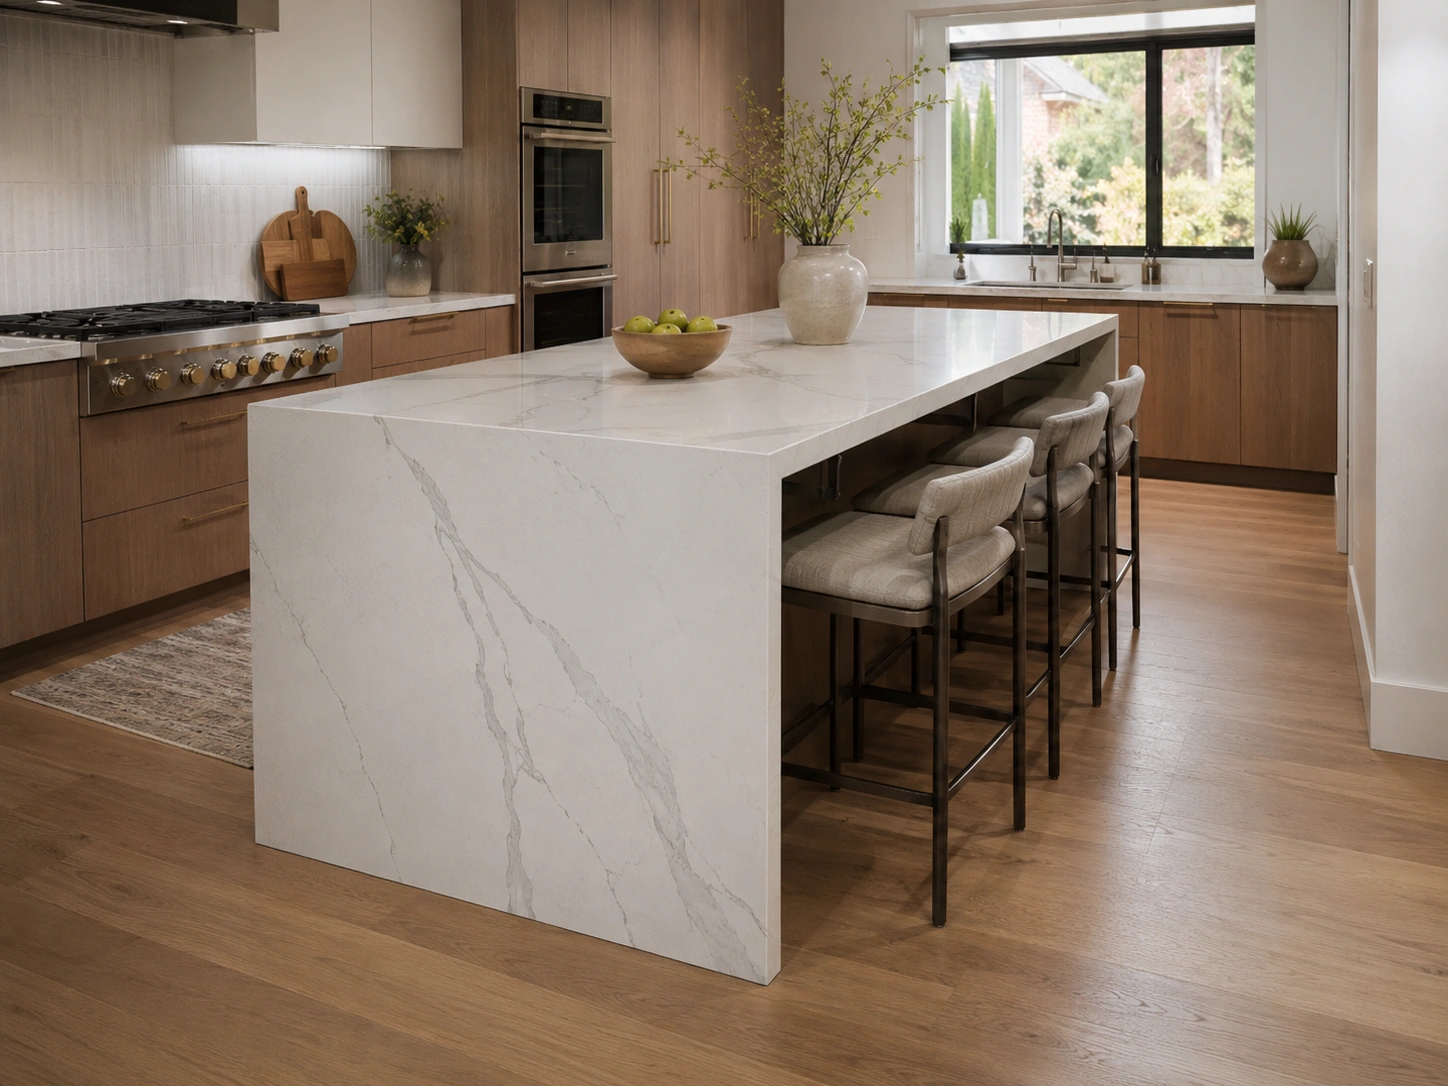
1. Waterfall Edge Quartz Island
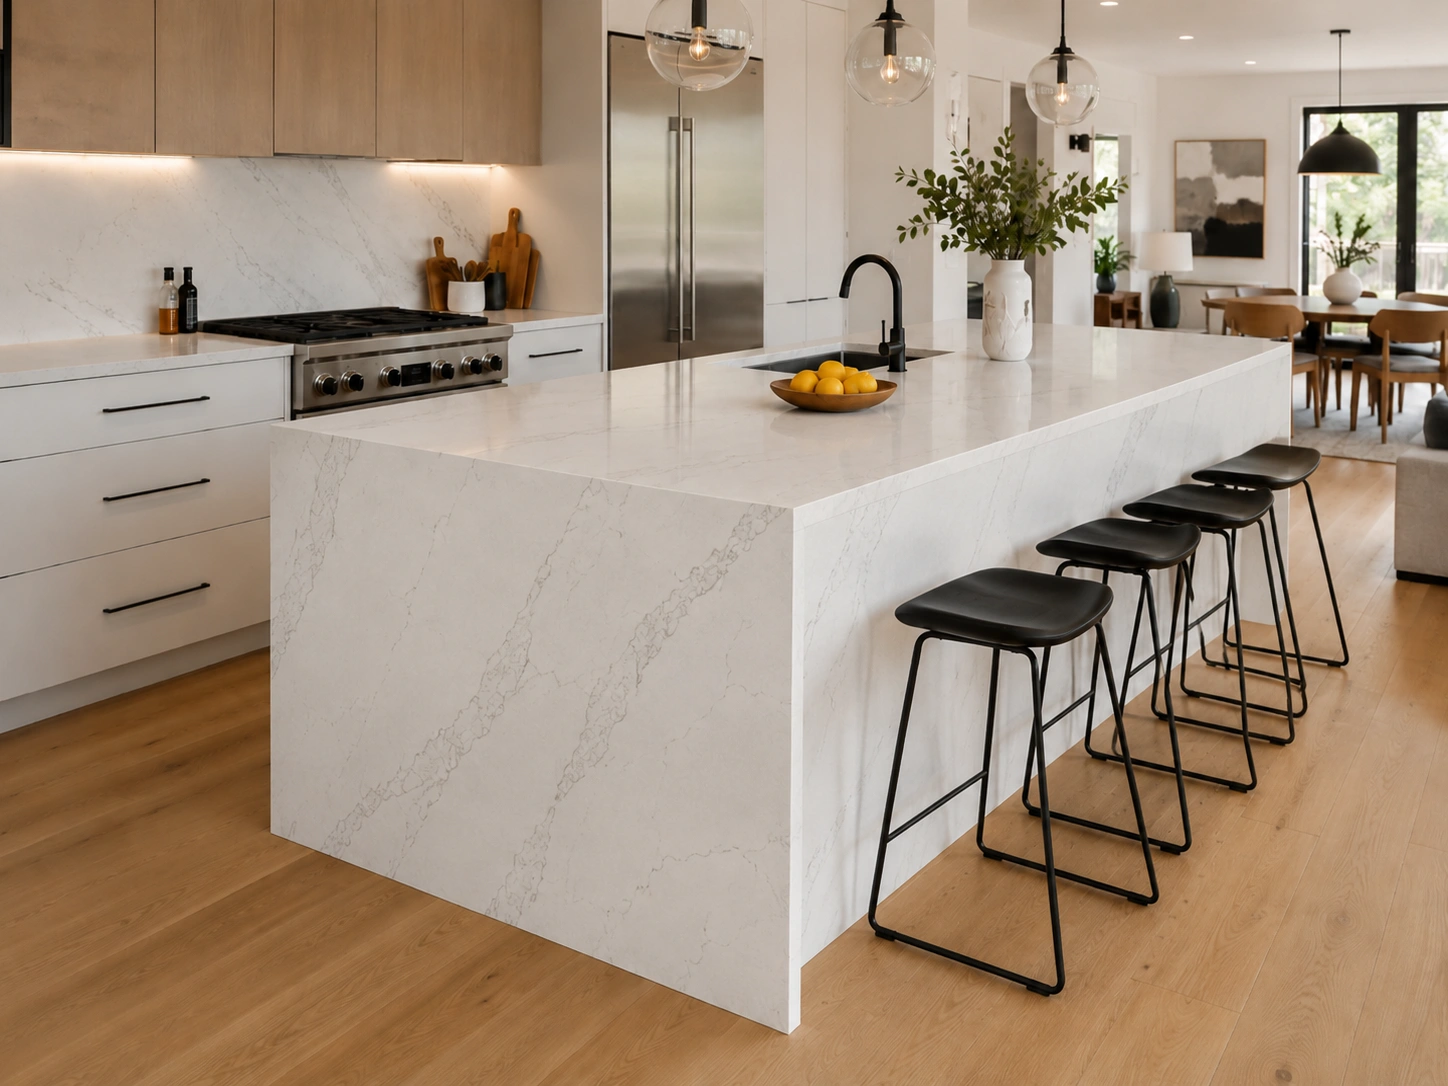
The countertop continues vertically down both exposed sides of the island, hiding the cabinet base and turning the slab into a seamless visual statement. This is the most-saved kitchen island detail on Pinterest — and the most-requested style in current modern kitchen renovations. Caesarstone’s Calacatta Nuvo and Pure White are two of the most commonly specified slab options. Budget for $150 to $250 per linear foot for a waterfall edge in quartz, fully installed, on top of the base countertop cost.
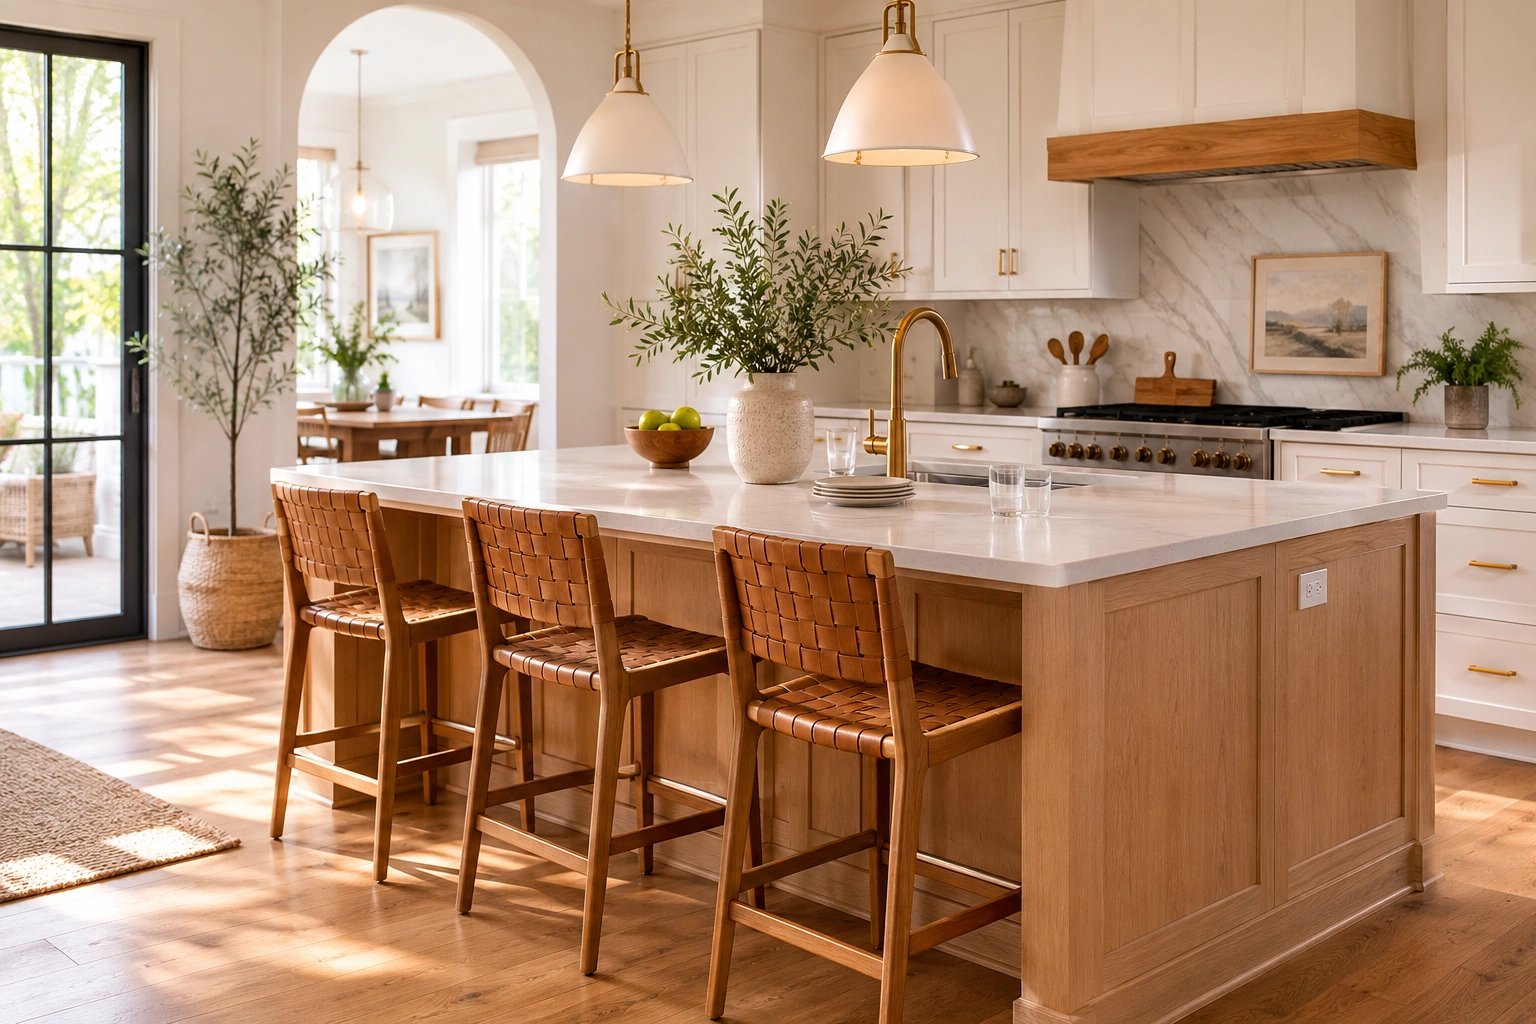
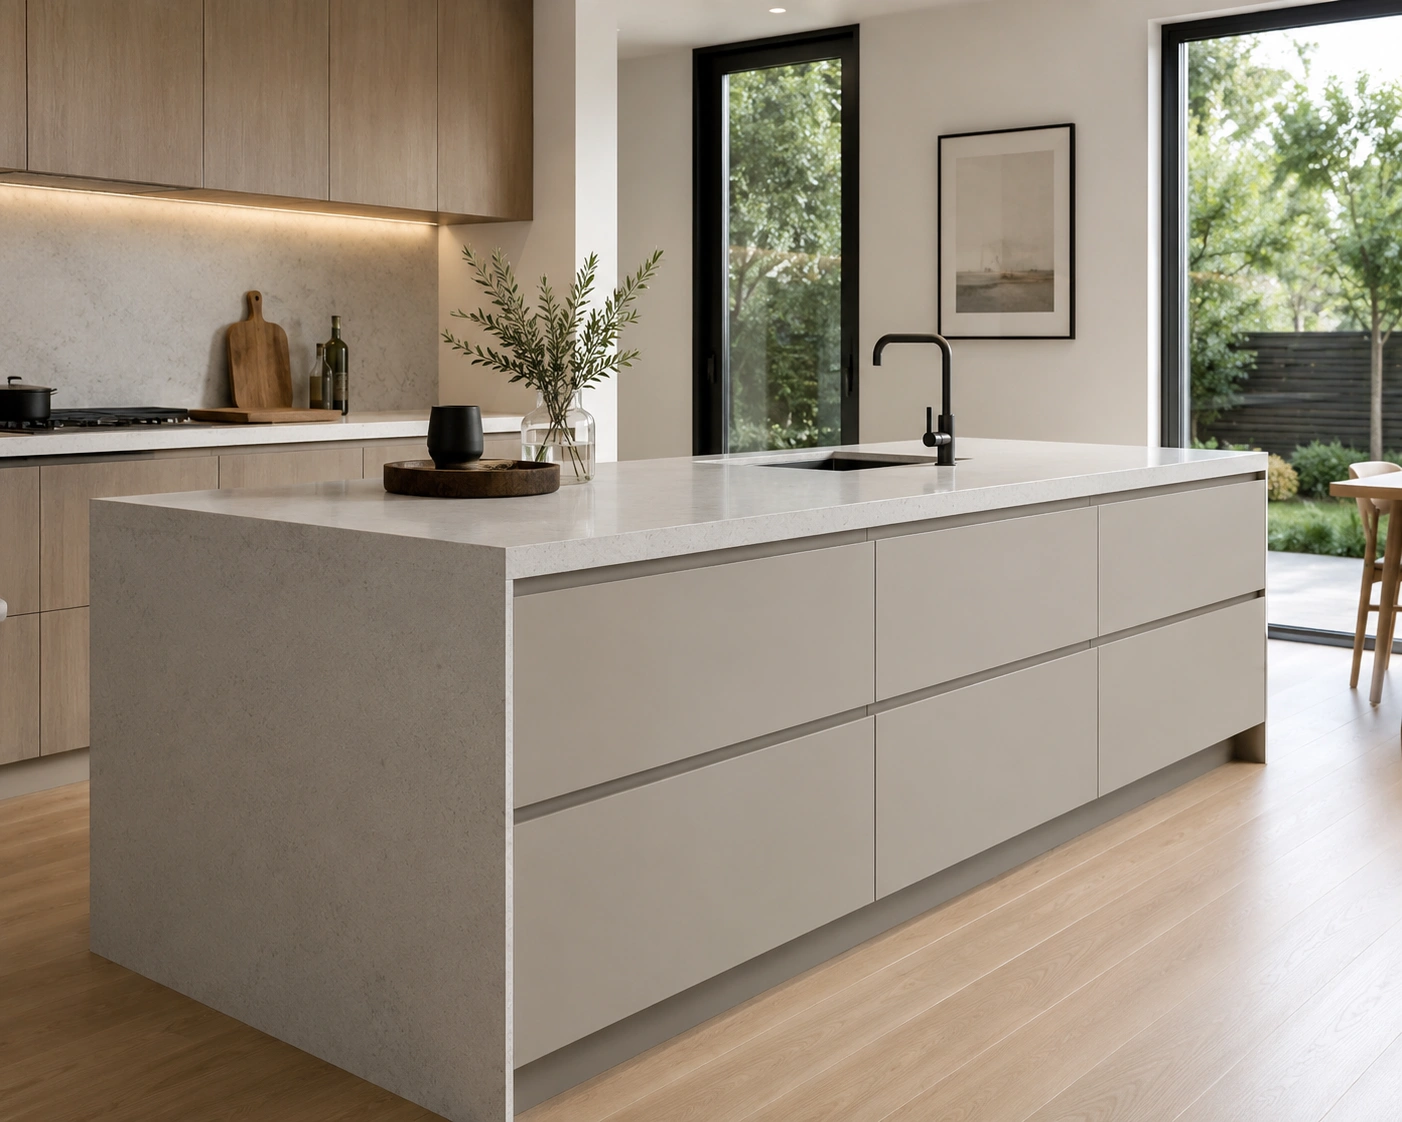
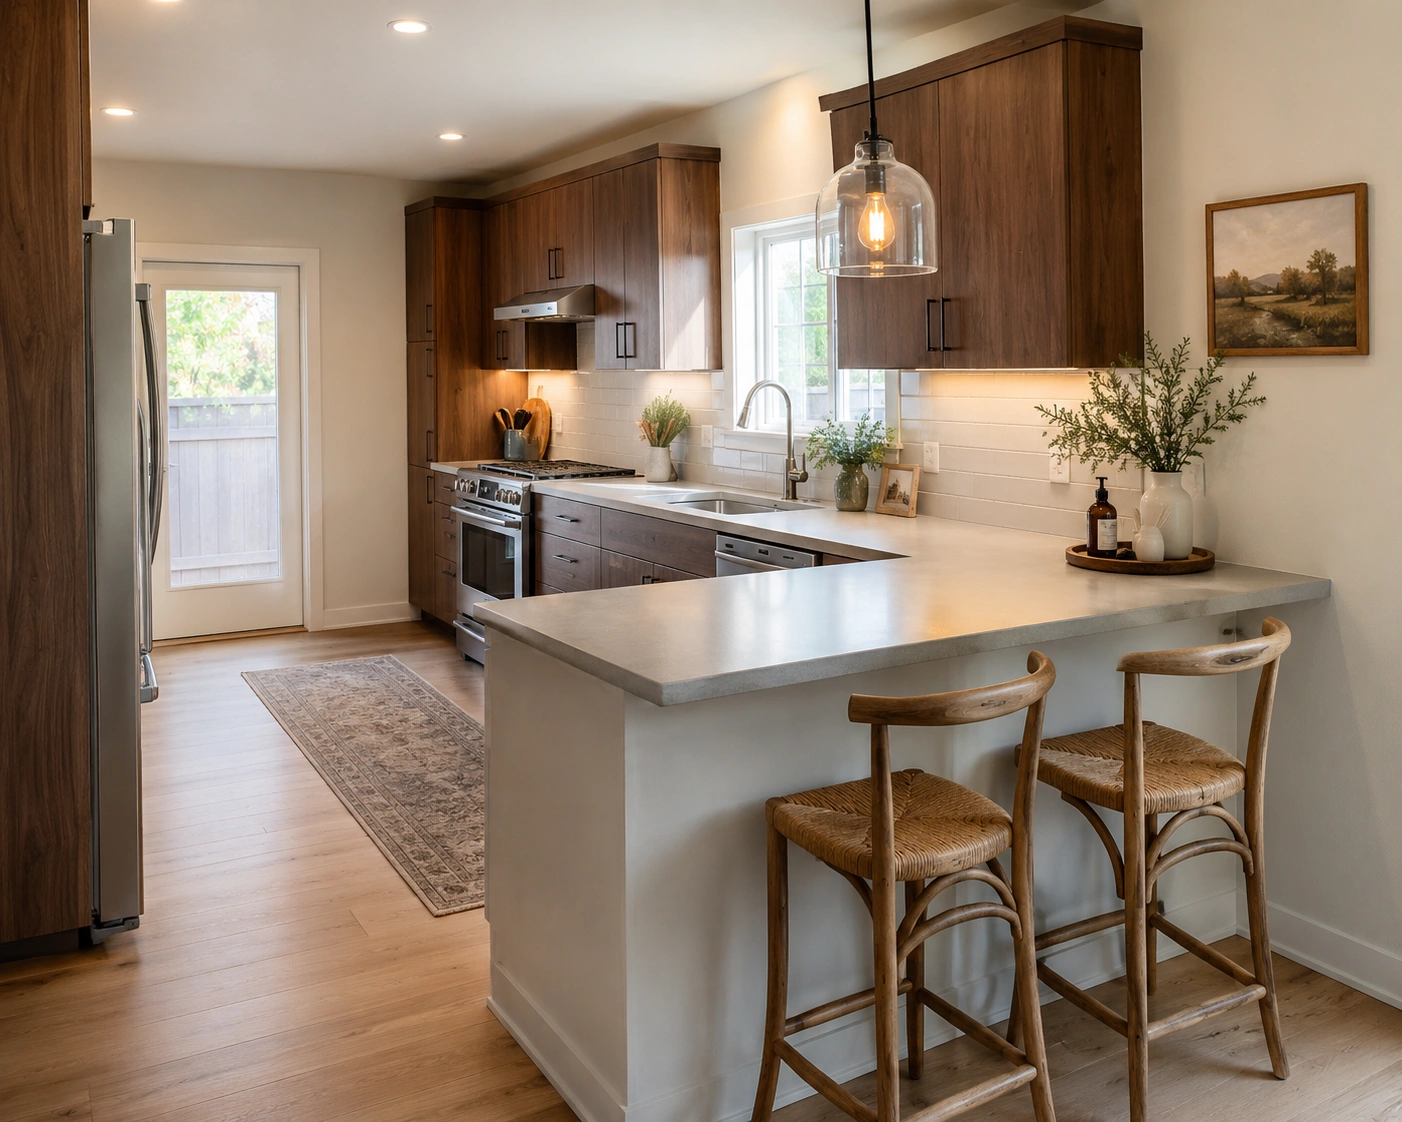
2. Two-Tone Island: Dark Base, Light Countertop

Paint the island base a deep tone — charcoal, forest green, black, or navy — and top it with white or warm white quartz. This is the most replicated modern kitchen contrast because it works across nearly every kitchen size and layout. The visual effect makes the island appear to float between lighter perimeter cabinets. Consistency in hardware finish across both the island and the surrounding cabinets is what keeps the contrast looking intentional rather than mismatched.
3. Fluted or Reeded Wood Panel Base
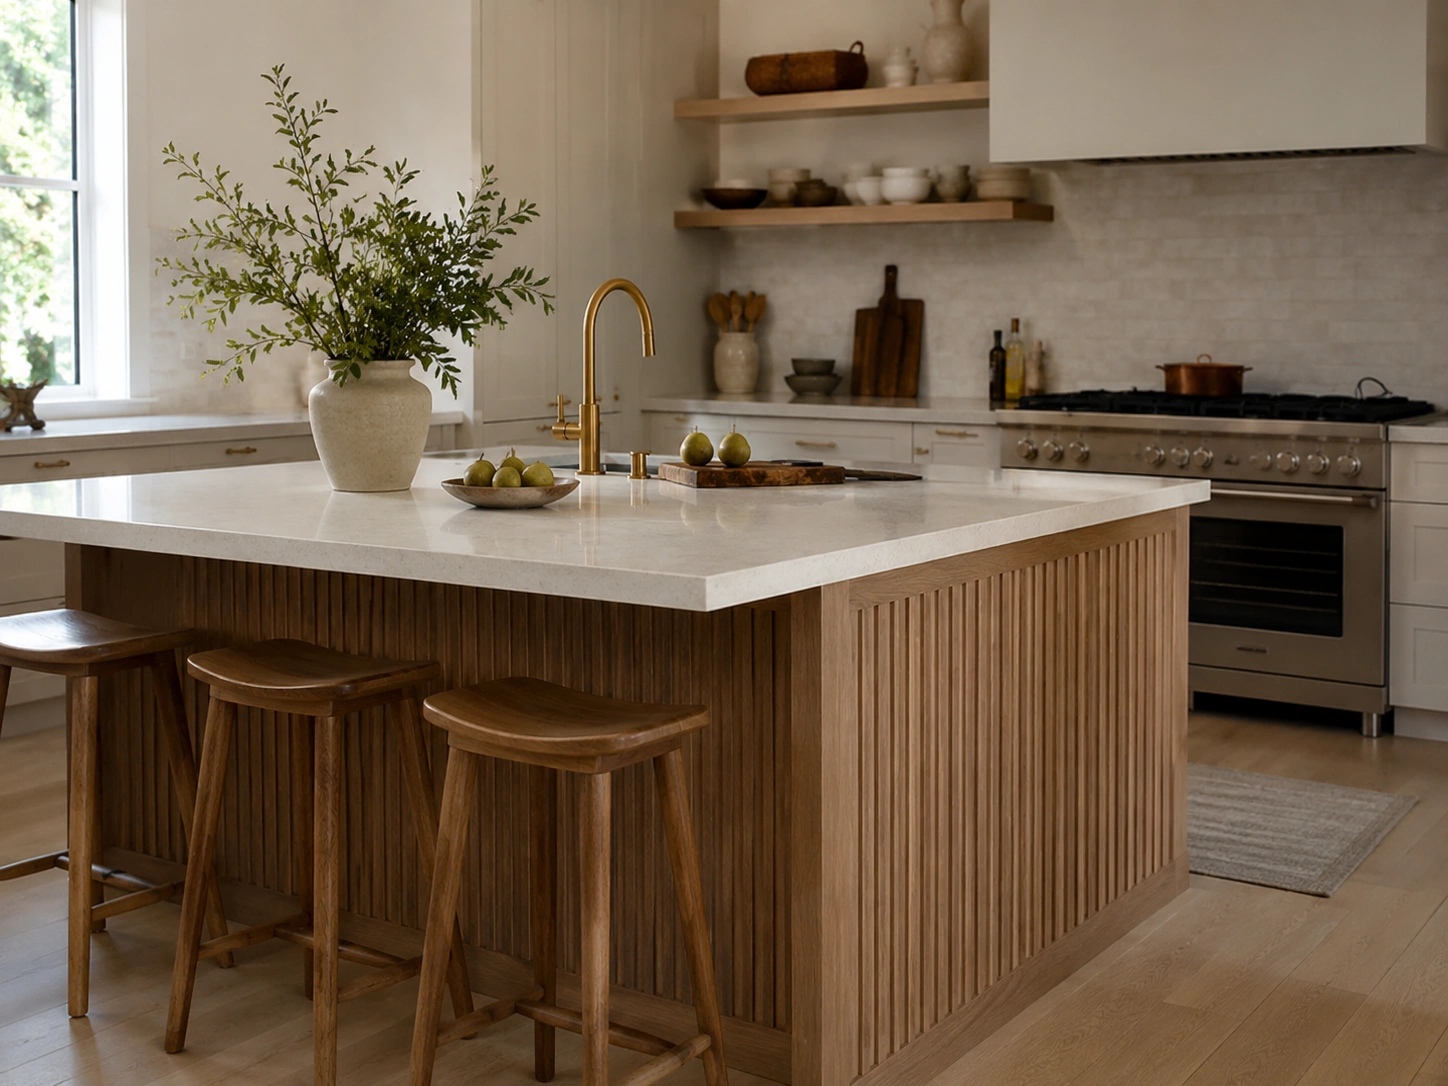
Vertical channels carved or applied to cabinet door and drawer faces have become the defining texture of modern-organic kitchen design. On an island base, they add tactile depth without color or pattern distraction. They photograph exceptionally well in warm-toned kitchens and pair best with sage green, greige, or soft white base tones. Real MDF fluted panels from cabinet shops run approximately $30 to $60 per panel before painting or staining — a meaningful upgrade at a reasonable cost.
4. Matte Black Island in a White Perimeter Kitchen
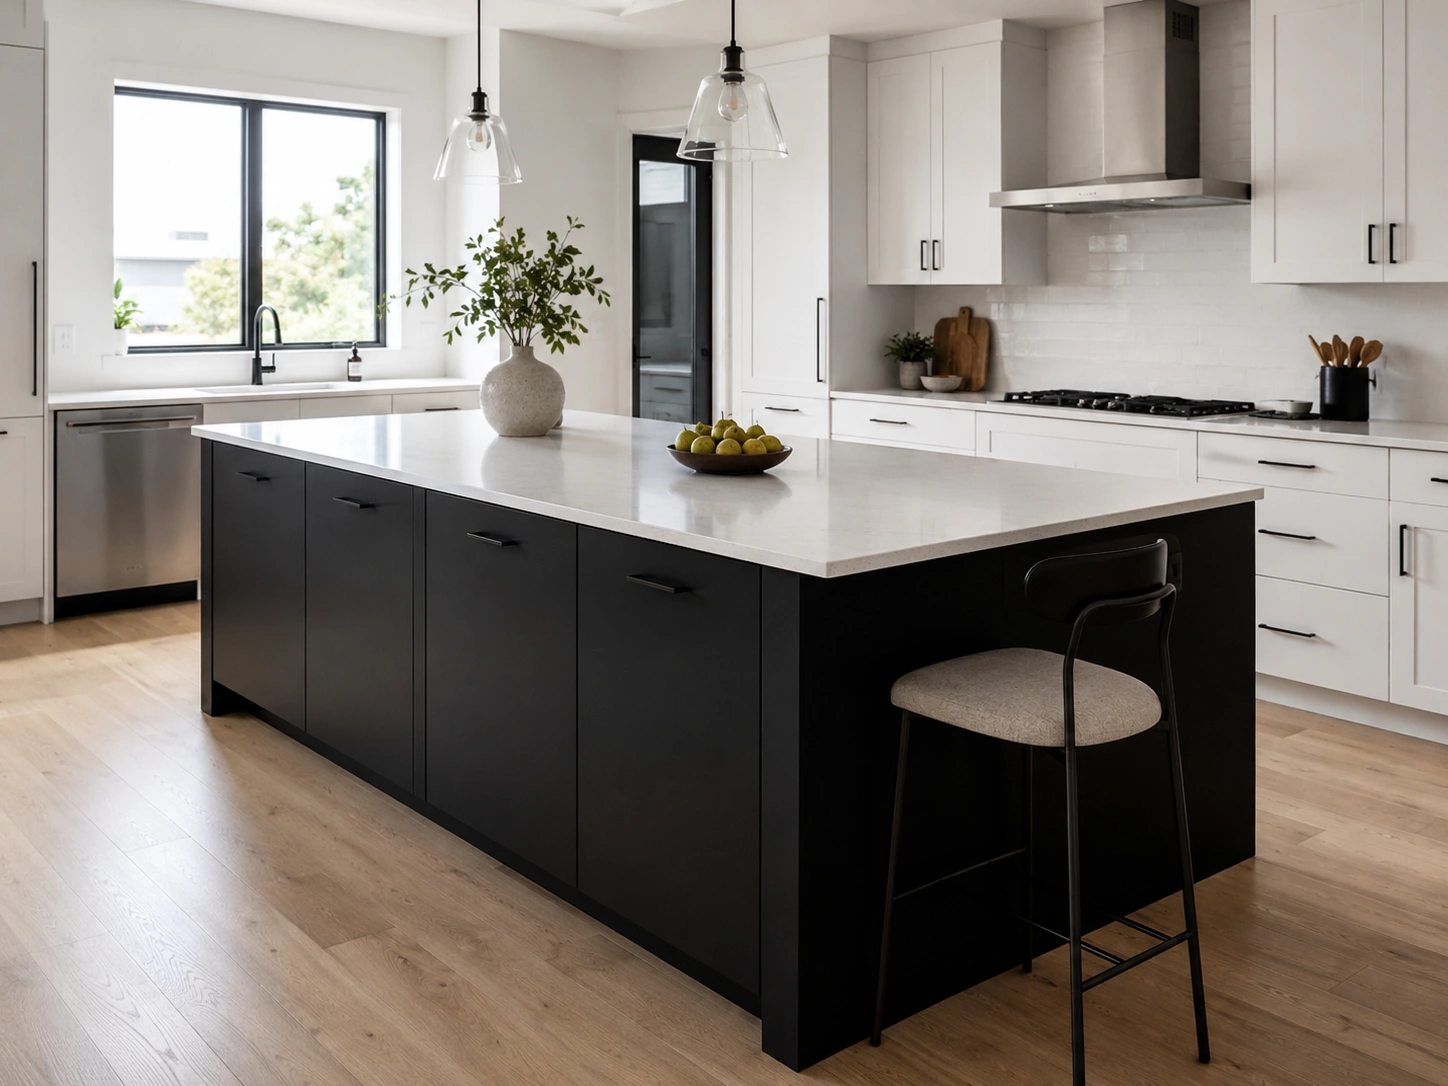
A matte black island against white perimeter cabinets reads more refined than it sounds — and far less severe than it appears on a mood board. Matte finish absorbs rather than reflects light, which softens the contrast and hides fingerprints considerably better than any gloss black surface. Pair with a white quartz top for maximum visual contrast, or a honed black granite for a monochromatic version. Simple flat bar handles keep the hardware from competing with the base color.
5. Navy Blue Island with Warm Brass Hardware
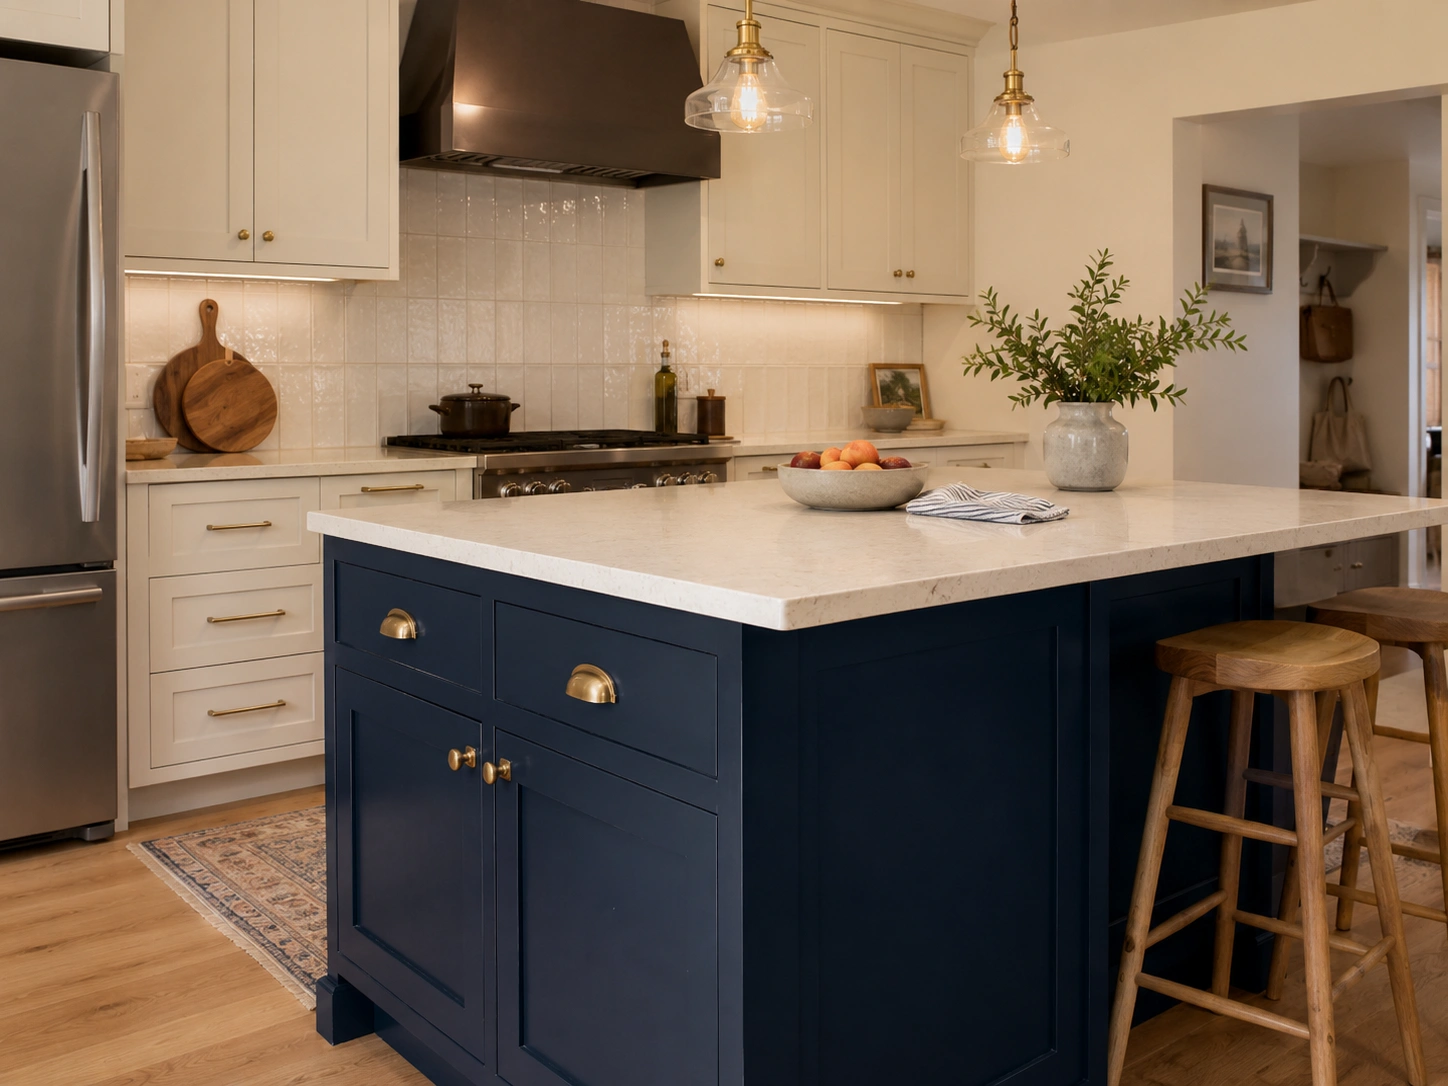
Navy functions as a sophisticated neutral in kitchen environments because it holds its tone in both natural daylight and warm artificial evening light without shifting dramatically. Unlacquered brass pulls — the kind that develop a slight patina over time — are the hardware pairing that appears most often in high-repinned navy island images. A creamy or warm white quartz countertop (not bright white) completes the combination without adding harshness. This color story has maintained strong pin volume for over two years with no signs of declining.
6. Sage Green Island Base
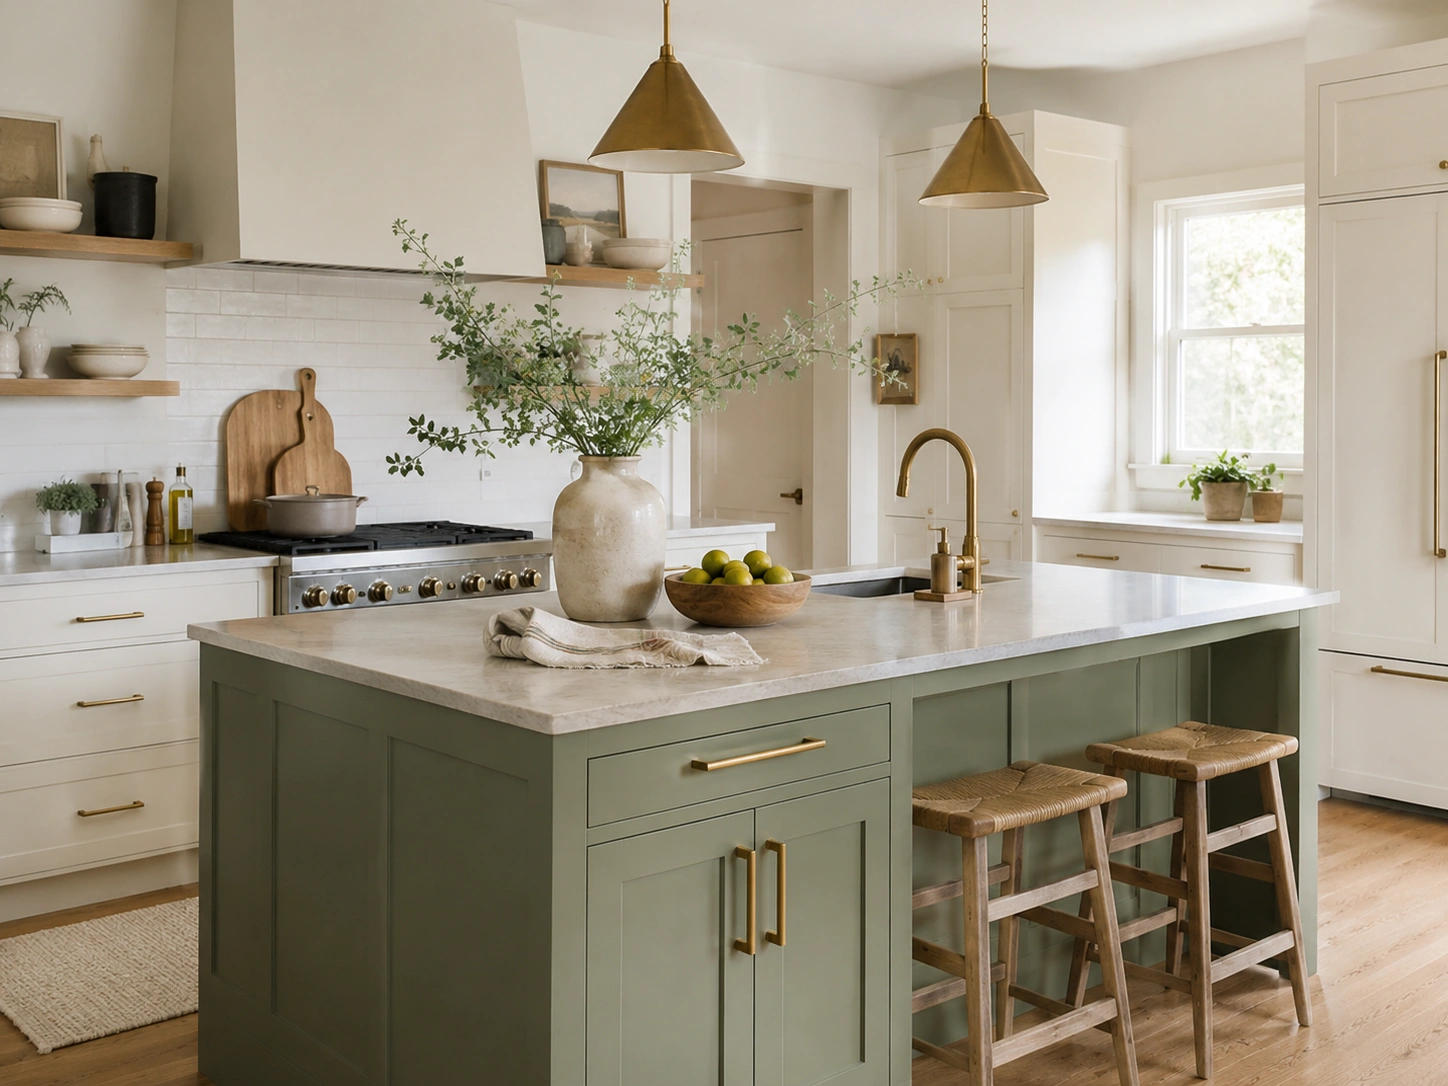
Sage green became the defining island color of the mid-2020s renovation cycle because it bridges organic warmth and contemporary restraint at the same time. It works with natural wood accents, warm white walls, aged brass hardware, and both light and dark countertop options. Benjamin Moore Rosemary and Sherwin-Williams Cascade Green are two widely referenced paint matches. The tone shifts noticeably between natural morning light and warm evening light — always test a paint sample on the actual cabinet surface before committing to a full order.
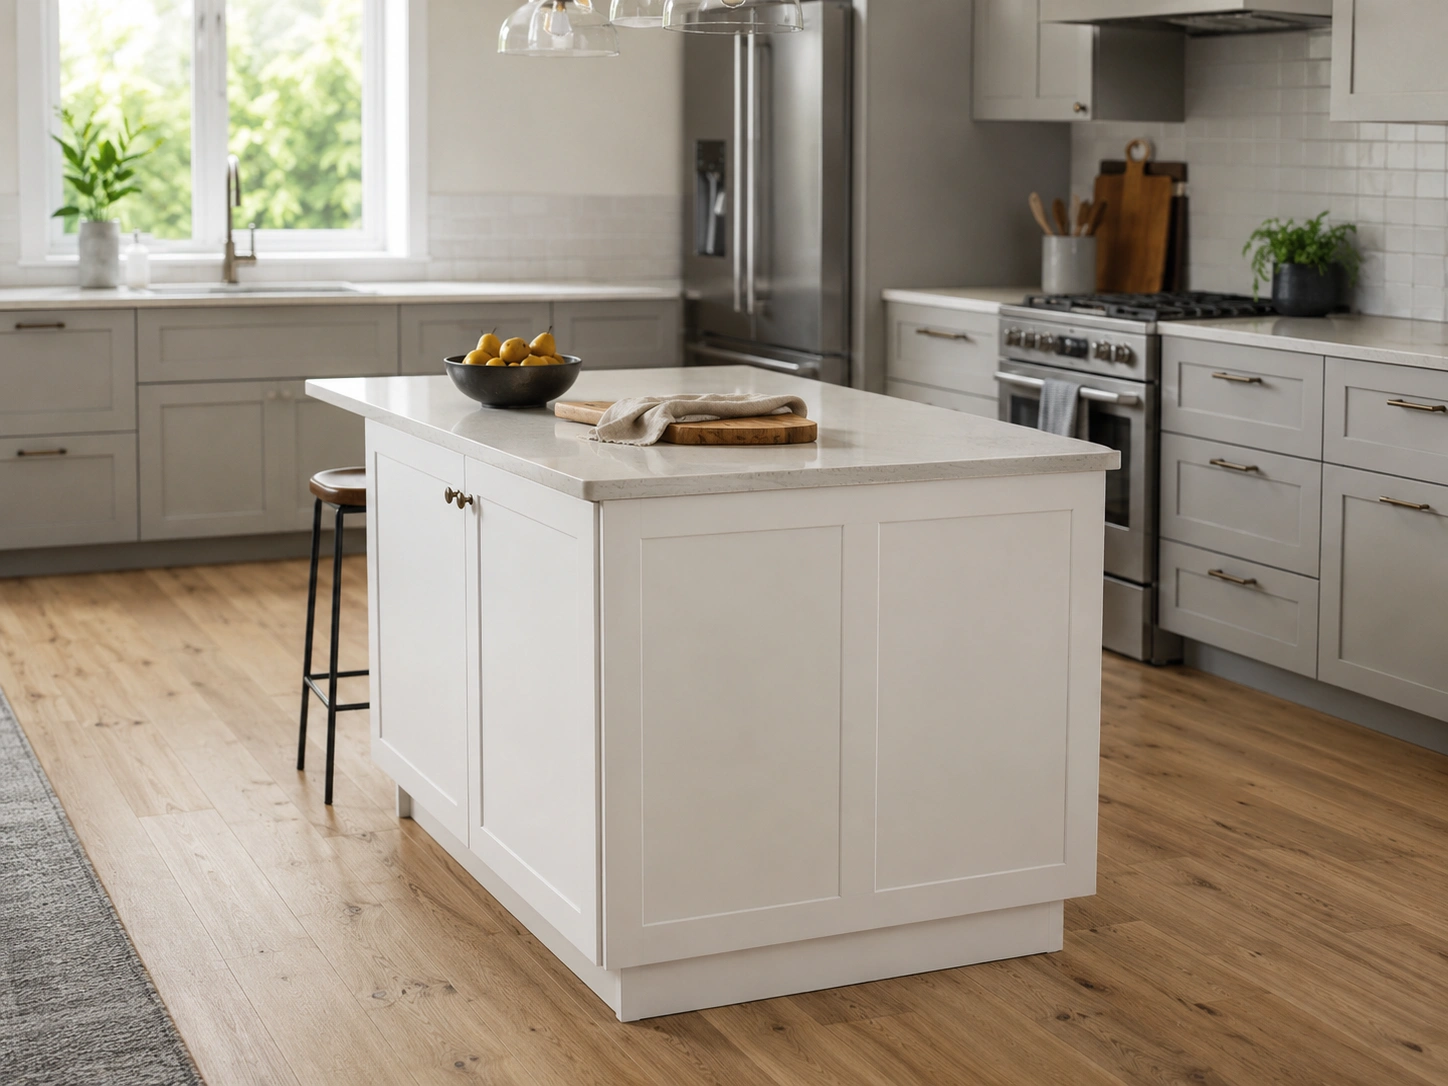
7. Butcher Block Countertop Island
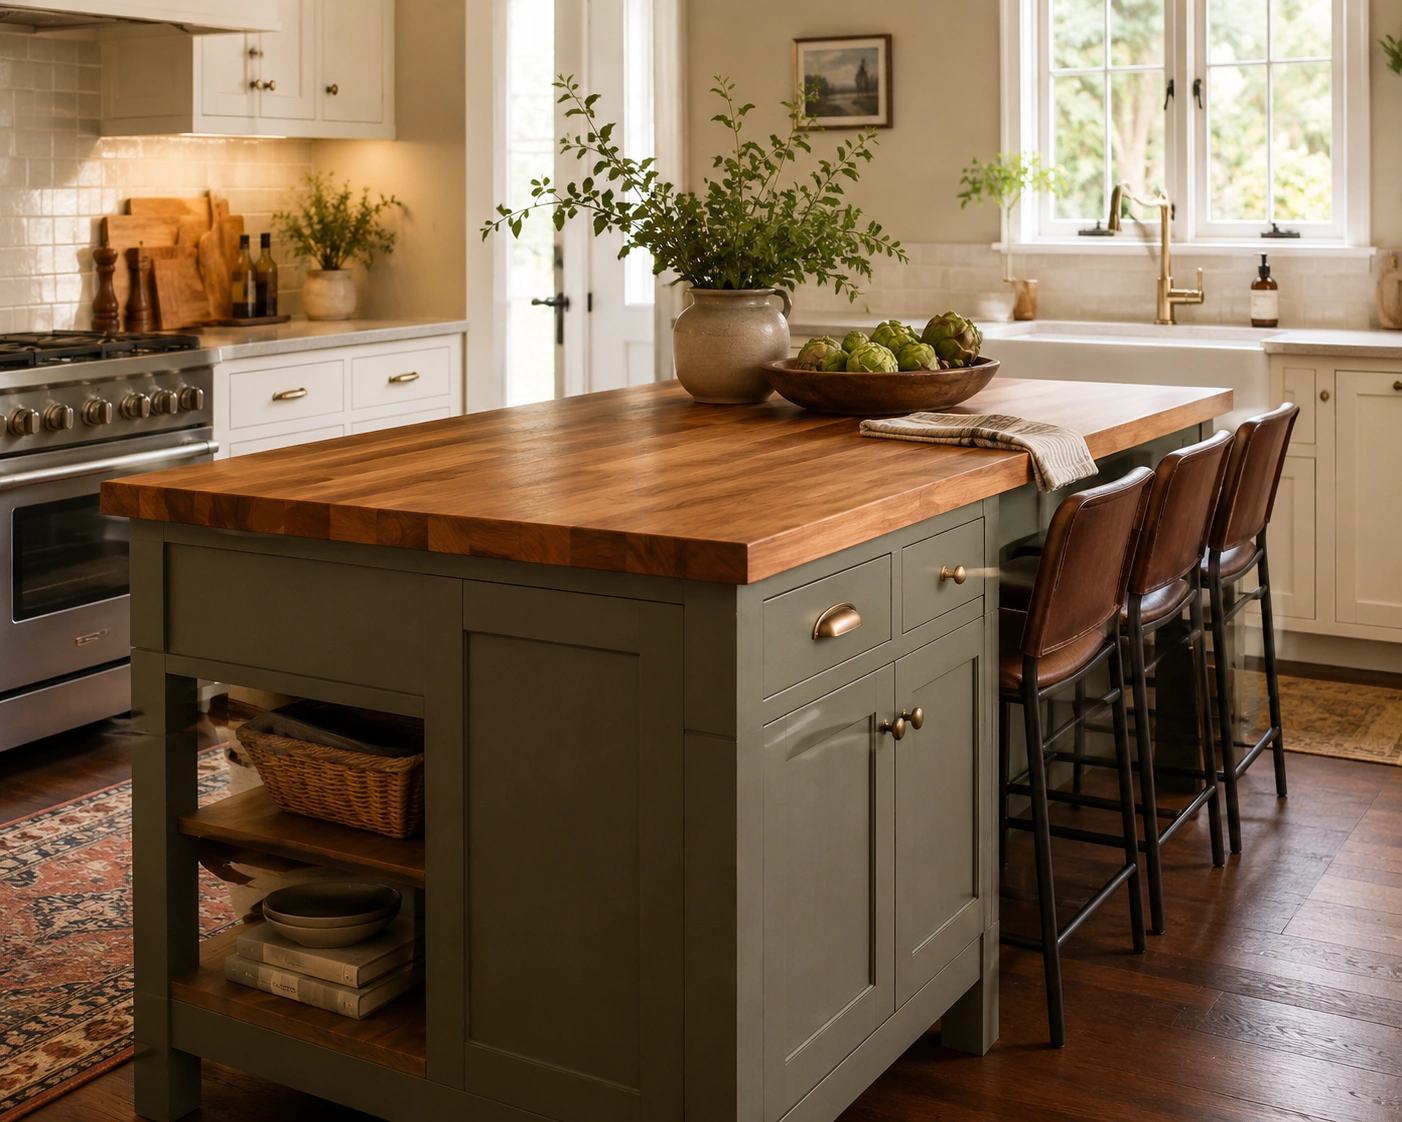
A butcher block top makes an island look and feel like a piece of furniture — crafted and intentional rather than builder-grade. The honest trade-off: it needs sealing with food-safe mineral oil once a year and will show knife marks and water rings over time. Homeowners who treat those marks as earned patina tend to love it long-term. For painted or wood-base islands in warm-toned kitchens, butcher block delivers one of the most visually cohesive countertop choices available at a mid-range price point.
8. Marble-Look Quartz Waterfall Island
Real marble on a waterfall island means etching, staining, and annual sealing. A marble-look quartz version — veined patterns like Calacatta Gold or Statuario finishes from brands such as Caesarstone and Silestone — delivers the same visual presence without those maintenance realities. The key fabrication detail: request book-matched slabs so the veining continues from the horizontal surface onto the waterfall panel in one unbroken flow. Fabricators charge a small premium for this alignment, but it’s what separates a careful installation from a generic one.
9. Shiplap or Wood Plank Island Base
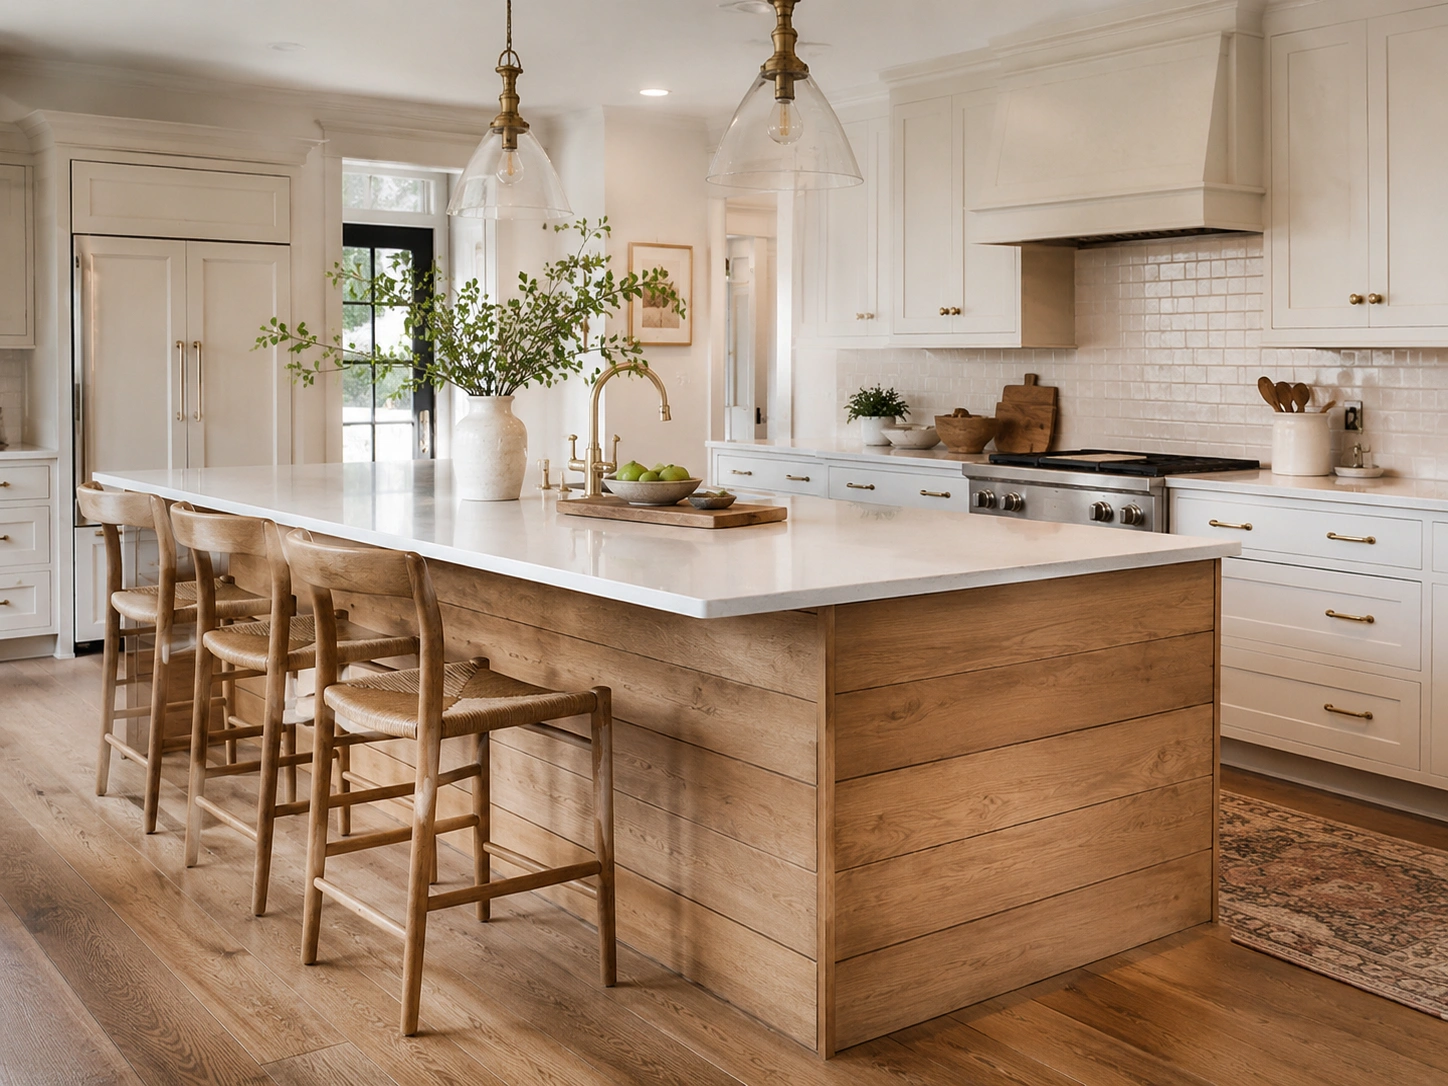
Horizontal wood planks applied to the island base panels soften the boxy look of standard cabinetry without adding color. Whitewashed reads coastal. Natural wood reads organic and warm. Dark stain reads moody and grounding. This detail works best in farmhouse-leaning or transitional modern kitchens — not in high-gloss or strictly minimal interiors. DIY note: 1×4 boards nailed directly over a stock cabinet base cost under $100 in lumber and finish comfortably in a weekend.
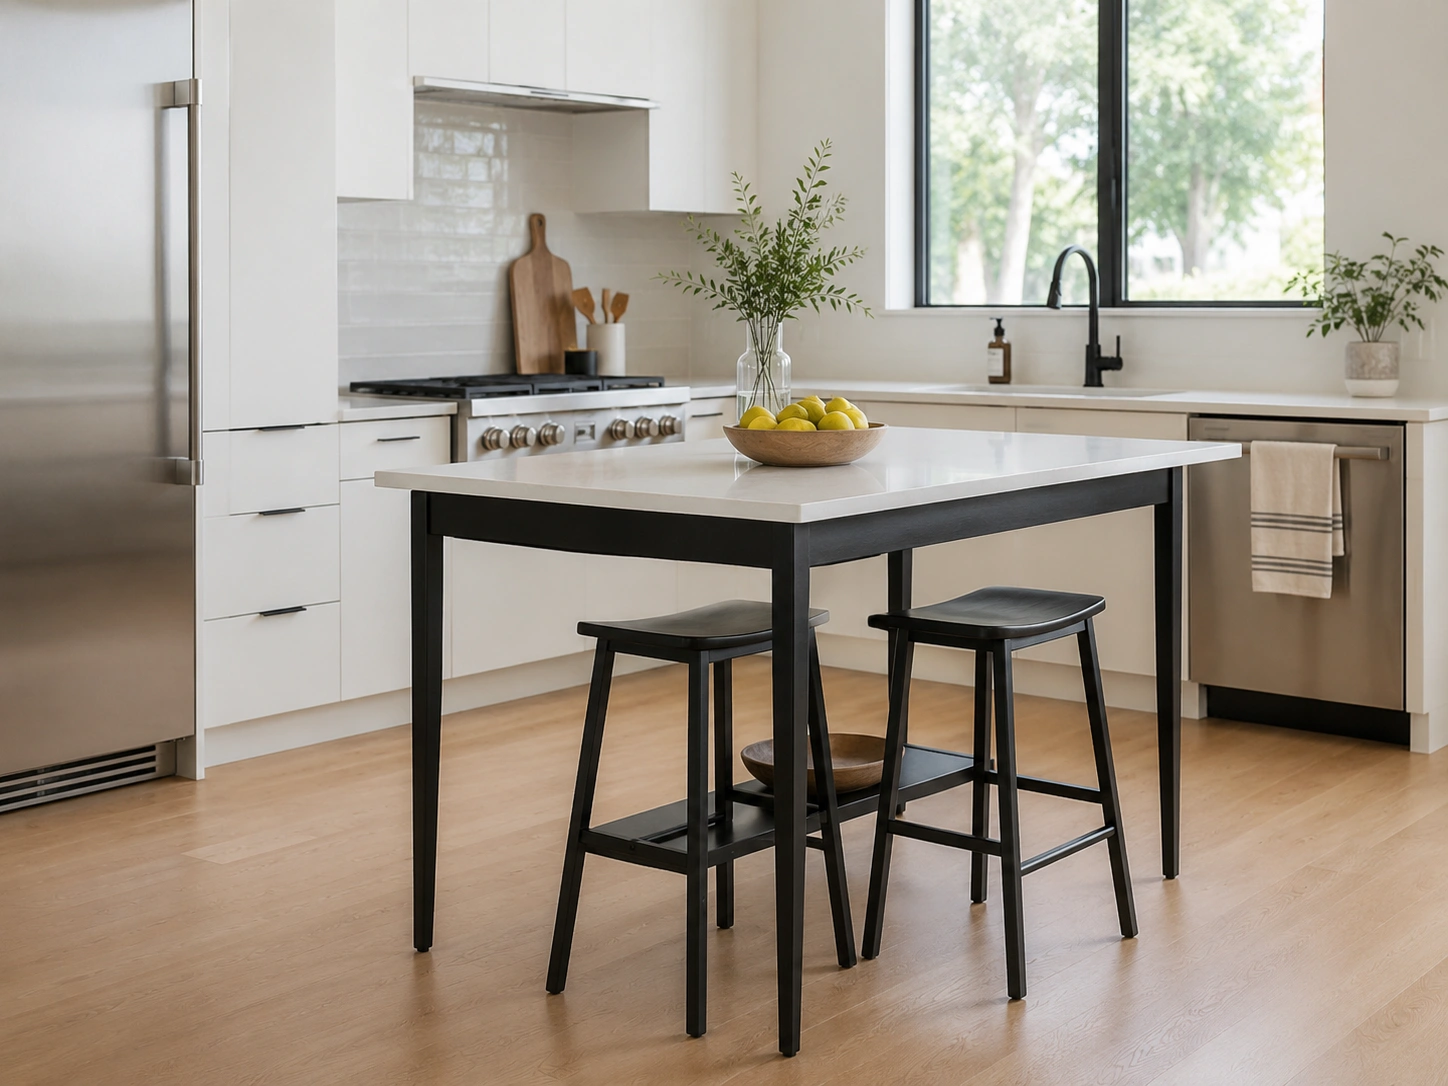
10. Exposed Leg Furniture-Style Island Base
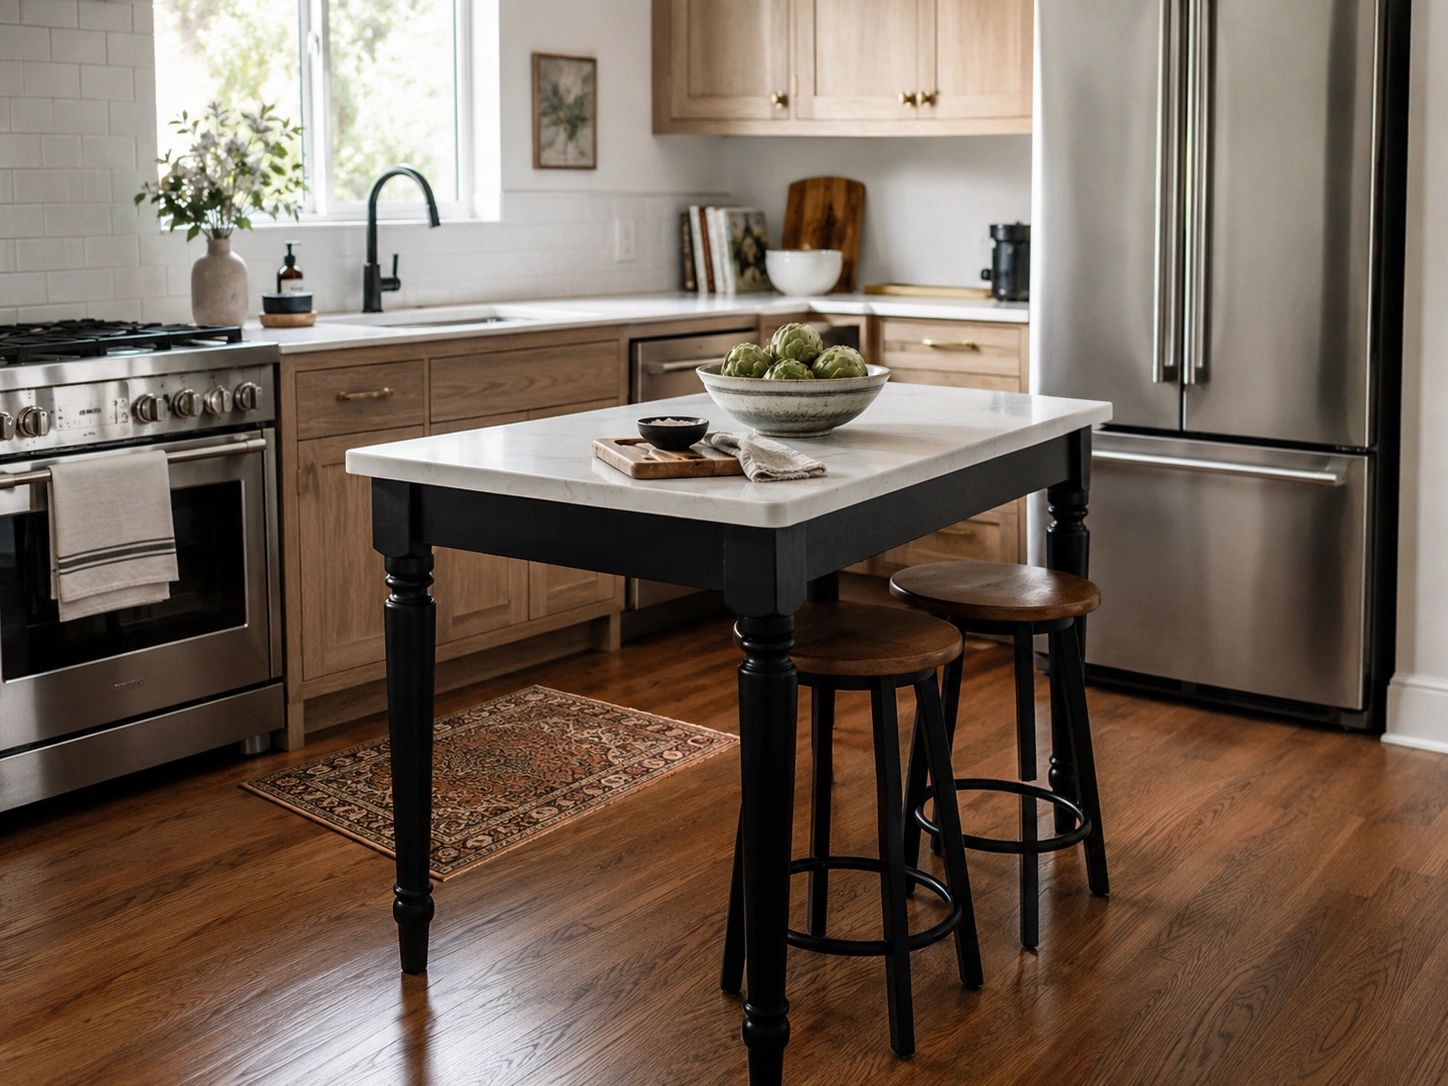
An island that sits on tapered or turned legs instead of a full cabinet base looks like a piece of furniture, which breaks the visual weight of a kitchen — especially useful in smaller rooms where a solid-box island creates too much mass. Use legs in a contrasting tone: matte black legs under a white quartz countertop, or natural oak legs under a butcher block surface. The floor visible beneath the legs keeps the kitchen from feeling visually enclosed.
11. Tile or Zellige Panel Island Base
Tile the island base instead of painting it, using a contrasting grout color for visual definition. Zellige tile — handmade Moroccan ceramic with a slightly uneven glaze — in warm white or cream with a warm beige grout is one of the most-repinned island base treatments in current design content. The irregular surface catches light differently at different angles and resists kitchen splash and scuffing in a way painted MDF cannot. Expect $12 to $25 per square foot for zellige, plus installation labor.
12. Warm Greige Island in an Open-Plan Kitchen
Greige — the grey-beige hybrid tone that has quietly replaced cool grey as the dominant neutral in open-concept kitchen renovations — gives an island a warm, calm presence without competing with bolder room elements. When the island’s greige tone connects to an adjacent accent wall, open shelving run, or a painted range hood in the same palette, the kitchen reads as designed from a unified vision rather than assembled from separate purchase decisions. Keep the countertop one tone lighter than the base to prevent flattening.
Kitchen Island Seating and Layout Ideas
Seating transforms an island into a gathering point. The configuration — the height, the overhang depth, how many sides you seat — determines how the island functions on a regular Tuesday more than how it looks in any renovation photo.
What most renovation guides skip entirely is the clearance conversation. The 42-inch walkway rule is non-negotiable: every open side of an island where someone walks needs 42 inches between the cabinet face and the nearest wall, appliance, or fixed object. That single measurement changes every island decision in a kitchen under 150 square feet.
13. Single-Side Bar Seating with a 12-Inch Overhang
The simplest seating setup: extend the countertop 12 to 15 inches past the cabinet face on one long side and add stools underneath. Bar height (42 inches) uses taller stools and creates visual separation between the prep zone and the seating area. Counter height (36 inches) uses shorter stools and creates a more conversational, integrated dynamic. Design sources tend to give conflicting guidance here — some recommend bar height as the more modern-looking option, others favor counter height for daily livability. Or maybe the better way to say it: bar height wins in photos; counter height wins in real life.
14. Counter-Height Seating: The More Livable Choice
Counter-height islands sit at the standard 36-inch cabinet height, which puts seated guests at roughly the same eye level as the person cooking. That shared visual plane is the detail most people don’t realize they want until they experience it — it makes the kitchen feel genuinely social rather than performative. For households with children, elderly guests, or anyone who dislikes climbing onto tall stools, counter height is almost always the more practical long-term choice.
More livable. Less dramatic in photos.
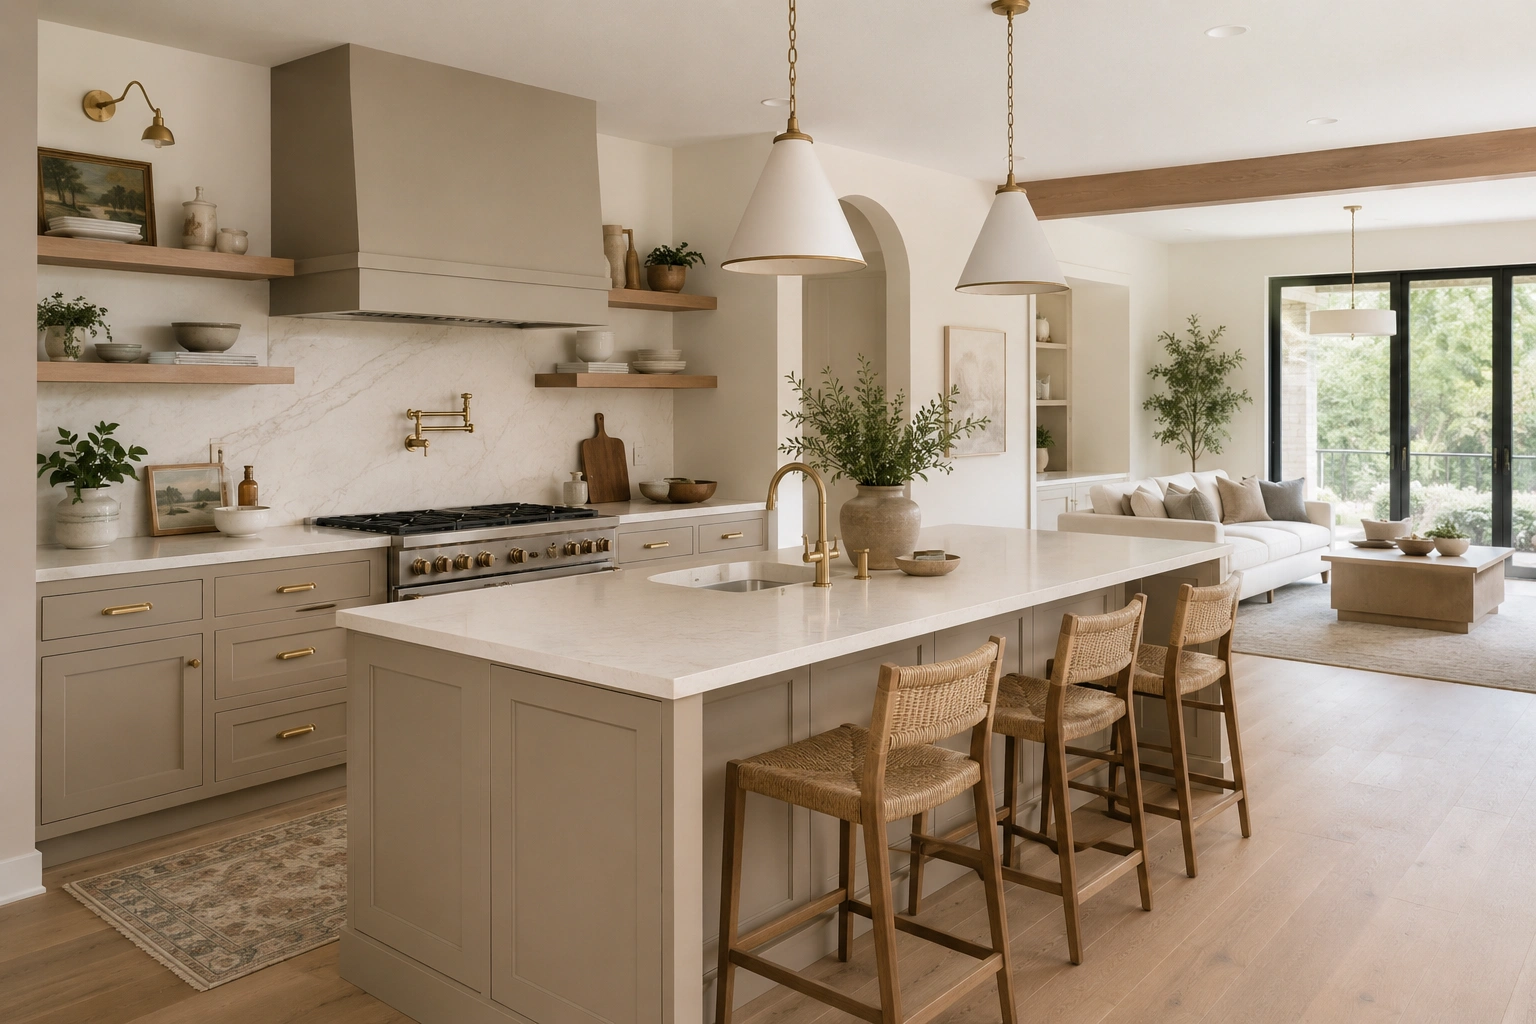
15. Seating on Two Sides of the Island
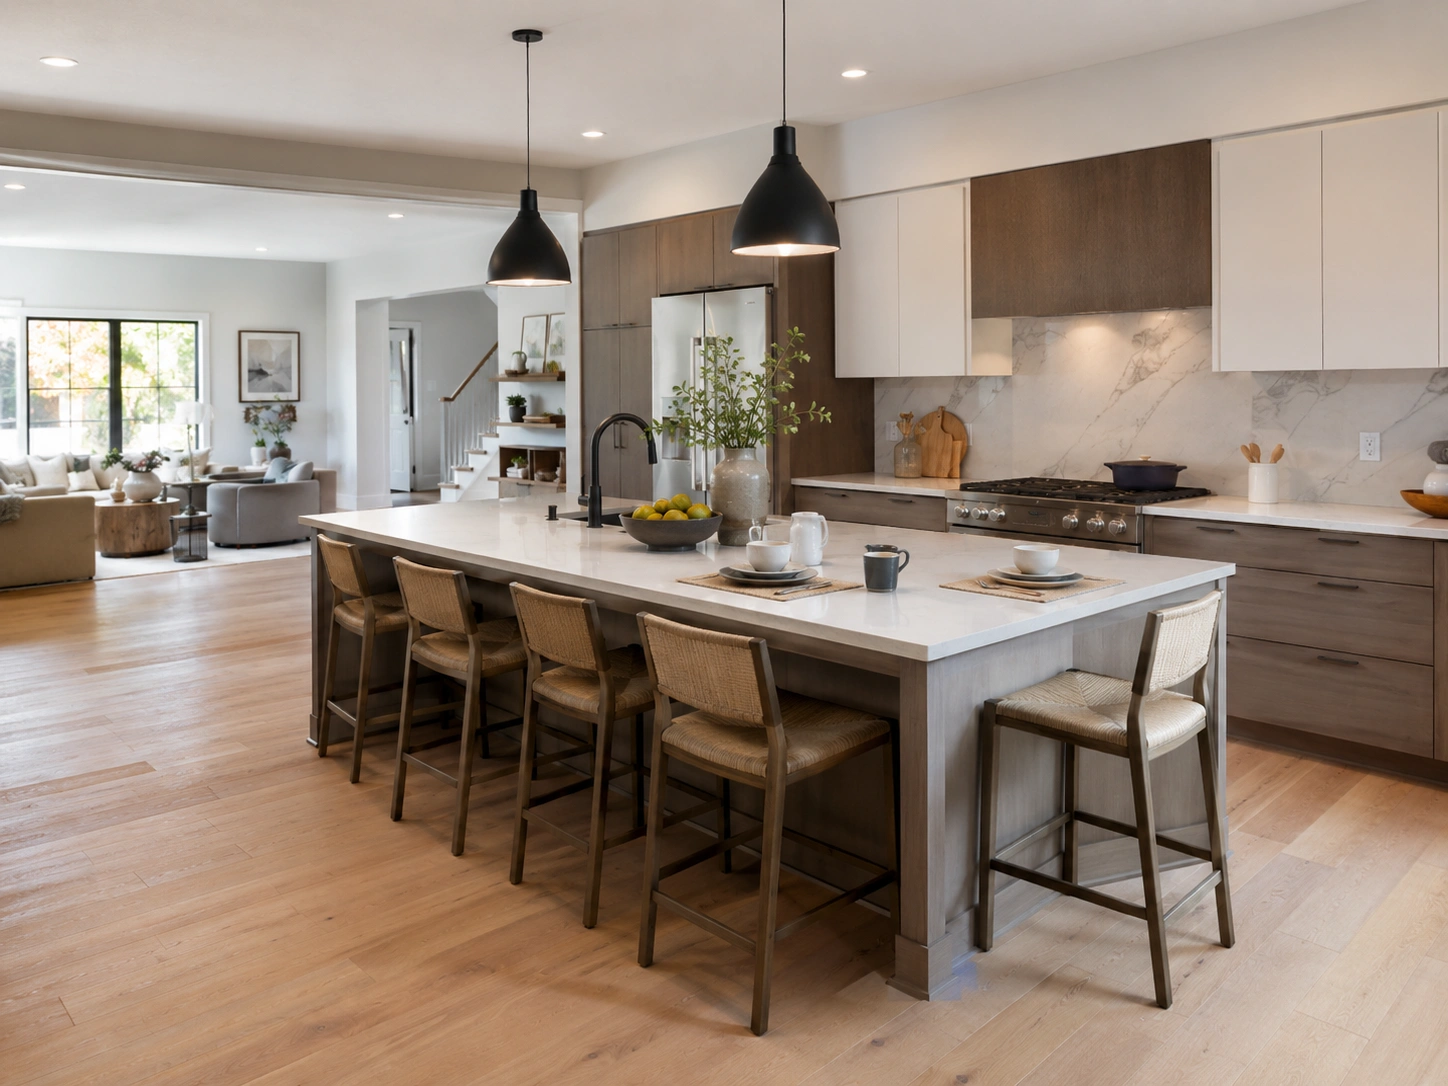
Two-sided seating requires at least 42 to 48 inches of walkway clearance on every open side of the island — more floor space than most standard kitchens offer. The payoff: a kitchen that functions as a dining table without needing one. A 48-by-96-inch island can realistically seat four to six adults this way. This layout appears almost exclusively in open-plan kitchens with 250-plus combined square feet of kitchen and dining area. In those layouts, it eliminates the need for a separate dining room.
16. Rounded Corner End for Better Seating Flow
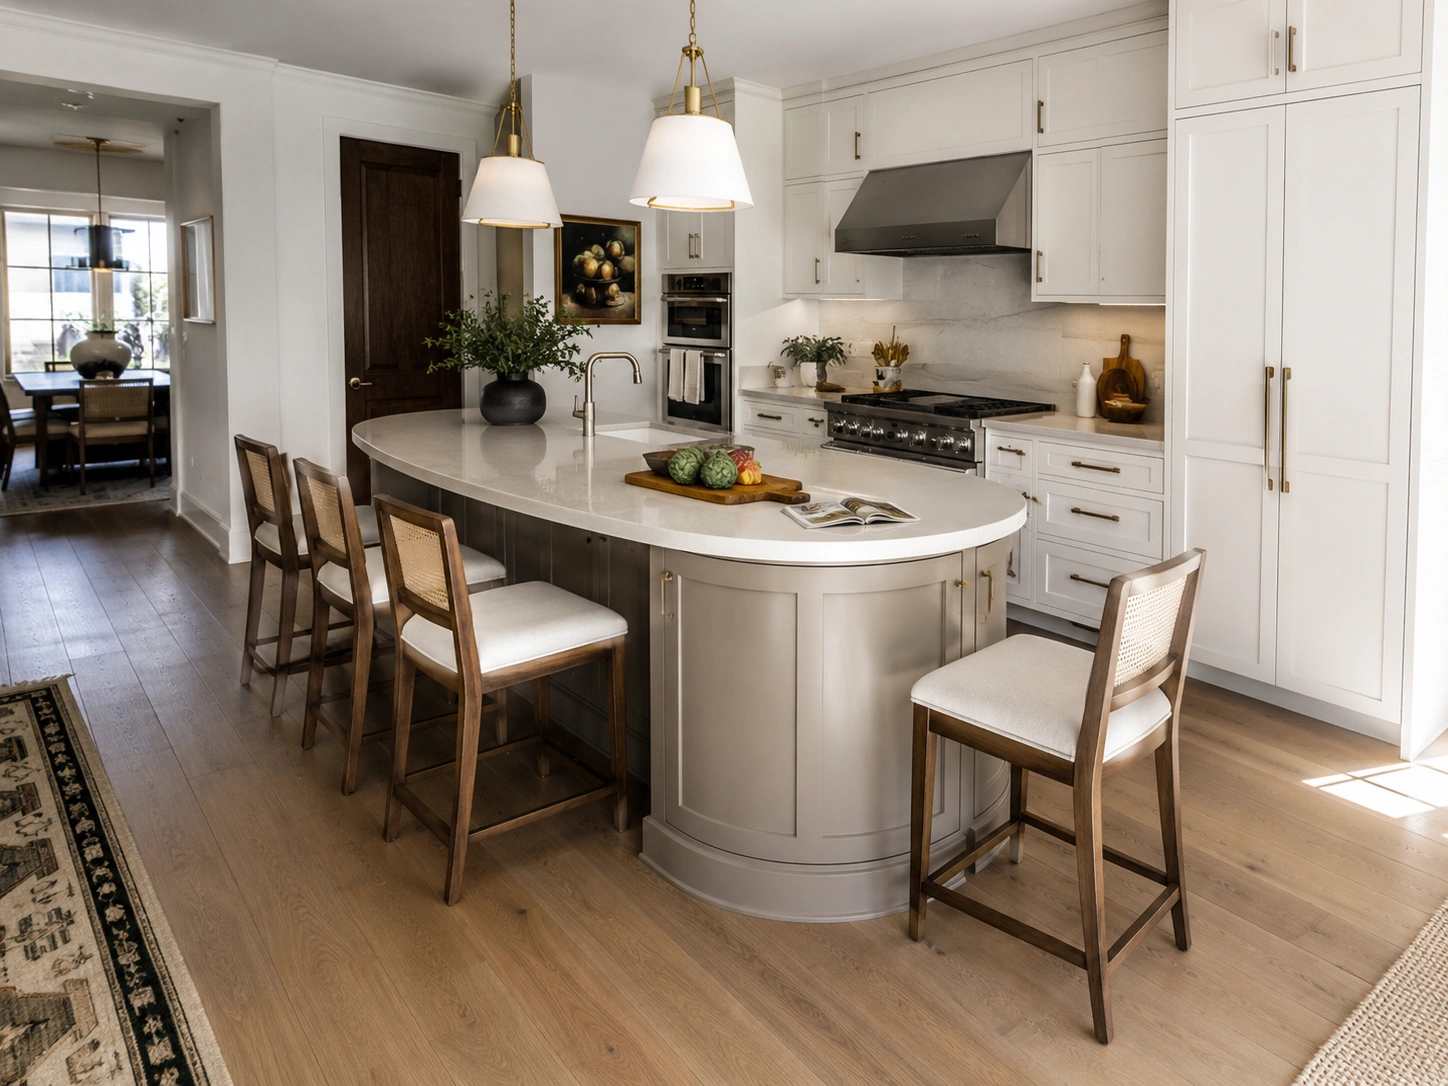
Rounding the seating end of the island — a bullnose curve or gentle semicircle — removes the sharp corner that crowds the stool closest to a wall or doorway. It improves traffic flow and creates a more natural gathering shape. This requires custom cabinetry for the curved base section, typically adding $300 to $600 over a standard straight build. In kitchens where the island sits within a few feet of a wall or adjacent dining table, that curve makes a measurable daily difference in how the space feels to move through.
17. Waterfall End + Seating Overhang: Combined Layout
You don’t have to choose between a waterfall edge and seating. Position the waterfall on one short end of the island — the end that faces into the room as you enter — and run the seating overhang along the opposite long side. The waterfall becomes a visual anchor on approach; the overhang handles daily function from the seating side. Any overhang exceeding 12 inches needs a support corbel or metal bracket underneath, especially for heavy stone slabs like quartzite or thick-gauge quartz.
Kitchen Island Pendant Lighting and Finishing Details
Pendant lighting over an island does two things: it illuminates the work surface and it defines the vertical space above the countertop. The right cluster or single pendant creates a ceiling moment that the island itself can’t generate from below. These five finishing details are what separate a kitchen that’s been renovated from one that’s been designed.
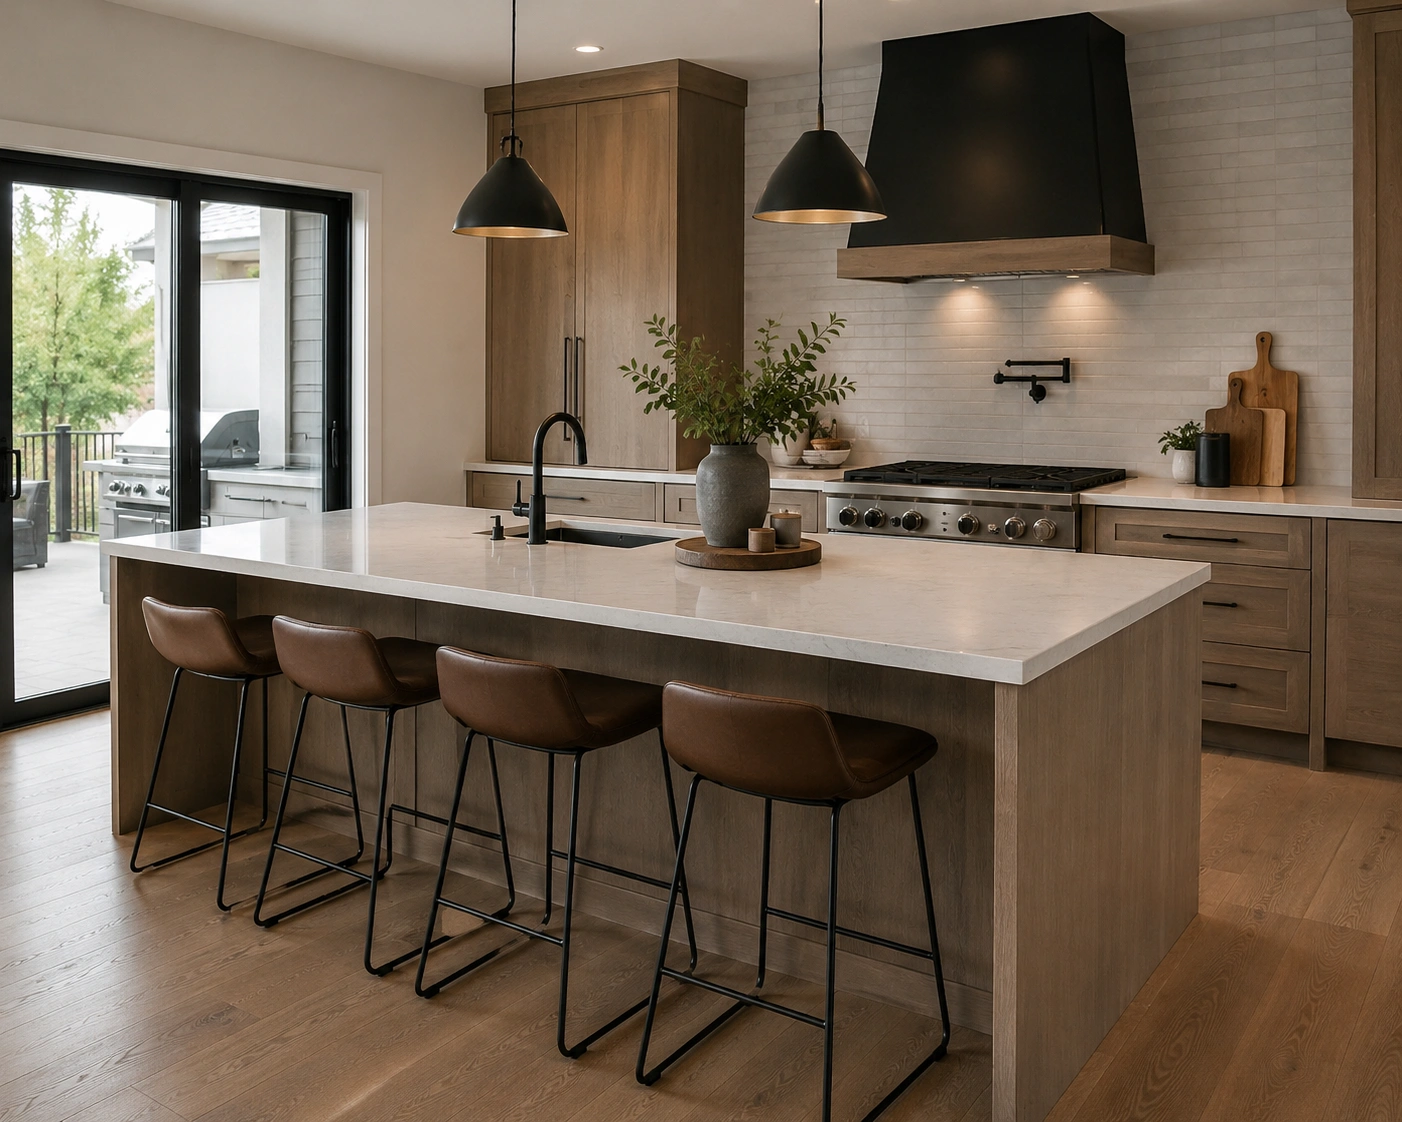
18. Three-Pendant Cluster in a Straight Row
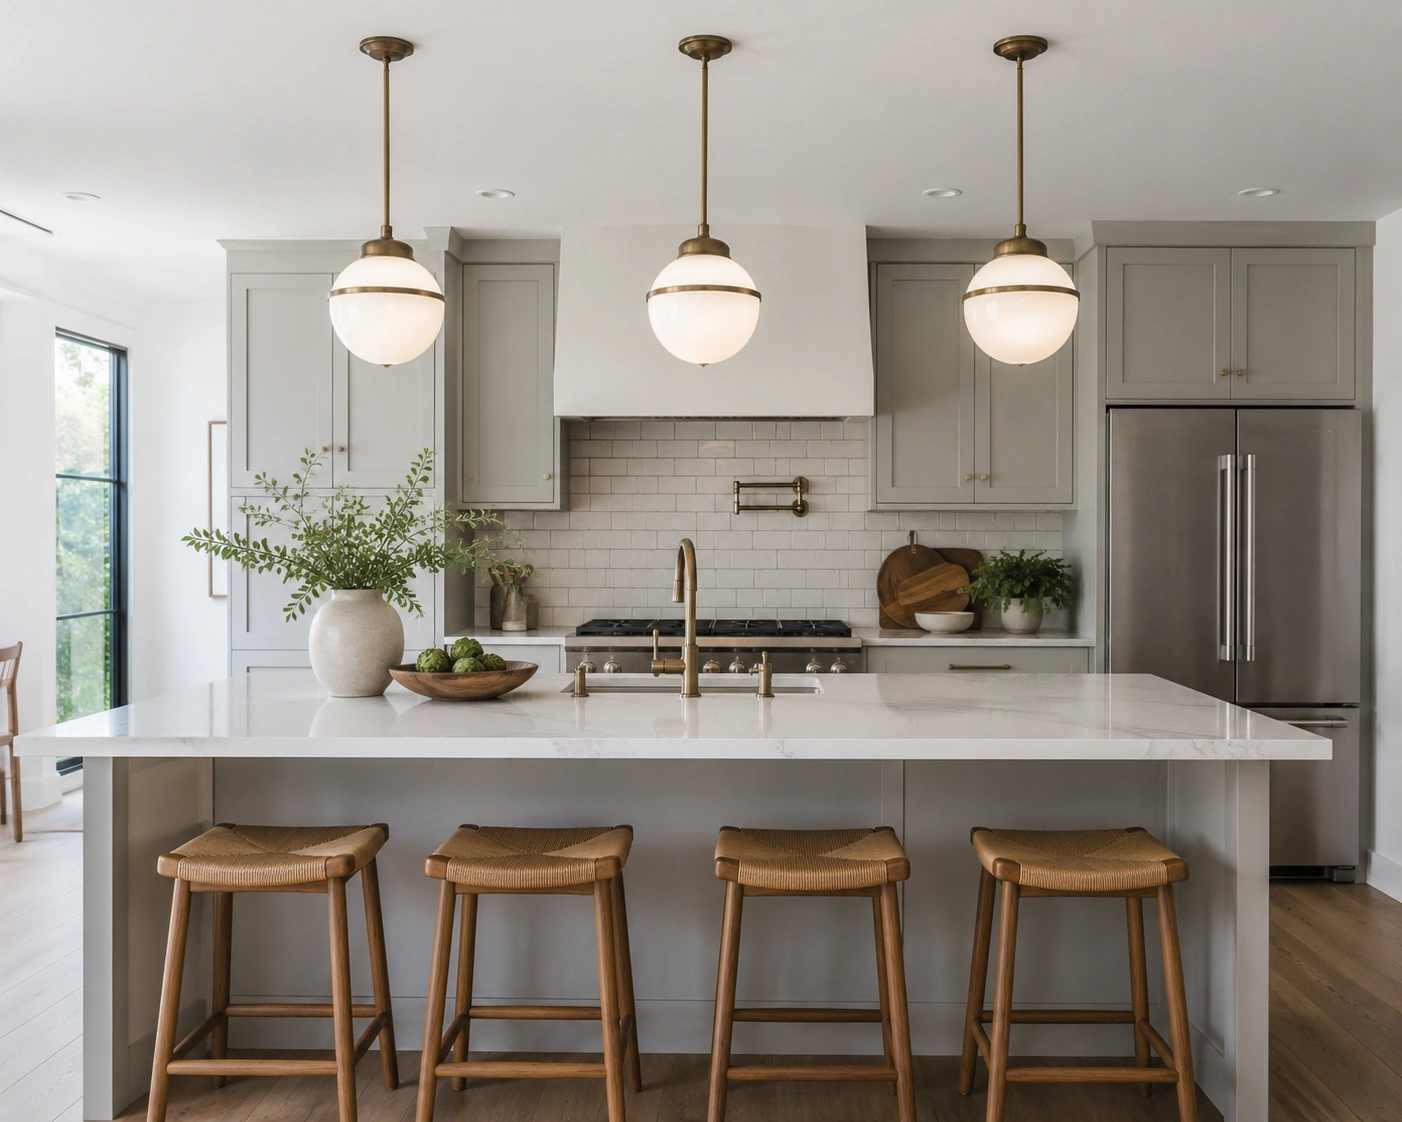
Three pendants hung in a straight line over a long island is the most universal lighting configuration for modern kitchens. Space them 24 to 30 inches apart, centered along the island. The bottom of the shade should hang 30 to 36 inches above the countertop surface. Rejuvenation’s schoolhouse globe pendants and ribbed glass shades are among the most-repinned island lighting options on Pinterest kitchen design boards — recognizable and current without being overexposed in the way some industrial cage fixtures have become.
19. Statement Single Pendant for Smaller Islands
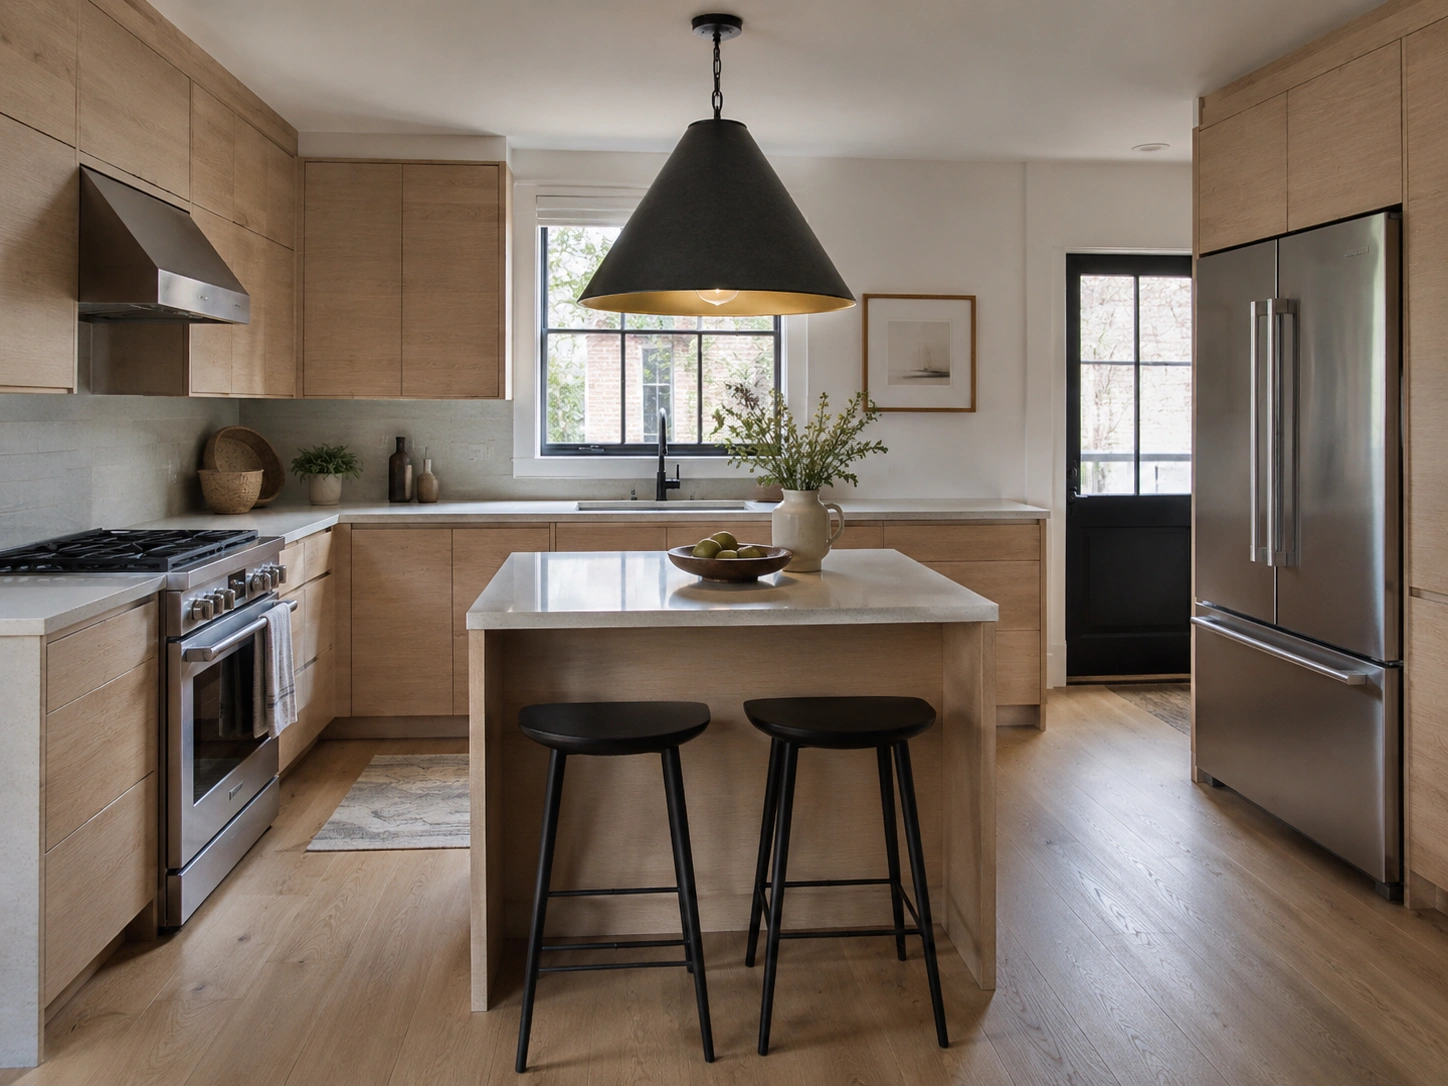
A single oversized pendant — a large drum shade, a sculptural woven sphere, or a wide-cone form — makes a stronger visual statement over a small island than three small pendants would. It commands vertical space without crowding it. Size it to roughly one-third to one-half the length of the island below. An 18-to-24-inch pendant over a 48-inch island is typically the right proportion. Anything smaller visually disappears; anything larger overwhelms the countertop surface it’s meant to highlight.
20. Rattan or Woven Pendant for a Warm Organic Feel
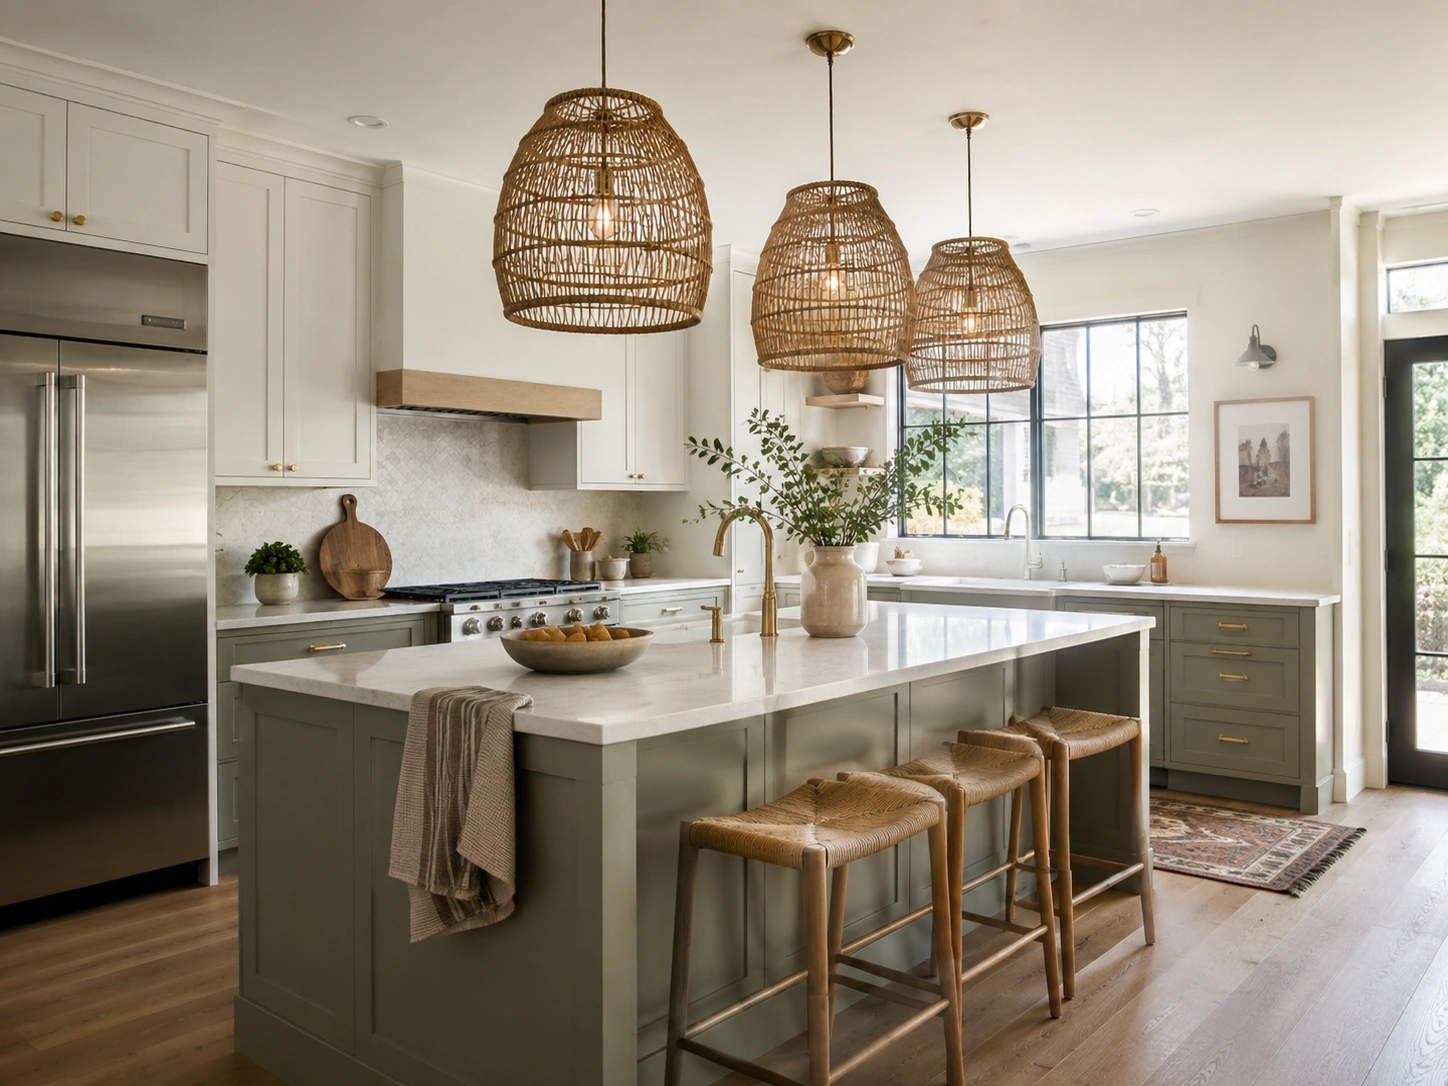
Natural fiber pendants — rattan, seagrass, hand-woven bamboo — over a modern kitchen island create an intentional counterpoint between the precision of the cabinetry and the texture of the shade. This pairing reads as curated rather than matched. It works especially well over sage green, warm white, and greige island bases. One practical caveat: woven shades collect kitchen grease and dust, so choose a style with visible open weave rather than a tight-woven shell form for easier spot cleaning.
21. Under-Island LED Strip Lighting at the Toe Kick
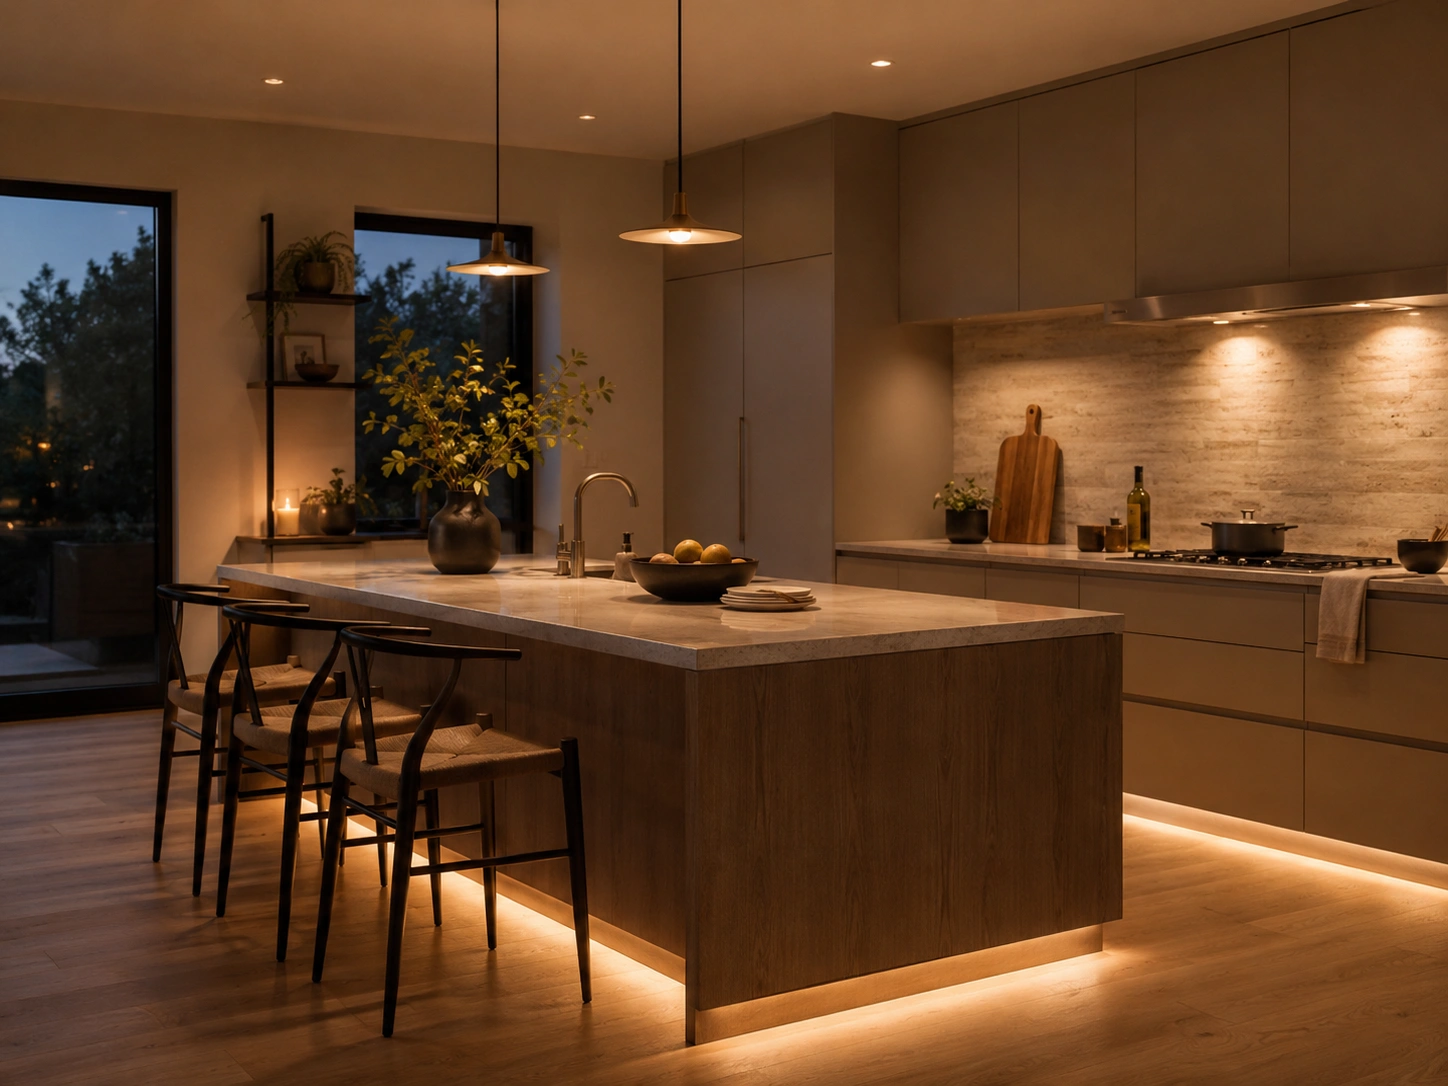
A warm LED strip tucked into the island’s toe kick produces a soft floating effect at floor level — most visible and impactful during evening use. Use LEDs in the 2700K to 3000K range exclusively. Daylight-temperature strips (5000K and above) make the glow look clinical and institutional in residential kitchens. Dimmable options — such as Philips Hue Lightstrip or similar variable-temperature strips — allow the ambiance to shift from task brightness during cooking to softer atmospheric light for entertaining.
22. Hardware-Free Push-to-Open Island Doors and Drawers
Integrated push-to-open or touch-latch mechanisms eliminate visible hardware entirely, creating the seamless slab-front look associated with contemporary European kitchen design. In photos, this style reads almost architectural — completely unbroken by pulls or knobs. The practical note: push-to-open latches occasionally need adjustment as wood expands and contracts seasonally. For painted MDF doors, this is a straightforward retrofit; for wood-grain veneer panels or two-toned finishes, it’s the expected standard on most European-style cabinet lines.
Kitchen Island Storage, Appliances, and Built-In Features
Function is where most island planning goes wrong. Homeowners spend the renovation budget on countertop material and pendant lighting, then discover after installation that the storage configuration doesn’t match how they actually cook. The features below are the ones kitchen designers cite most often as highest-impact — and most frequently regretted when skipped.
23. Stacked Deep Drawers for Pots and Pans
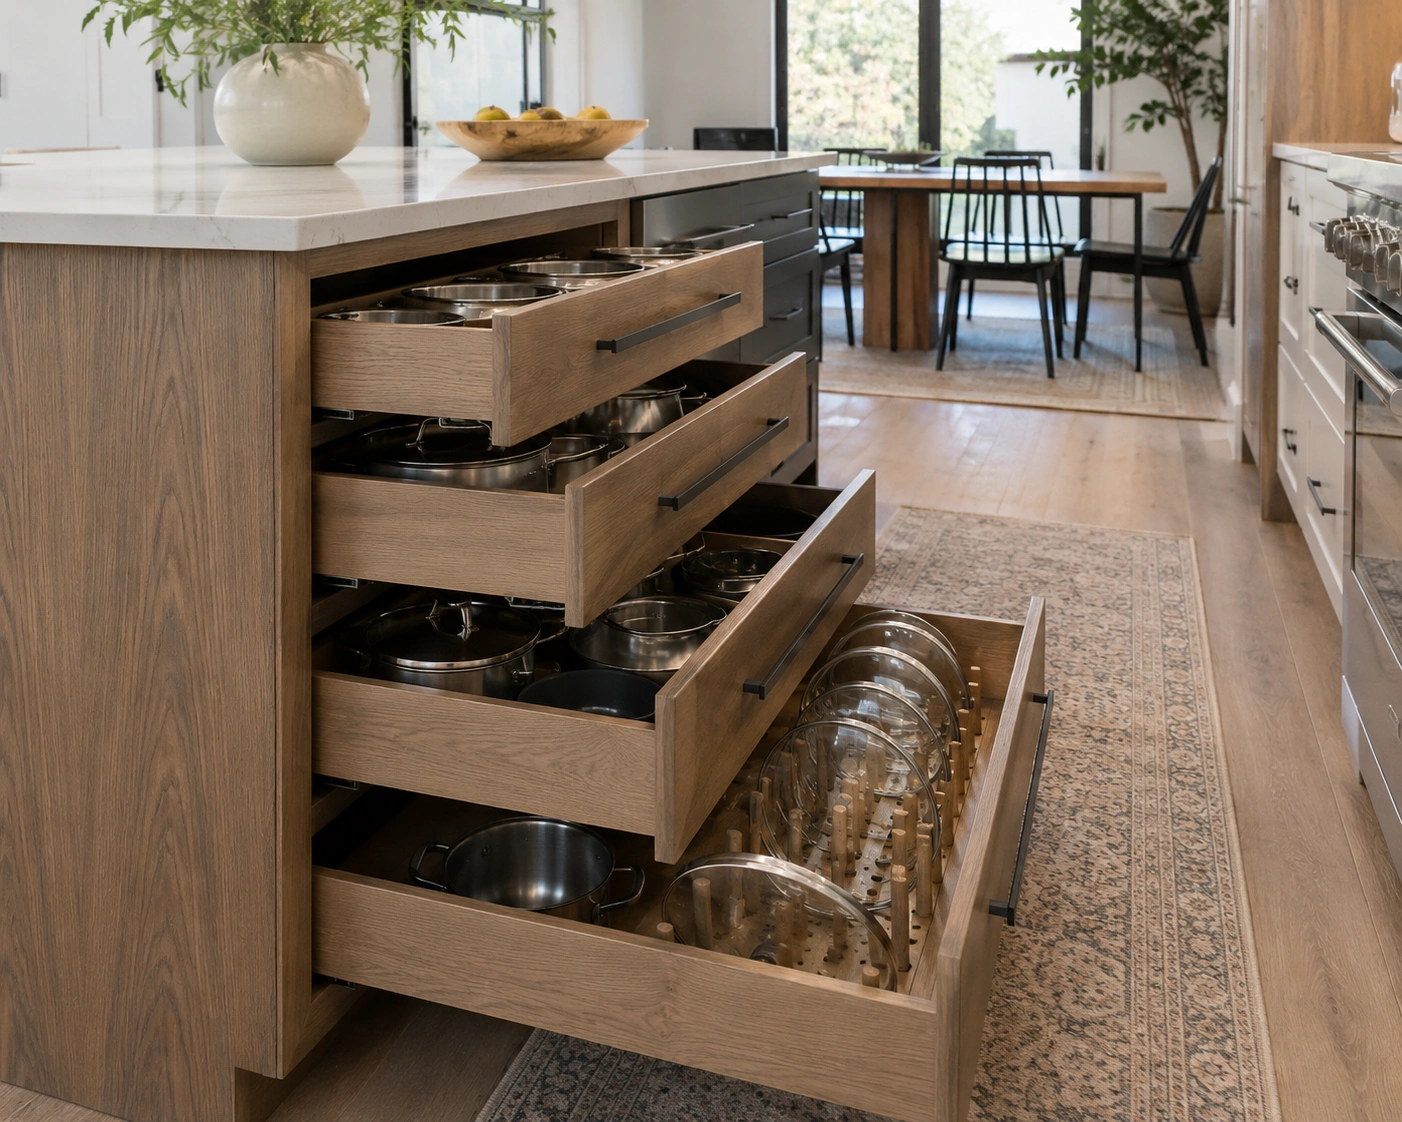
Three or four stacked drawers — each 8 to 10 inches deep — on one island face replaces the traditional door-and-shelf base cabinet, putting every pot, pan, and lid in plain sight and reach without crouching. Add a peg insert to the largest drawer to keep lids upright and separated. Homeowners who renovate with this configuration consistently rate it among the highest-impact storage changes in the entire kitchen project — specifically because daily access time decreases so noticeably from day one.
24. Built-In Prep Sink in the Island
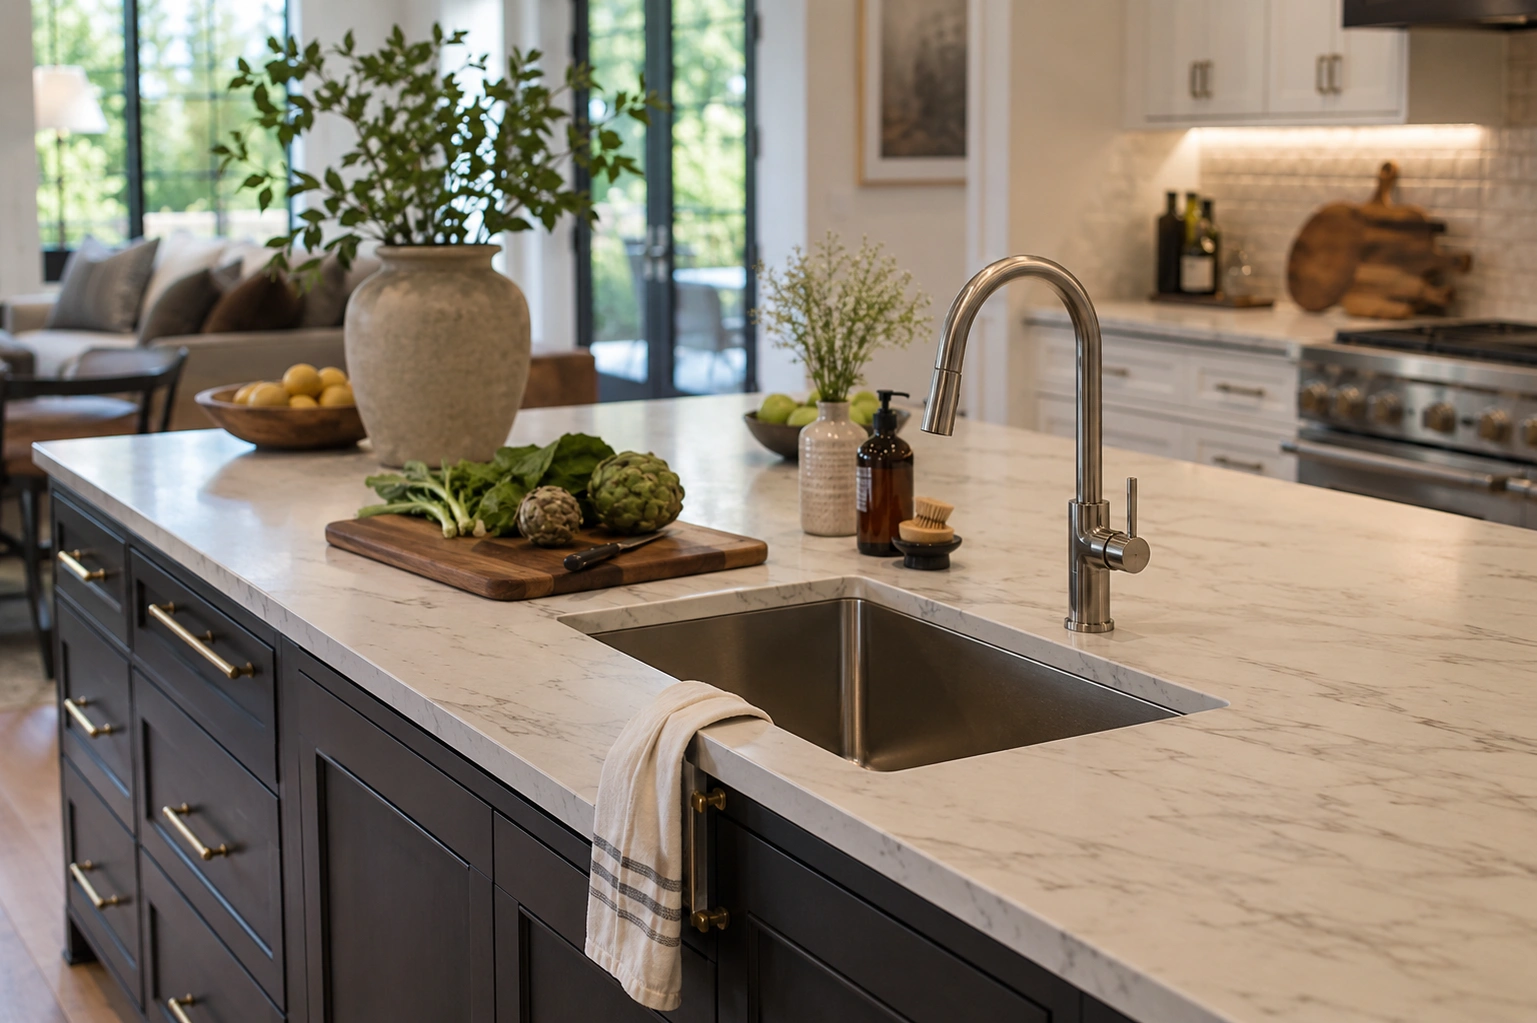
A secondary prep sink — typically 15 to 18 inches wide — in the island separates produce washing and food prep from the main cleanup zone. In households where two people cook simultaneously, this changes the kitchen workflow in a measurable, immediate way. It requires plumbing rough-in to the island during the construction phase, adding $500 to $1,500 depending on the distance from existing supply lines. Retrofit island plumbing is significantly more expensive — plan this before drywall, not after.
25. Integrated Wine Fridge or Beverage Drawer
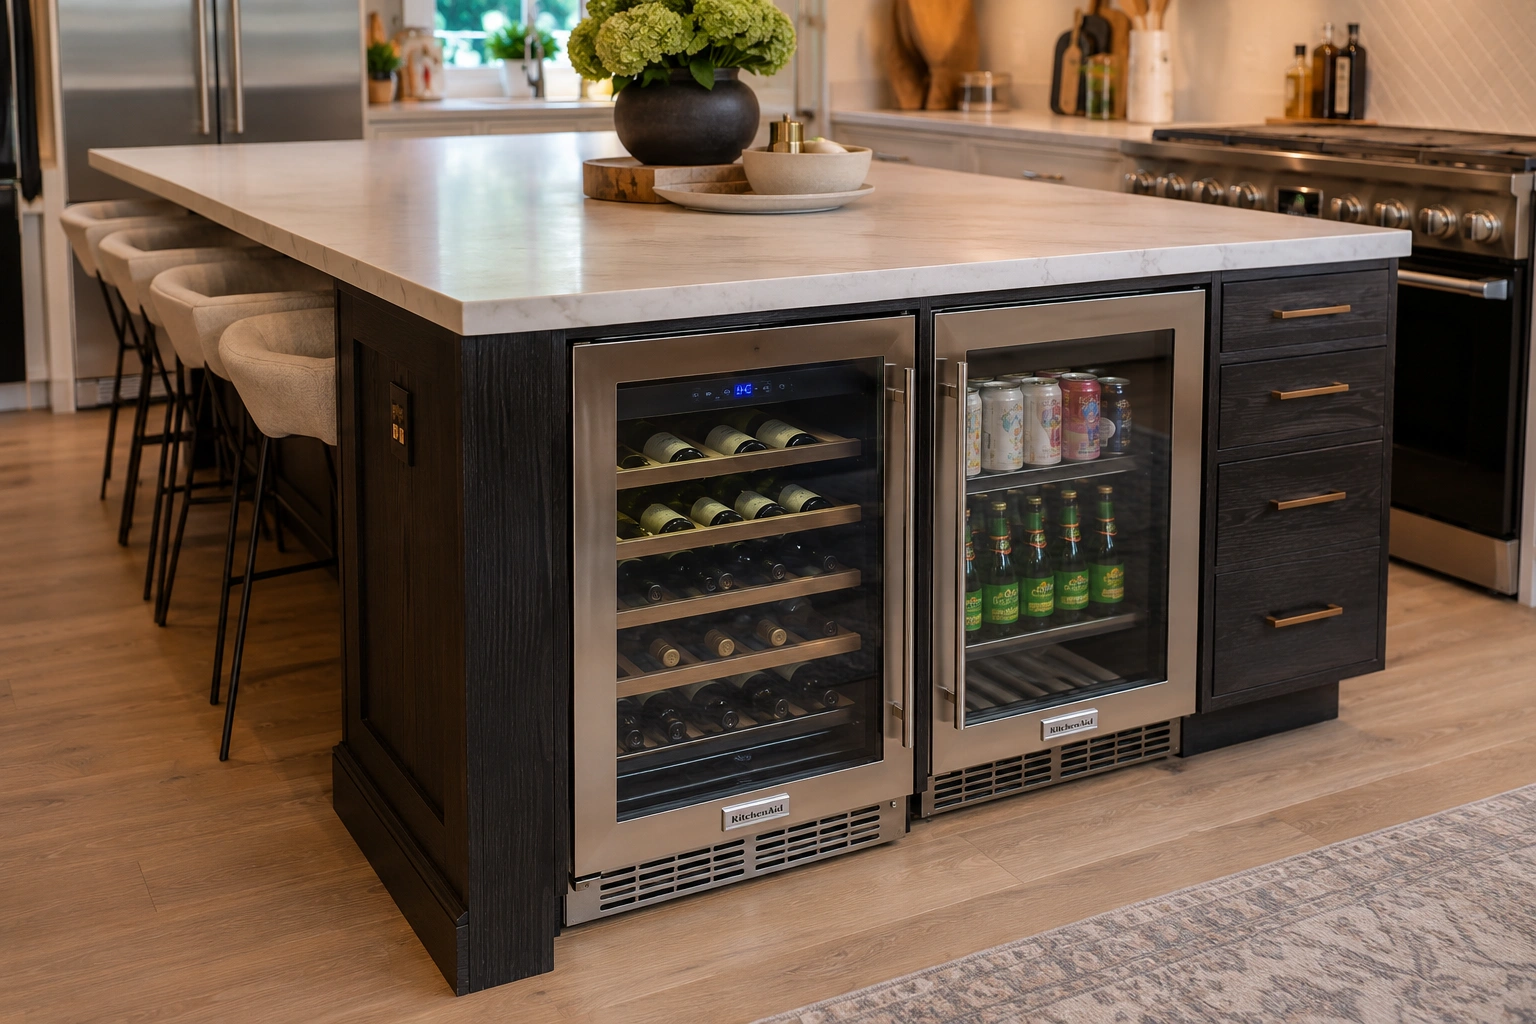
A 15-inch wine column or 24-inch beverage refrigerator drawer built into the island base removes the freestanding wine rack from the countertop permanently. For kitchens designed around entertaining, this has become expected rather than optional. KitchenAid, Liebherr, and Thermador make widely referenced models. One installation detail: these appliances vent heat through side panels, so leave at least one inch of clearance on each side. Don’t box them flush against an adjacent deep drawer stack without confirming ventilation space first.
26. Microwave Drawer Built Into the Island
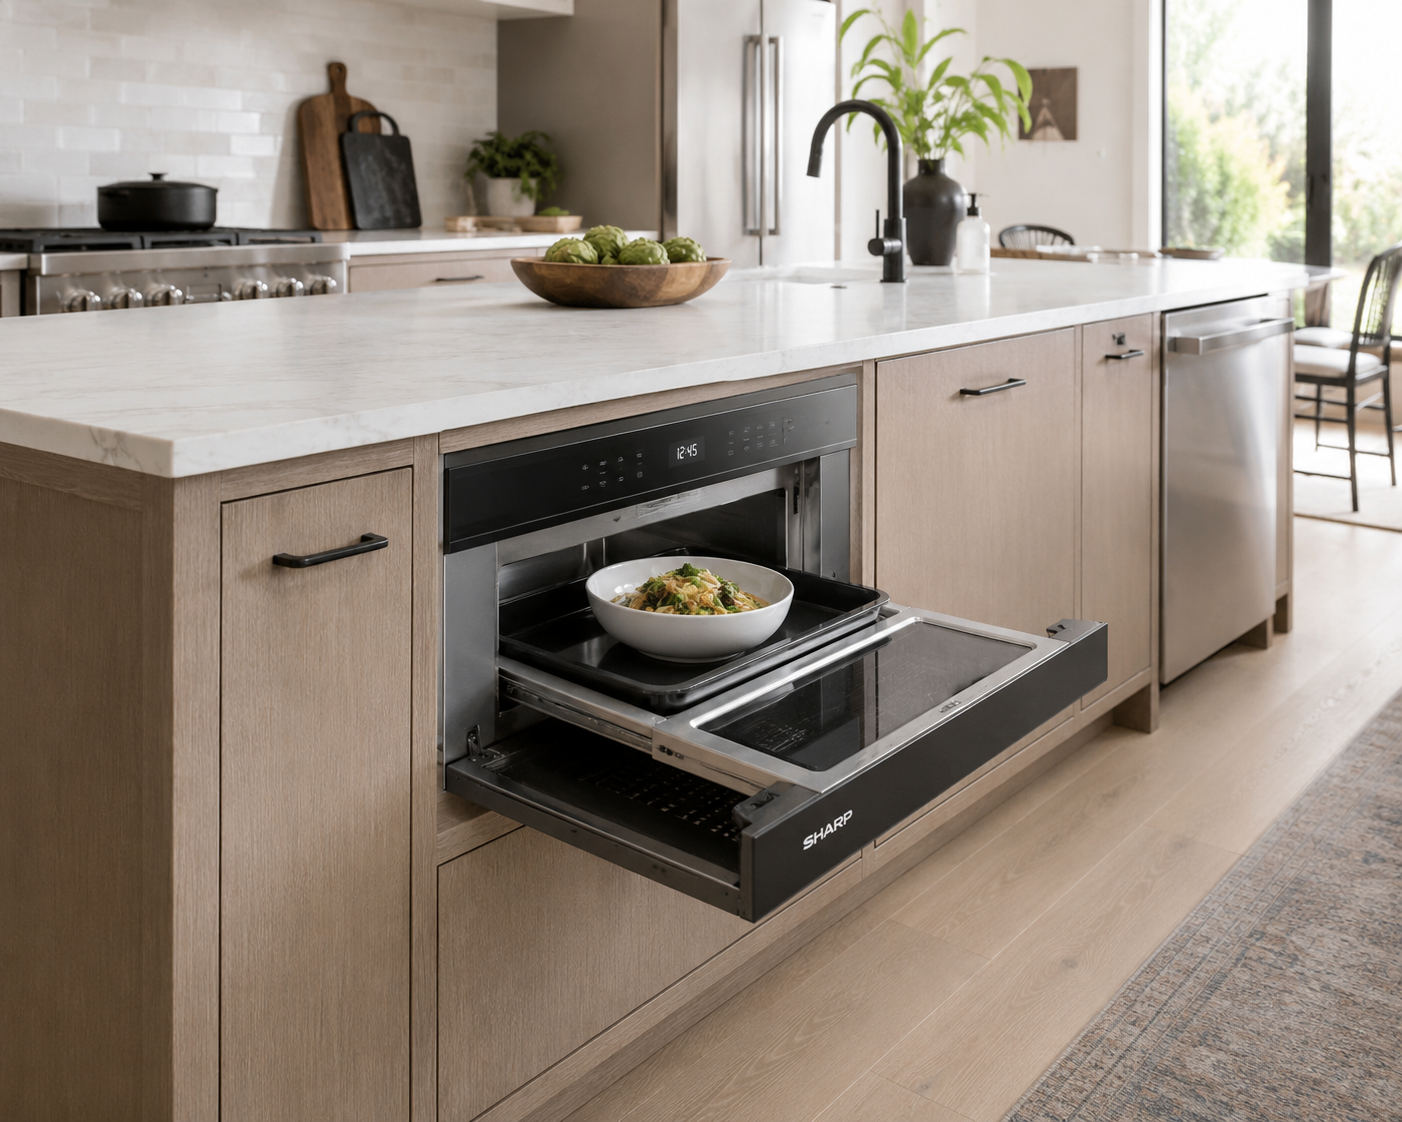
A microwave drawer — where the door opens downward and the tray slides out at counter level — installed inside the island frees up an entire run of upper cabinet space or eliminates the countertop appliance that most people dislike the look of most. Sharp and KitchenAid are the most-referenced brands for this configuration. The island needs a minimum 26-inch depth to house the unit flush with the surrounding door fronts. This reads as a high-end detail even in a mid-range renovation budget.
27. Open Shelving on the Island End
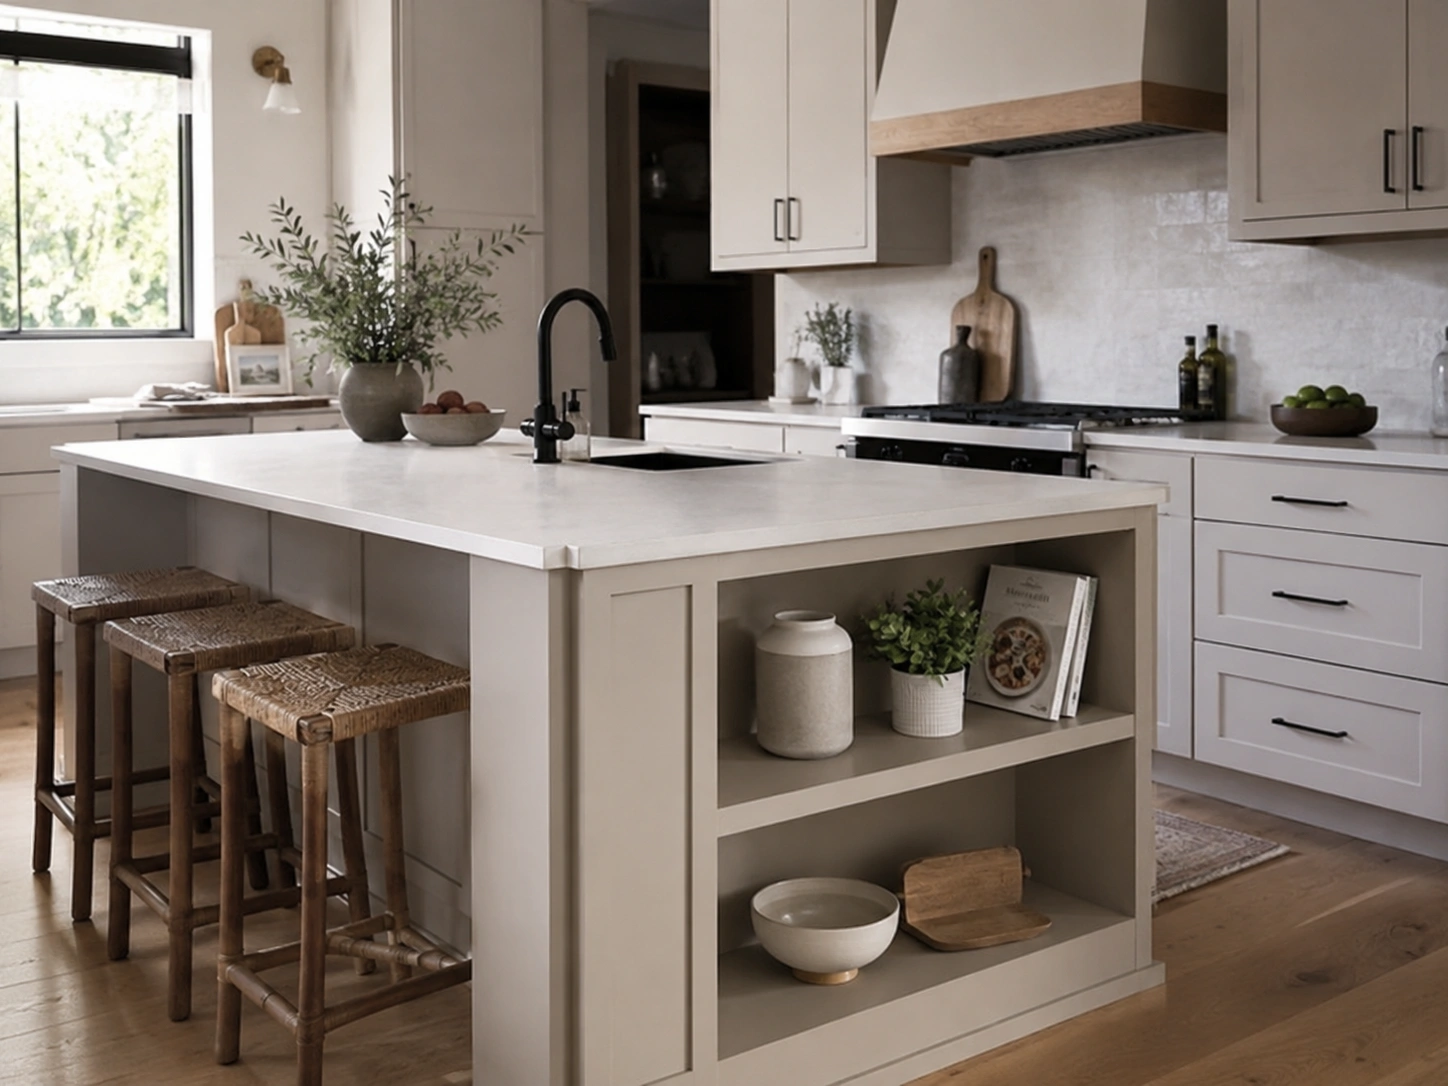
A single open shelf — or two shelves stacked — on one island end adds display and quick-access storage without requiring a door. Style it with one cookbook, a small plant, and one or two ceramic vessels. Stop at three to five objects maximum; beyond that, the end reads as cluttered in both photos and in person. This is also one of the most accessible DIY additions to an existing island — basic carpentry, one afternoon, a drill and a level.
28. Hidden Pop-Up Outlet in the Countertop

A pop-up electrical outlet block or flush-mounted outlet strip integrated into the island countertop eliminates the extension cord draped over the edge for the stand mixer, phone charger, or electric kettle. Pop-up versions retract flush when not in use and cost $150 to $300 installed. The outlet must be positioned on the non-seating side of the island — most electrical codes require minimum clearance from the sink and seating overhang edges. Confirm placement with your electrician before countertop templating is scheduled.
Small Kitchen Island Ideas That Still Look Sleek
Look — if your kitchen is under 150 square feet, a standard 36-by-72-inch island isn’t going to fit, and pretending otherwise wastes planning time and renovation budget. These six ideas are built for compact kitchens where the island still needs to earn its footprint without blocking movement or dominating the room’s visual field.
29. Slim 24-Inch-Deep Island for Galley Kitchens
A galley kitchen with 10 feet of total width can accommodate an island at 24 inches deep — rather than the standard 36 — and still maintain 42-inch clearance on both walkable sides. Keep the length under 54 inches in tight layouts. A 12-inch seating overhang on one long side adds function without adding visual mass. The proportional result is leaner than a standard island, which actually suits the galley kitchen’s clean, linear aesthetic rather than fighting against it.
30. Rolling Butcher Block Cart on Locking Casters
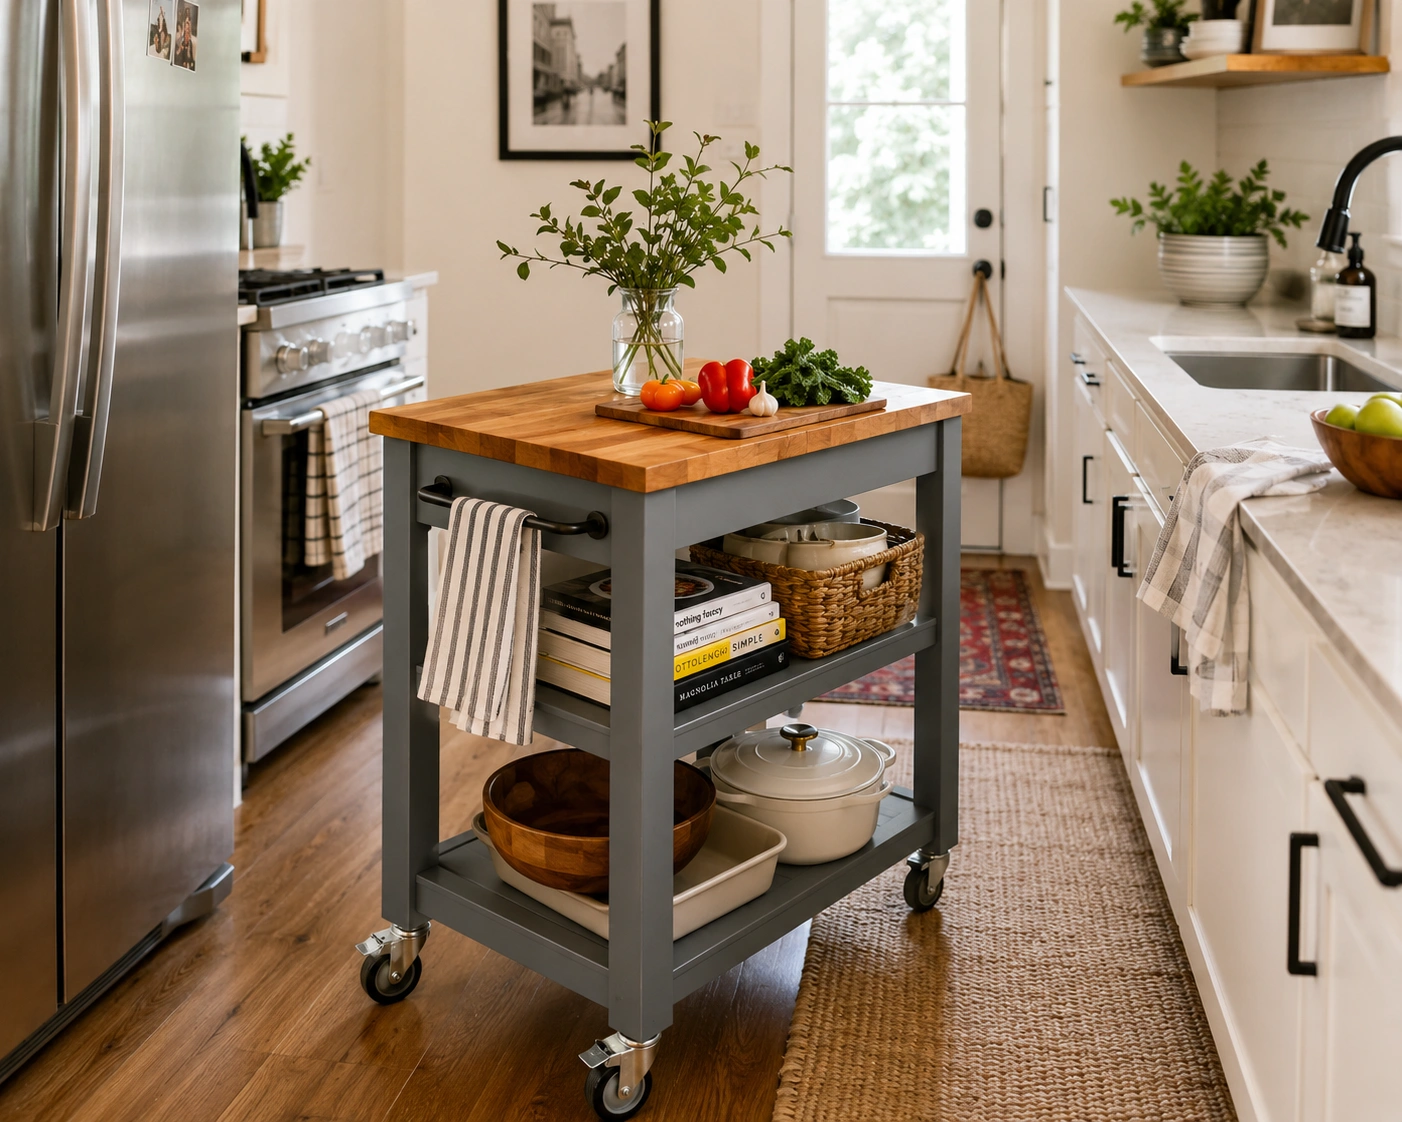
A butcher block cart on locking casters resolves the small kitchen’s central tension: you need prep island space, but you also need an open floor plan when you’re not cooking. Roll it to center during meal prep; park it against the wall for cleanup or parties. IKEA’s BEKVAM cart starts below $200 and is widely customized with paint, new hardware, and additional shelving. For a more finished look, a repurposed furniture piece with a custom butcher block top added runs $300 to $600 total.
31. Peninsula-Style Island Connected to a Wall
A peninsula attaches to the perimeter wall or existing cabinet run on one end — meaning it needs clearance on only three sides instead of four, requires less floor space than a freestanding island, and hides the back face of the cabinetry naturally. In kitchens under 150 square feet, a peninsula typically delivers more usable counter space per square foot than a freestanding option. The trade-off: you lose the walk-around flexibility and visual openness that a true freestanding island provides.
32. High-Gloss or Lacquer-Front Small Island
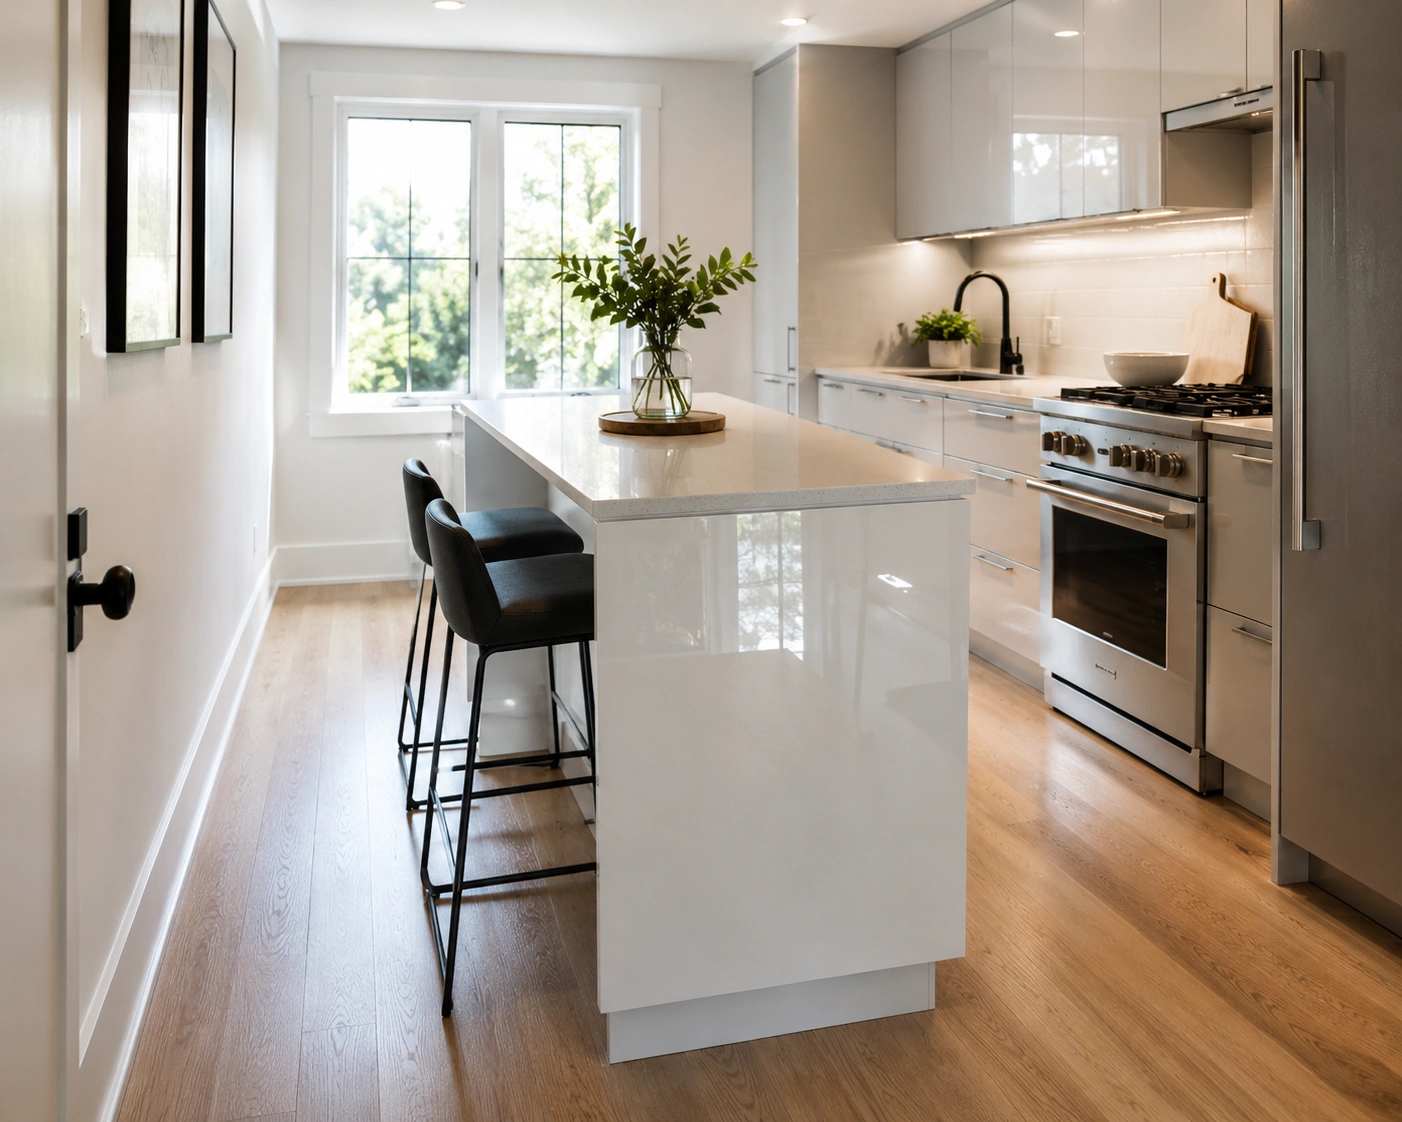
A high-gloss lacquered island base reflects ambient light back into the kitchen, making a compact space feel visually larger in a way matte surfaces cannot. It’s a technique borrowed directly from interior design: reflective surfaces expand the perceived volume of a room. A white high-gloss island in a naturally lit, small kitchen creates genuine spatial impact. Pair it with a matte quartz countertop and keep all other kitchen finishes flat — multiple glossy surfaces in the same room compete rather than cooperate.
33. Waterfall Island Scaled to a Compact Footprint
Most people assume the waterfall edge requires a spacious kitchen or a luxury budget. The dimensions say otherwise. A 30-by-60-inch island with a waterfall on one short end creates a strong visual statement without dominating the room — and regional quartz fabricators can start below $100 per square foot for basic slabs. Use lighter slab colors — warm white, pale greige, or soft grey — rather than dark stones, which can visually close in an already compact space.
34. DIY Island from IKEA SEKTION Base Cabinets
The IKEA SEKTION base cabinet is the most-referenced DIY starting point for kitchen islands across budget renovation forums, Reddit threads, and YouTube remodel content. Pull a 30-by-60-inch base configuration, apply MDF or lumber panel boards to the exposed sides, add furniture feet or trim the toe kick, and top with a slab from a local countertop fabricator. Total build cost typically runs $400 to $900 depending on countertop material. In photos, the result reads close enough to custom that most guests won’t guess the base source.
Quick Comparison: Modern Kitchen Island Options at a Glance
| Option | Best For | Key Benefit | Limitation |
|---|---|---|---|
| Waterfall quartz edge | Open-plan modern kitchens | High visual impact; non-porous and low-maintenance | Higher fabrication cost; heavy slabs need structural corbels |
| Butcher block countertop | Warm or transitional kitchens | Furniture-like warmth; accessible mid-range price | Annual sealing required; shows knife marks and water rings |
| Dark two-tone base | Kitchens with white perimeter cabinets | Creates strong contrast; visually defines the island | Matte finishes show dust in direct or raking natural light |
| Slim 24-inch island | Galley or under-150-sq-ft kitchens | Maintains 42-inch clearance; adds prep surface | Limited seating overhang depth and overall storage capacity |
| Rolling cart island | Rentals or very small kitchens | Portable, budget-friendly, flexible floor plan | Not permanent; limited integrated storage and countertop area |
Quartz vs. Quartzite for Kitchen Islands
Quartz vs. quartzite for kitchen islands: Quartz (engineered) is non-porous, requires no sealing, and produces consistent patterning across production runs — better suited for high-use family kitchens that need minimal upkeep. Quartzite (natural stone) is harder and more heat-resistant but requires periodic sealing and varies slab to slab. The key difference: quartz is maintenance-free and predictable; quartzite delivers a more natural look at the cost of more involved care.
Common Questions About Modern Kitchen Islands
What’s the best countertop material for a modern kitchen island?
Quartz is the most practical choice for most households — non-porous, no sealing required, available in marble-look finishes. Quartzite and butcher block are strong alternatives depending on your aesthetic goal and daily use habits.
How much overhang do I need for kitchen island seating?
Plan 12 to 15 inches at counter height (36 inches) and 15 to 18 inches at bar height (42 inches). Any overhang over 12 inches needs a support corbel or metal bracket under the countertop, especially for heavier stone.
Should I choose counter height or bar height for my island seating?
Counter height (36 inches) works better for most daily-use households — it’s comfortable for a wider range of guests and creates a more conversational dynamic. Bar height (42 inches) is more dramatic in photos. Choose bar height for entertaining-focused kitchens; counter height for everyday family living.
How do I make a small kitchen island work without losing floor space?
Keep the island depth at 24 inches and maintain 42-inch clearance on every walkable side. A rolling cart or peninsula-style design gives you the prep surface without cutting off movement. In very tight kitchens under 120 square feet, a peninsula almost always wins on usable counter space per square foot.
What kitchen island colors are trending right now?
Sage green, navy blue, and warm greige are the three most-pinned island colors in current renovation content. Matte black remains strong in high-contrast white kitchens. Standard builder white is increasingly being replaced by two-tone configurations that pair a lighter perimeter with a darker or warmer island base.
A Final Note Before You Plan
Thirty-four ideas is a lot to hold at once. If you feel stuck, narrow it to three decisions first: base color, countertop material, and whether you need seating and at what height. Everything else — the lighting style, the hardware finish, the storage configuration — follows once those three anchors are set.
A modern kitchen island doesn’t require a luxury budget to look purposeful and well-considered. Some of the most-repinned island renovations in current home decor content are sub-$900 builds using IKEA base cabinets, a locally fabricated quartz top, and one well-chosen pendant light overhead. The idea and the execution always matter more than what was spent.


No Comment! Be the first one.