


20 Timeless Studio Kitchenette Ideas That Feel Expensive (Even on a Tight Budget)
There’s a quiet heartbreak in coming home to a kitchenette that feels more like a sad afterthought than the warm, welcoming heart of your studio. You’ve pinned a hundred glossy kitchens, but none of...
")
There’s a quiet heartbreak in coming home to a kitchenette that feels more like a sad afterthought than the warm, welcoming heart of your studio. You’ve pinned a hundred glossy kitchens, but none of them fit a 22-square-meter condo where you can’t even drill into the wall. I see you — and I promise, you can have a space that makes you smile every time you reach for a coffee mug. No renovation, no permission from the landlord, and no spending your entire bonus.
According to the Colliers Philippines 2023 Residential Report, the average Metro Manila studio unit has shrunk to 22 square meters. That means every centimeter of your kitchenette has to work hard and look beautiful doing it. The counterintuitive truth? Glossy, light-reflecting surfaces and deliberate styling often make a tiny kitchen feel significantly larger than matte, dark finishes, even if both take up the same physical footprint. An expert caveat: avoid the temptation to fill every vertical inch. Visually, negative space is what reads as luxurious, not density.
Some people will tell you open shelves in a kitchen are dust traps and completely impractical. They’re not entirely wrong — open shelves in a greasy cooking zone can be high-maintenance. But in a studio kitchenette where you mostly do light cooking and want the space to feel airy, a curated set of open shelves holding only your daily essentials can be both stunning and genuinely functional. The key difference is intention: everything on display must be something you use daily and love looking at.
Of course, this article has an honest scope limit. I won’t be covering permanent structural changes, built-in appliance replacements, or any project that requires a contractor’s permit. These 20 ideas live in the sweet spot between a weekend project and a rental agreement.
Instant Illusions: Materials & Finishes That Fool the Eye
1. Wrap the Countertop in Warm Wood-Grain Contact Paper for an Instant Butcher-Block Look
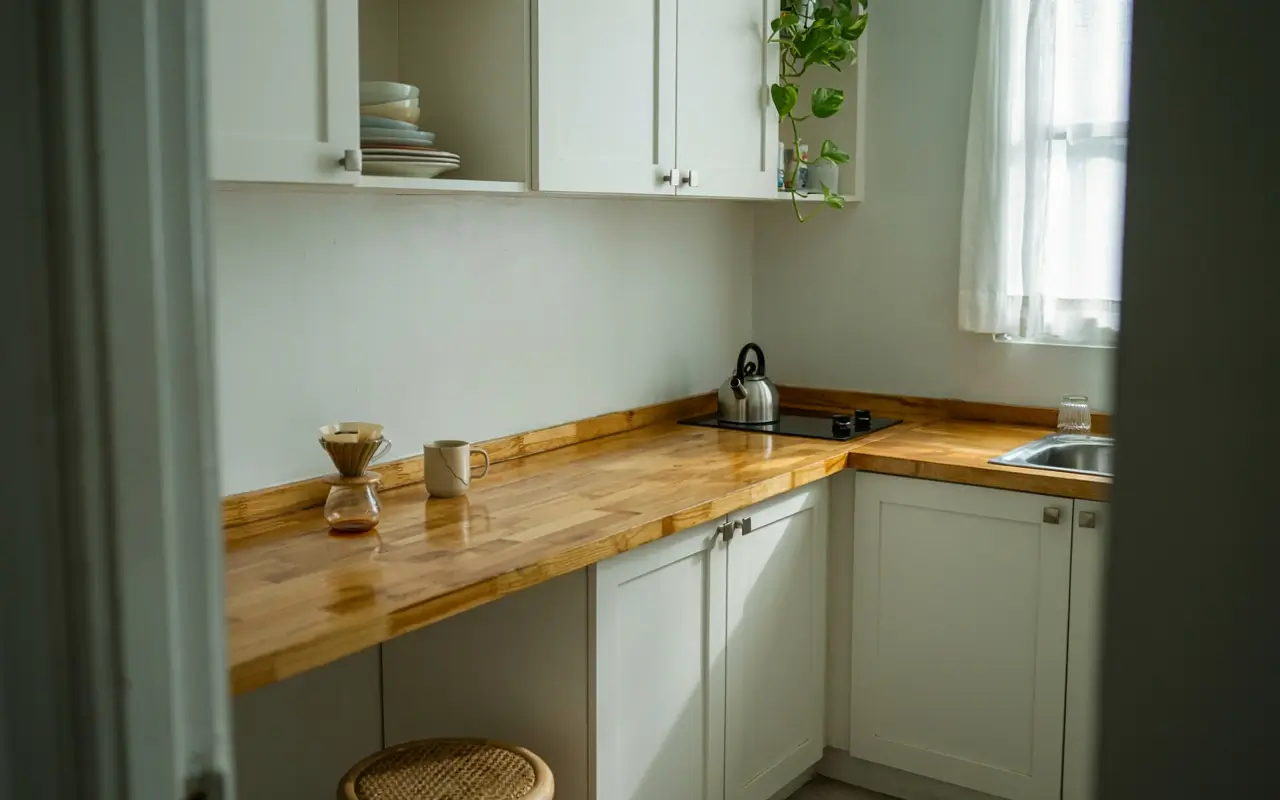
That generic laminated countertop is the quickest thing dragging your kitchenette down. A roll of high-quality wood-grain contact paper, applied with patience and a credit card for smoothing, transforms it into what reads as a warm butcher block. Pick a tone with a hint of honey — it catches the light beautifully and makes the whole corner feel more bespoke. I’d only do this on a dry, weekend morning so you can work slowly and bubble-free.
2. Apply Peel-and-Stick Marble Tiles as a Backsplash Focal Wall
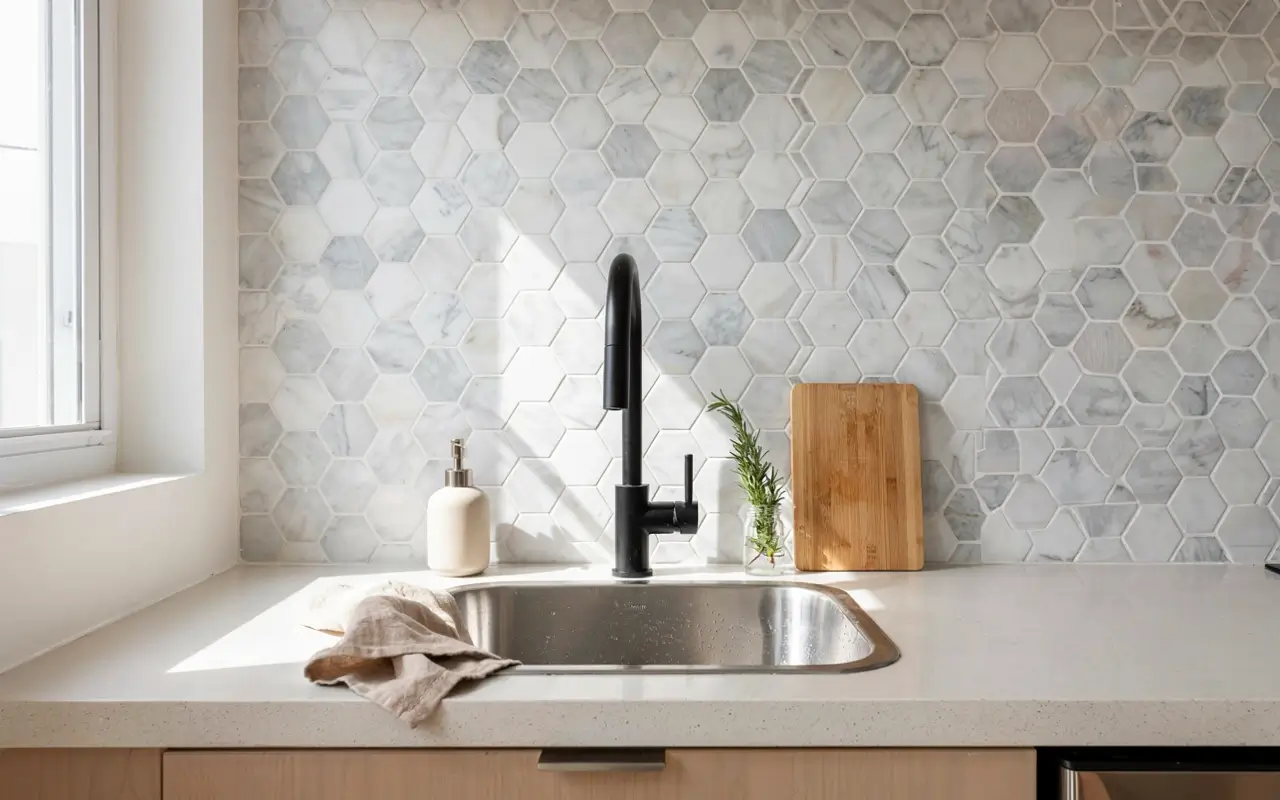
A slab of real marble would cost more than your monthly rent, but self-adhesive marble-look tiles on the wall behind your sink deliver that same sculptural elegance for under a thousand pesos. Keep the rest of the kitchenette muted — white walls and simple wood accents — so the marble does all the talking. This single move makes the whole space photograph like a design magazine spread.
3. Paint Just the Lower Cabinets in Deep Sage While Leaving Uppers Crisp White
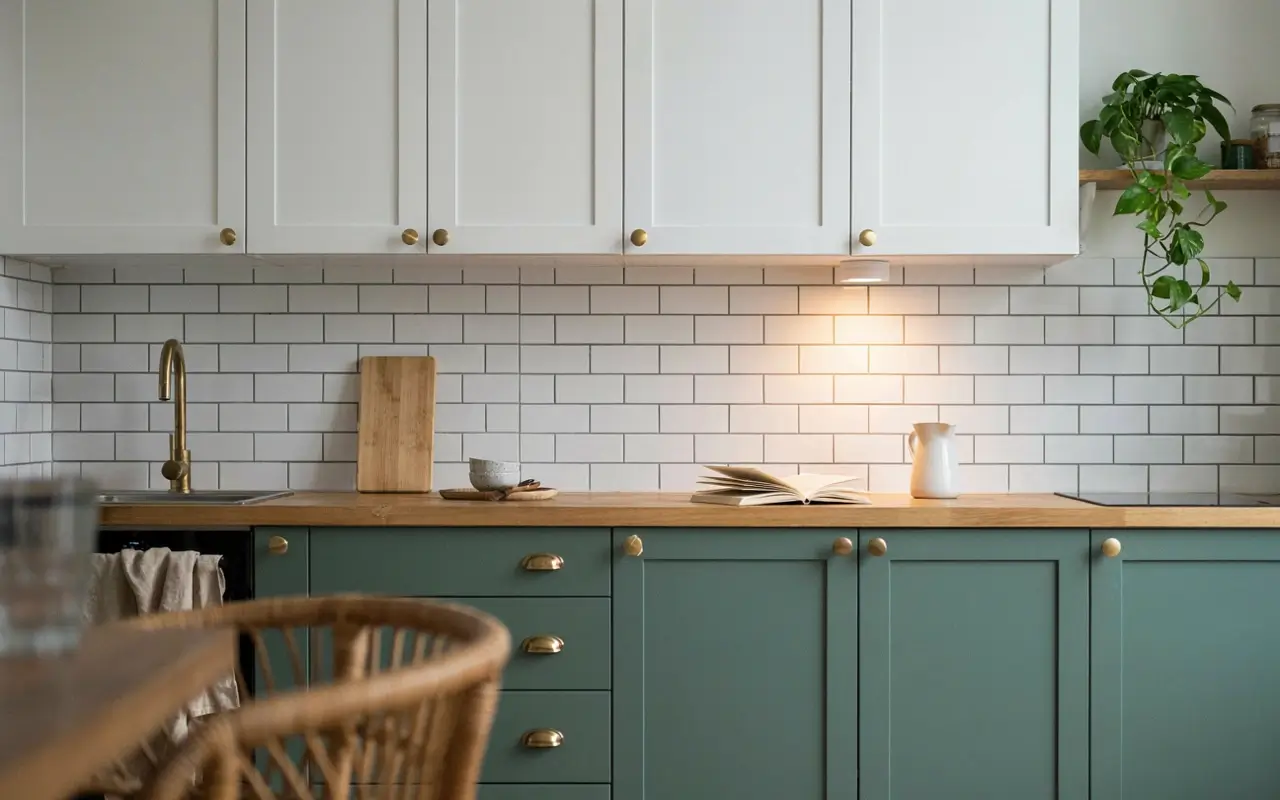
A two-tone cabinet scheme instantly signals “custom kitchen,” even when the boxes came standard from the developer. Use Boysen Quick Dry Enamel in a muted sage green on the base cabinets only. Leave the upper cabinets white to keep the top half of the room feeling light and tall. A quick swap of the plastic knobs afterward makes the illusion complete — it feels like a kitchen that got a real design consultation.
4. Create a Faux Tongue-and-Groove Accent Wall Using Removable Wallpaper
Paneled walls add cottage charm but require nails and carpentry. A peel-and-stick wallpaper with a subtle vertical groove pattern, applied to the wall that faces your kitchenette, gives the same tactile warmth without a single nail. Choose a soft cream or barely-there clay shade so the texture stays gentle and doesn’t compete with your shelf styling.
5. Hang a Frameless Beveled-Edge Mirror as an Unexpected Backsplash
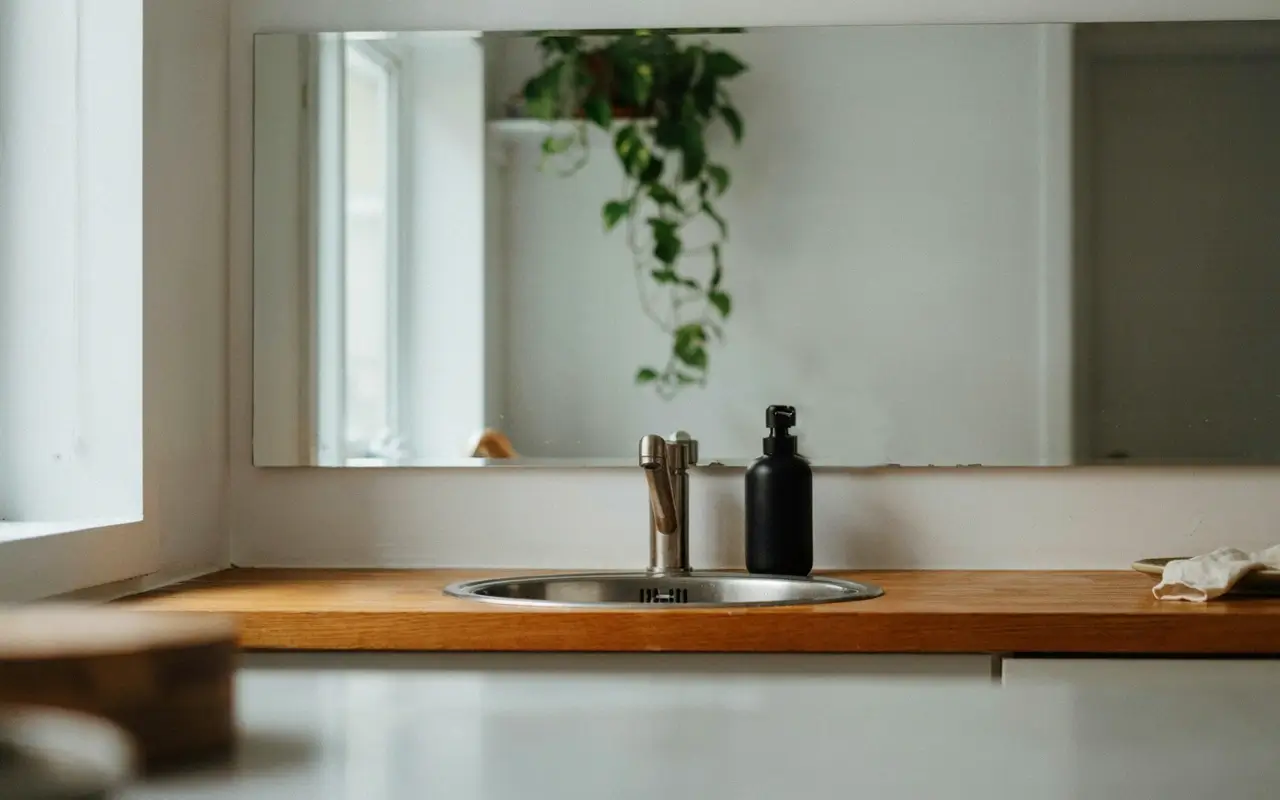
This is the kind of trick that makes guests tilt their heads and ask, “How is your kitchenette twice as big as mine?” A large, frameless mirror with beveled edges, mounted where you’d usually install a backsplash, catches every bit of light and visually doubles the counter depth. It also forces you to keep that zone spotless, which is a bonus. Use heavy-duty adhesive mirror clips so you don’t drill.
6. Stick Removable Wallpaper on the Kitchenette Niche Ceiling for an Unexpected Surprise
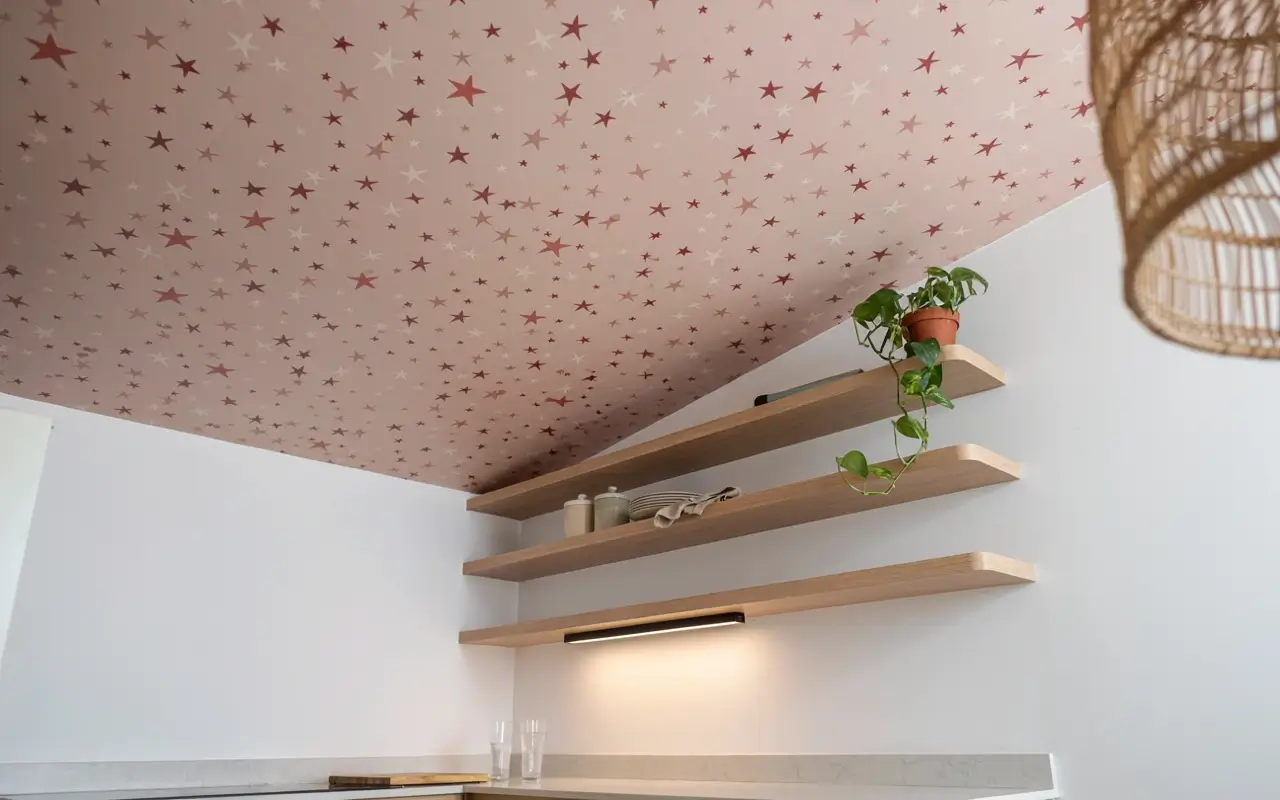
Most people forget the fifth wall. Lining just the ceiling of your kitchenette alcove with a subtle star-pattern or soft blush removable wallpaper adds an almost whimsical design note. It doesn’t shrink the space — it just feels like a secret that only you notice when you look up from your morning coffee. This tiny move makes the whole corner feel intentionally designed rather than left to chance.
7. Use Frosted Window Film on Glass Cabinet Inserts to Hide Clutter Elegantly
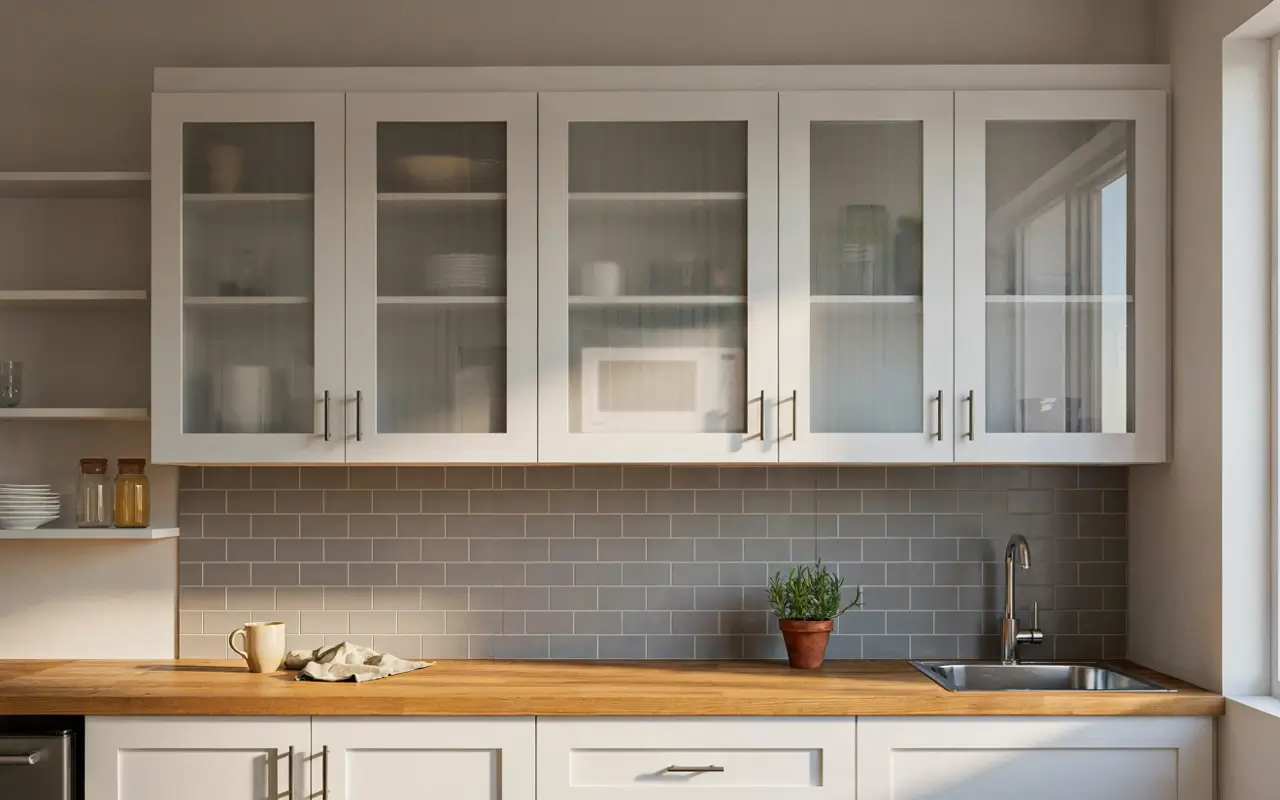
Glass-front cabinets sound fancy until they reveal a chaotic stack of mismatched mugs and instant noodle packets. A roll of frosted privacy film, cut to size and applied with water, instantly softens the look while still letting light pass through. It’s a minimal-effort edit that turns cabinet fronts into a calm, cohesive surface that whispers “expensive.”
Renter-Friendly Hardware & Cabinet Makeovers
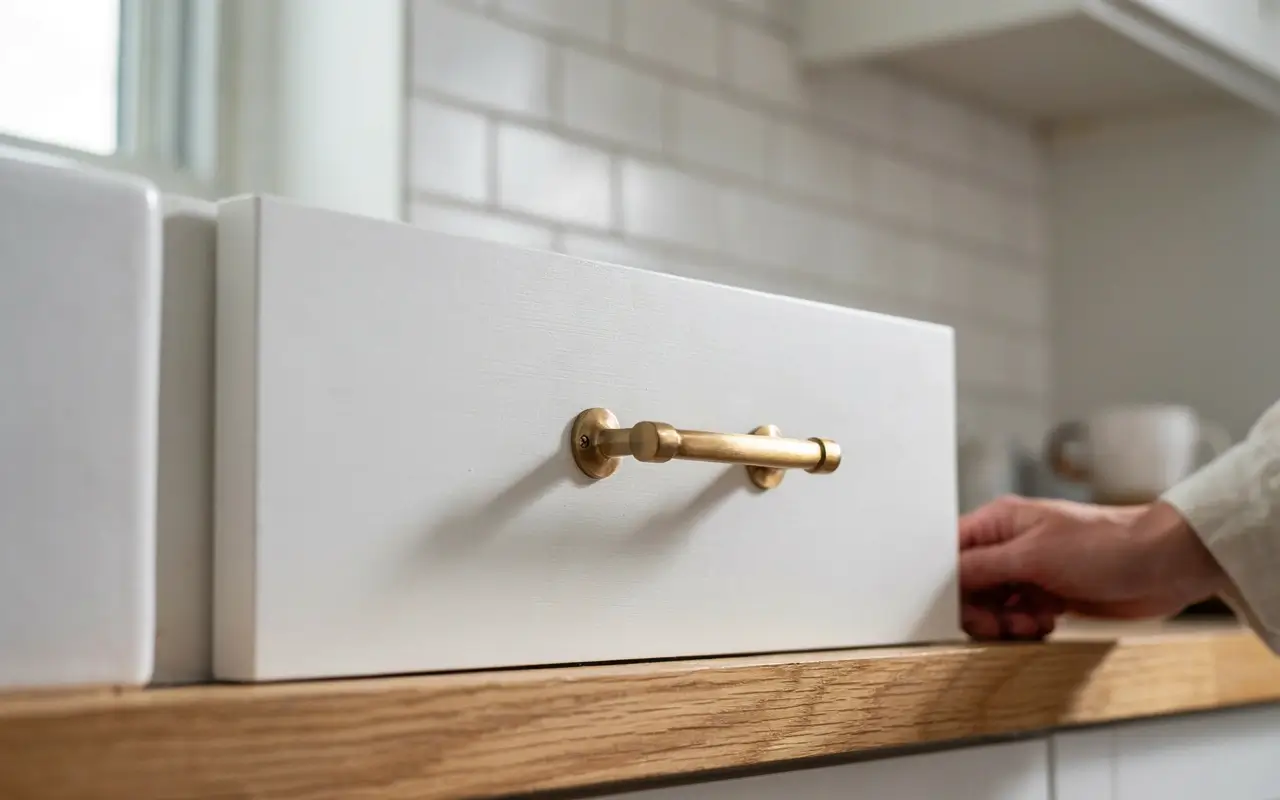
8. Swap Cabinet Knobs for Matte Black or Brushed Brass Pulls Without Drilling
That generic laminated countertop is the quickest thing dragging your kitchenette down. A roll of high-quality wood-grain contact paper, applied with patience and a credit card for smoothing, transforms it into what reads as a warm butcher block. Pick a tone with a hint of honey — it catches the light beautifully and makes the whole corner feel more bespoke. I’d only do this on a dry, weekend morning so you can work slowly and bubble-free.
Developer-issue chrome knobs are the fastest giveaway of a budget kitchenette. Look for adhesive-backed or existing-hole-match brass or matte black pulls at the hardware section of a home store. The transformation is instant — warm brass against a white cabinet feels inherited from a Parisian apartment. My read is that you should stick to one metal finish across all knobs, including the faucet if you can, for the most polished look.
9. Hide Exposed Pipes Under the Sink With a Fabric Skirt on a Tension Rod

That gaping cavity below the sink, with its ugly pipes and cleaning bottle graveyard, steals any sense of calm. Install a slim tension rod just under the counter edge and hang a simple linen or cotton-blend panel in a neutral tone. Suddenly, the whole area looks intentional and soft, and you’ve gained hidden storage that nobody needs to see. Washable fabric means zero stress about kitchen spills.
10. Replace the Standard Faucet With a Matte Black Gooseneck (and Keep the Original)
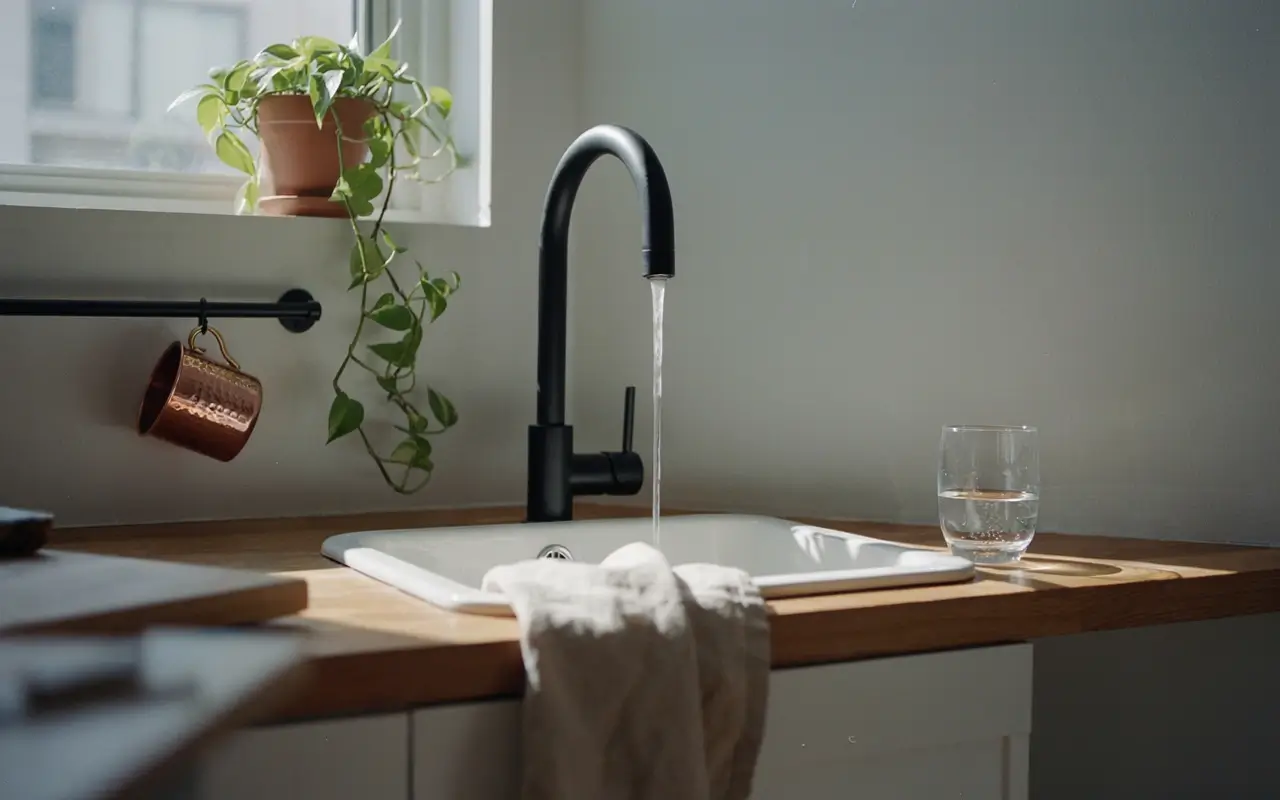
If you can wield a wrench for fifteen minutes, swapping the builder-grade tap for a matte black gooseneck faucet changes the entire character of the sink zone. Pack away the original faucet carefully; reinstall it when your lease ends. The high arc looks sculptural and makes washing larger pots in a shallow basin far less frustrating. Confirm your unit’s water shutoff valve location before starting — always a smart safety check.
11. Mount a Slim Brass Rail Under Upper Cabinets to Hang Copper Mugs and Herb Clips
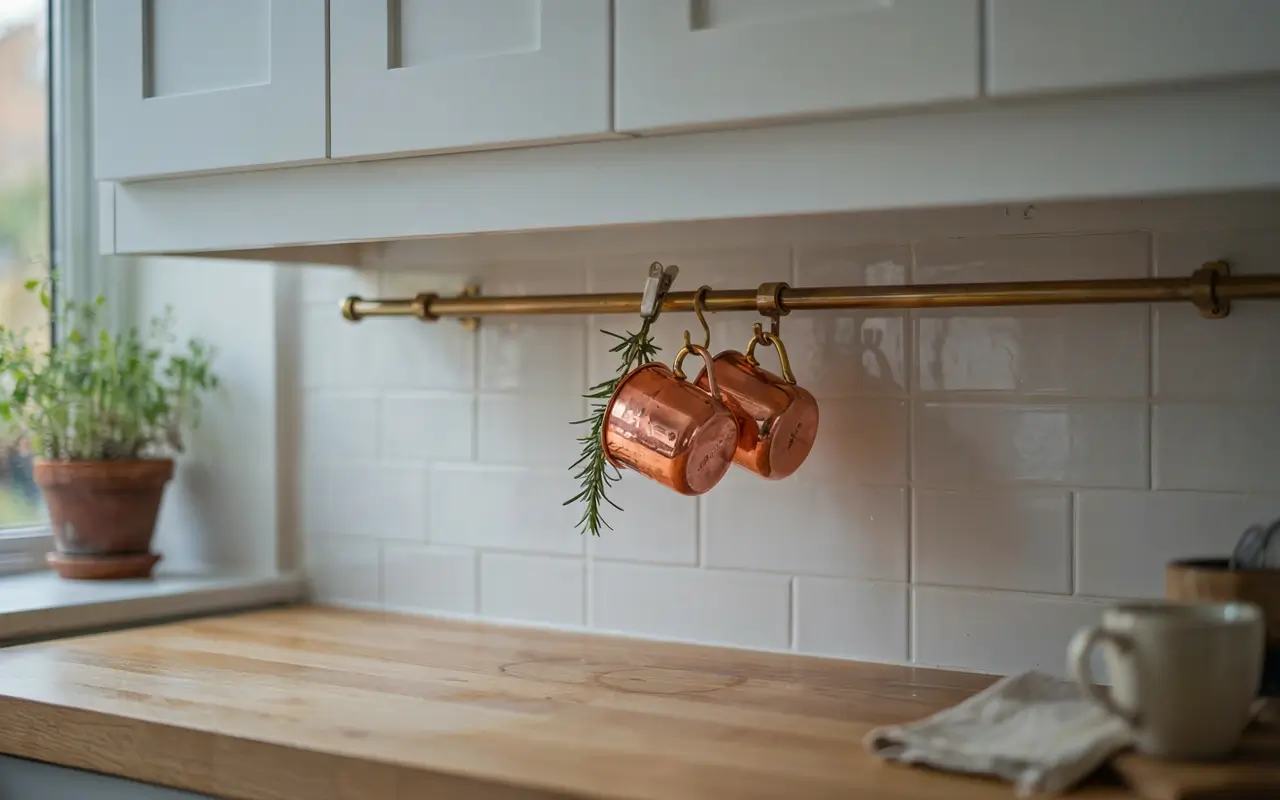
This is one of those tiny tweaks that makes you feel like your kitchen belongs in a specialty coffee shop. A slim brass rail, fixed with adhesive mounts, gives you a permanent home for two or three copper mugs and a small clip-on herb planter. It uses dead vertical space and adds warmth right at eye level. Keep the number of hung items small so it reads as curated, not cluttered.
12. Install a Pegboard Painted the Same Color as the Wall for Invisible Tool Storage
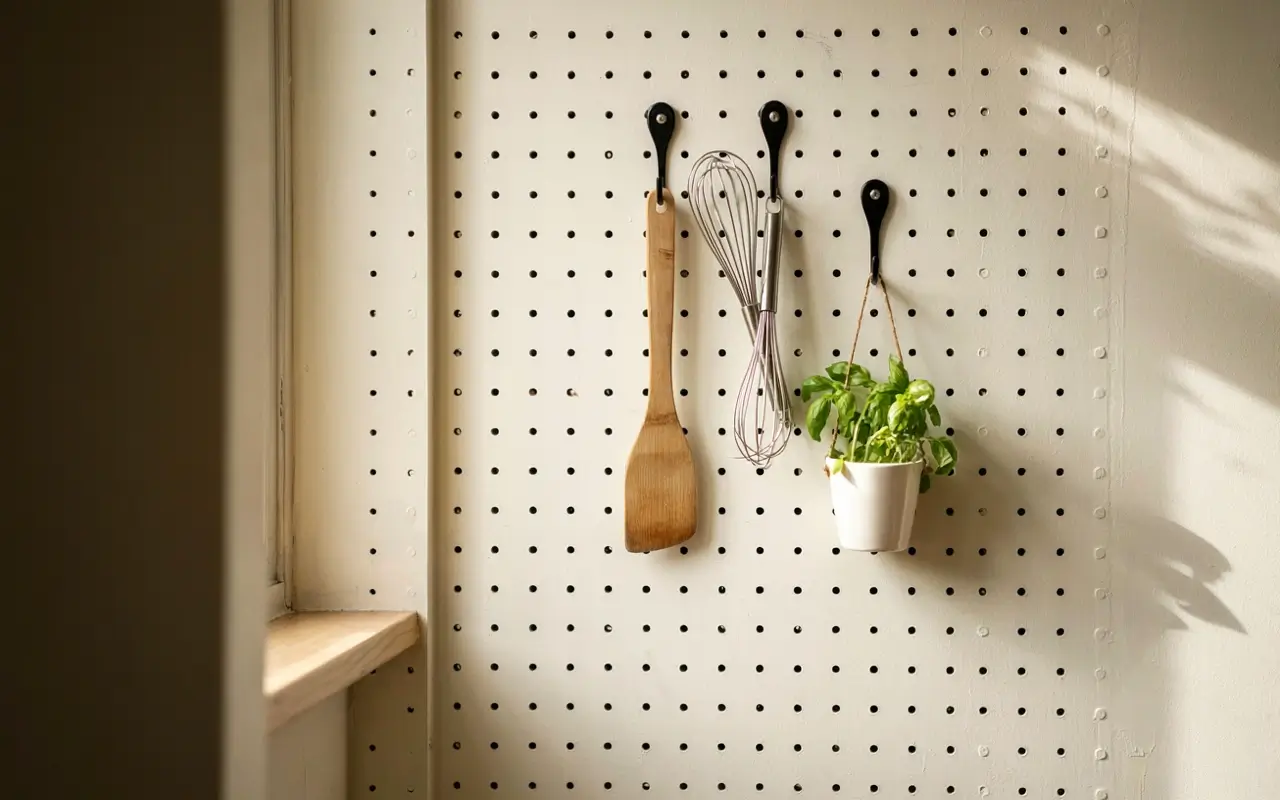
A pegboard is a classic small-space hero, but the typical raw wood or bright white look can feel craft-room-ish. Paint it with the exact same wall color — maybe a warm ivory — and it almost disappears while still holding your spatulas, whisk, and a tiny hanging pot of basil. This works best on a side return wall that gets less visual traffic, so the tools are accessible but don’t dominate the main view.
13. Stack a Slim IKEA KNOXHULT Cabinet on the Counter as a Vertical Pantry
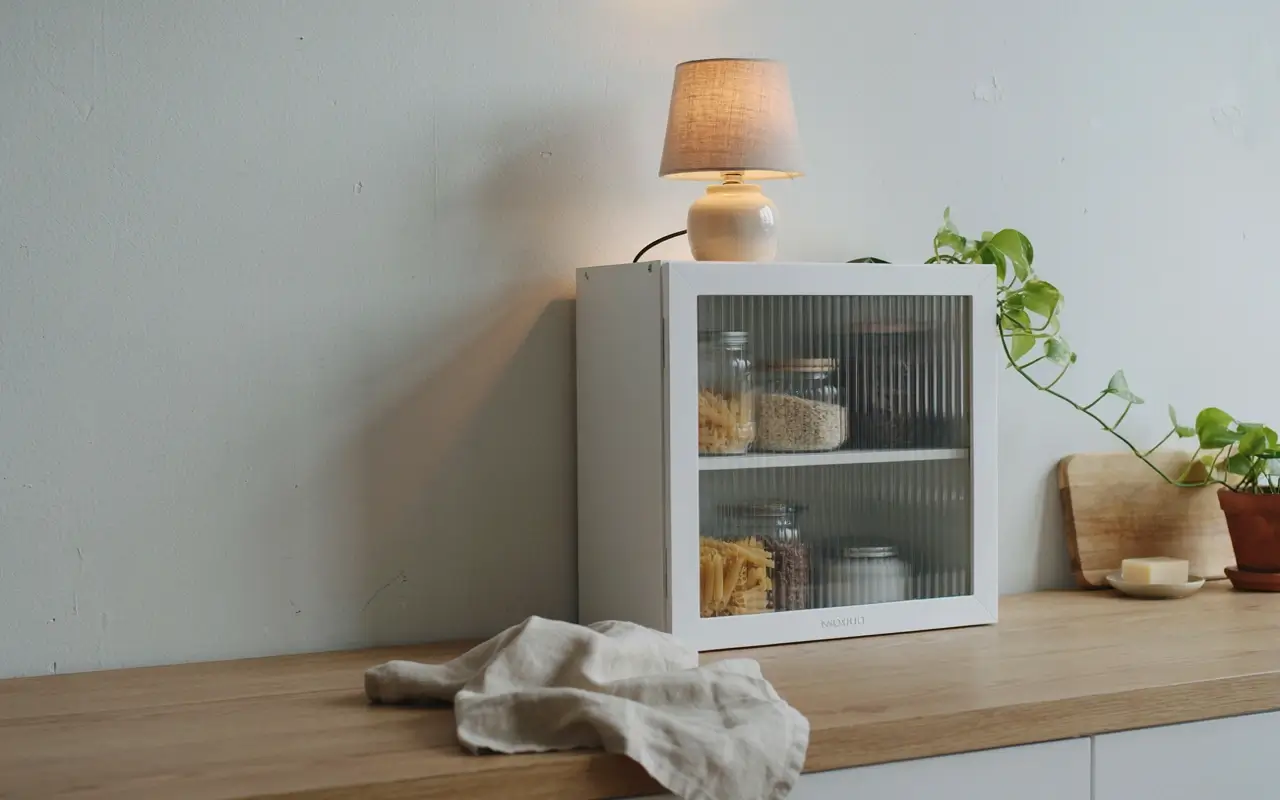
Counter space is precious, but sometimes surrendering a small corner to vertical storage pays off. The IKEA KNOXHULT wall cabinet, placed on the counter and secured with a safety strap, creates a slim pantry with a ribbed glass door that softly obscures your dry goods. Style the top with a small lamp or a stack of pretty cookbooks, and you’ve gained both function and a moment of charm.
14. Attach a Folding Wooden Wall-Mounted Table as an Extra Prep Surface
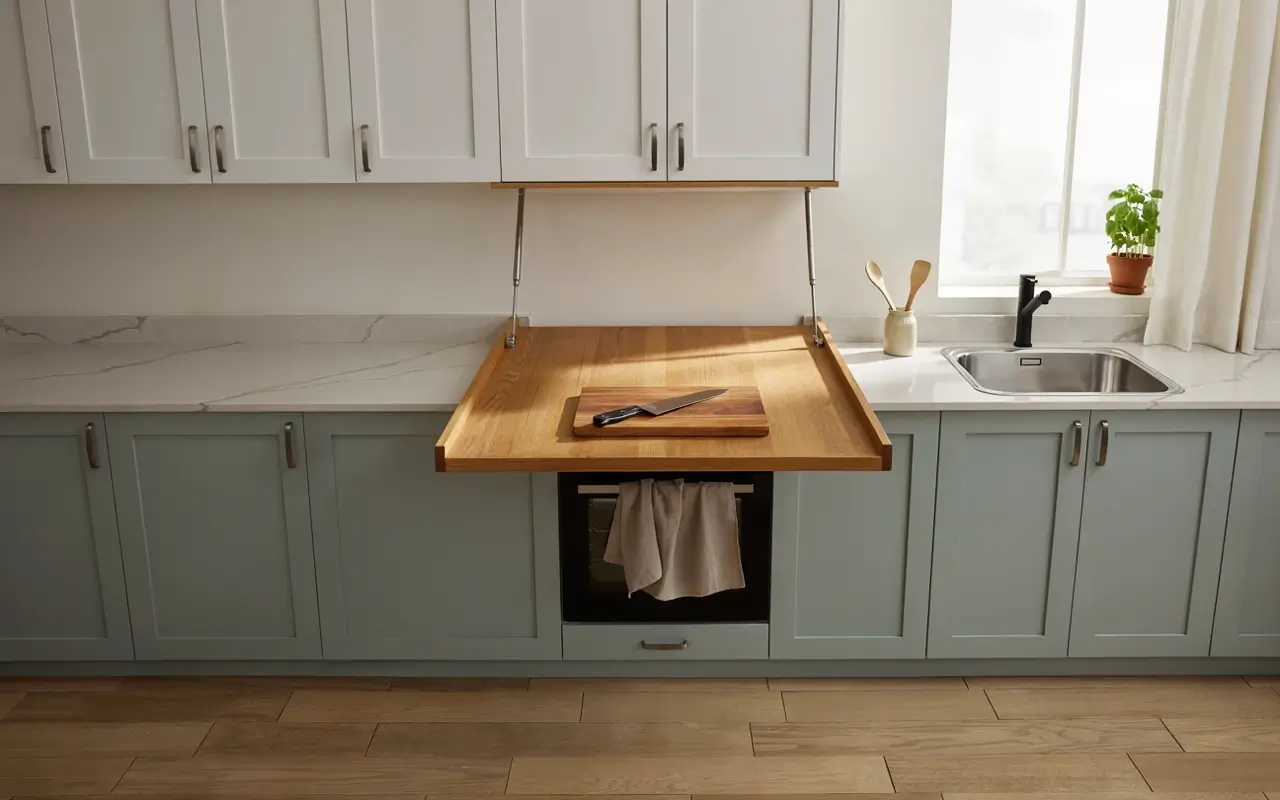
If your kitchenette lacks even a proper chopping zone, a slim wall-mounted drop-leaf table, painted in the same wood tone as your counter contact paper, can be folded down in seconds. Mount it with strong adhesive brackets into a stud if possible, or use heavy-duty anchors rated for vertical load. When it’s up, it becomes a decorative wood panel. Down, it gives you a dedicated prep area that instantly makes cooking feel less like a balancing act.
Lighting & Ambiance Shifts That Cost Almost Nothing
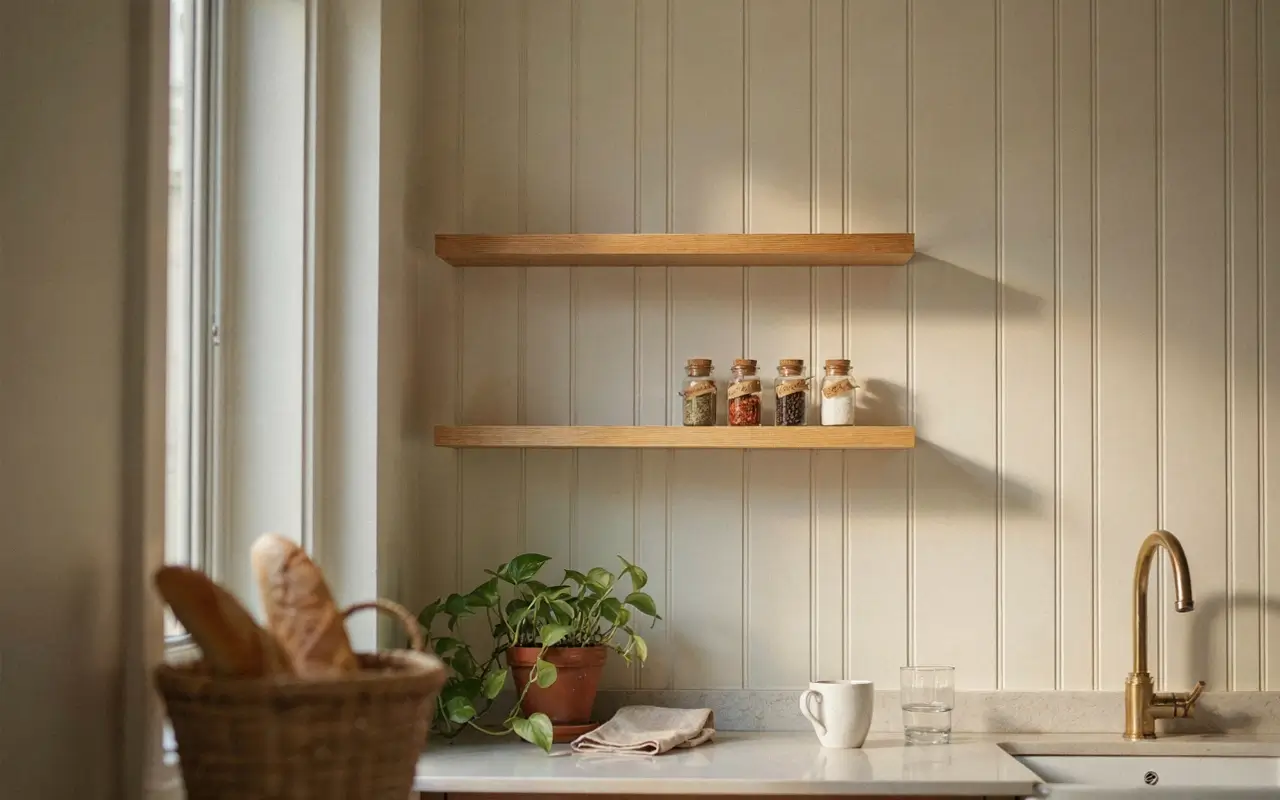
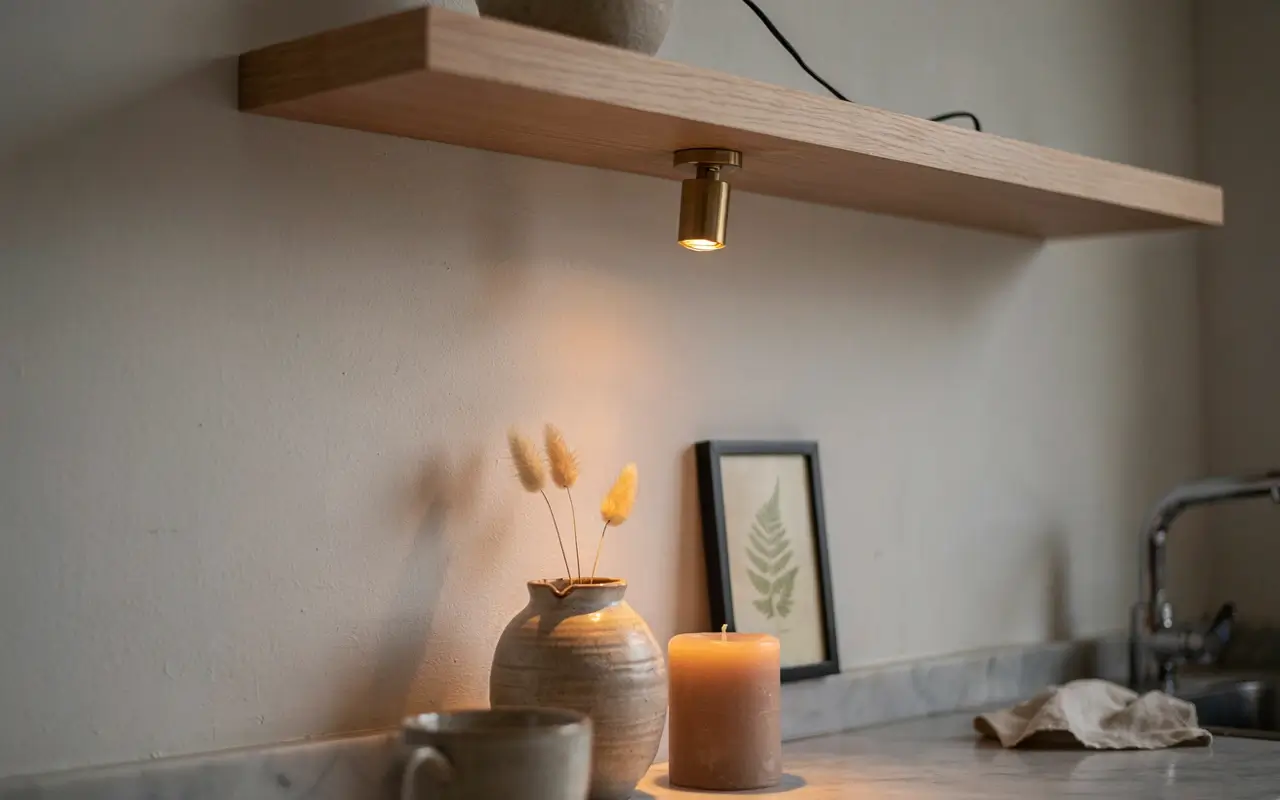
15. Hide a Warm LED Strip Under One Floating Shelf for a Café-Like Glow

The harshest thing about most condo kitchenettes is the single cold-white ceiling bulb. A peel-and-stick warm LED strip, tucked underneath the lowest open shelf, casts a golden wash onto the counter below. At night, with only that light on, the space transforms into a quiet coffee corner. This is the lighting equivalent of switching your phone to “do not disturb.”
16. Place a Small Battery-Operated Picture Light Above a Styled Open Shelf
Little details create luxury. A tiny brass picture light, the kind meant for artwork, mounted above a shelf that holds three beautiful objects — say, a textured vase, a candle, and a small framed print — makes that shelf look like a gallery moment. The light is battery-operated and attaches with removable adhesive, so it’s completely renter-friendly.
17. Hang a Single Rattan or Paper Pendant Light Centered Over the Counter
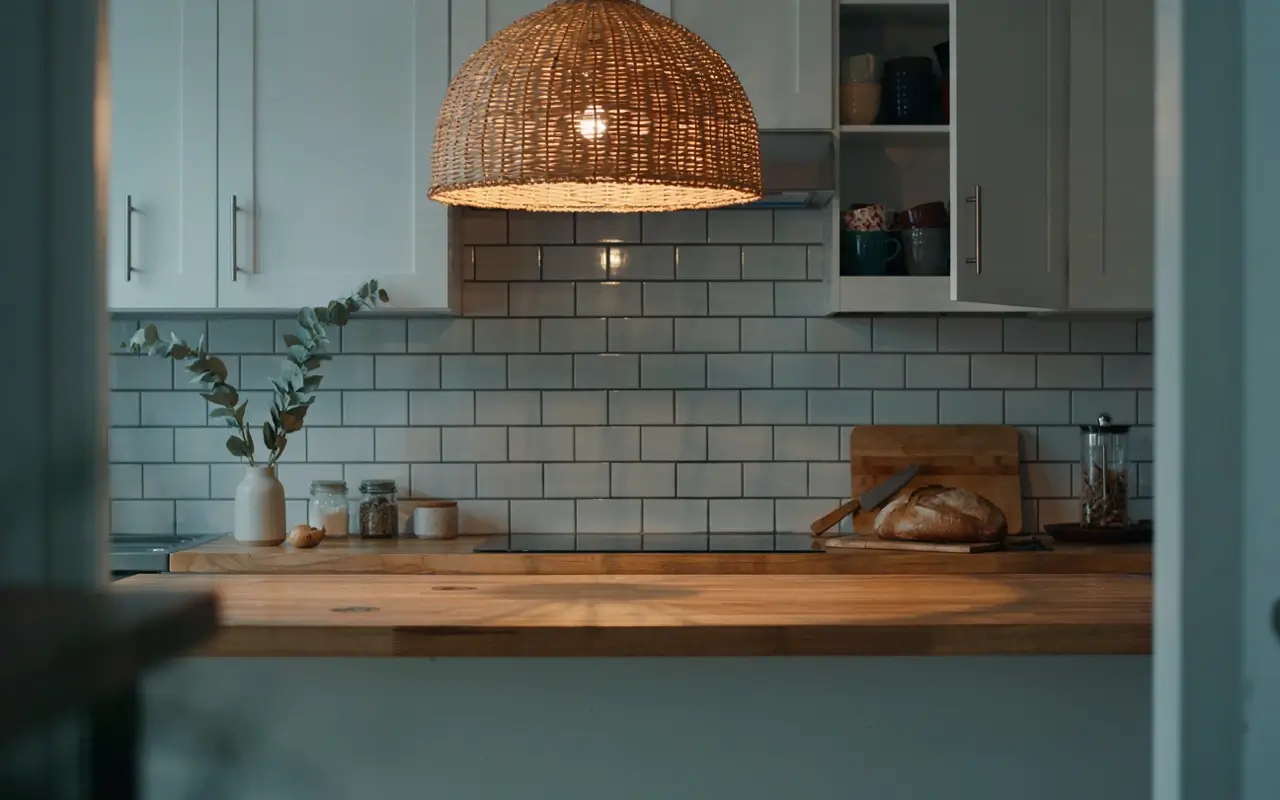
You may not be able to hardwire a new light, but many Philippine studios have a pre-existing junction box above the counter. Swap the generic flush mount for a woven rattan or soft paper lantern pendant that plugs in or is easily rewired by a handyman. It draws the eye up, makes the ceiling feel higher, and scatters warm, patterned shadows that are genuinely Pin-worthy. Always switch off the breaker before even touching a ceiling fixture.
18. Run a Warm LED Strip Along the Cabinet Toe-Kick for a Floating Effect
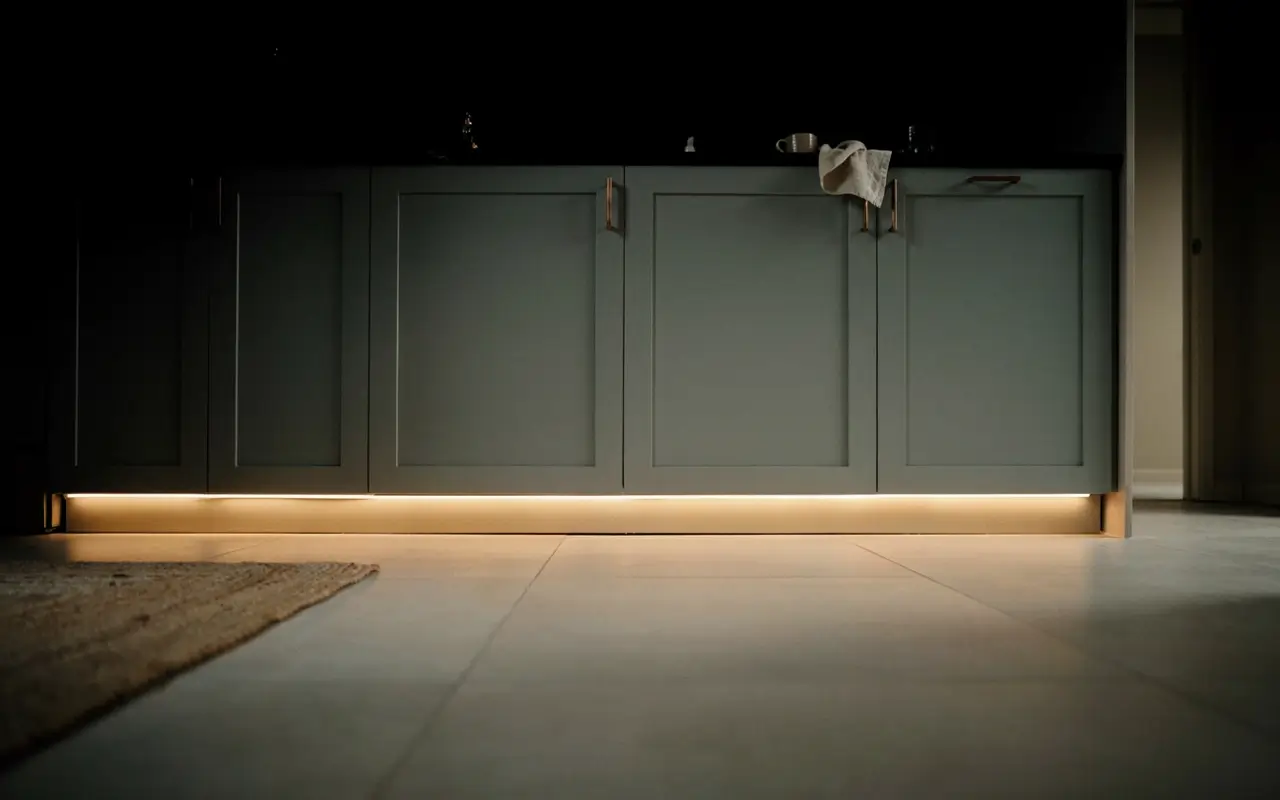
This is the design secret of high-end kitchens scaled down to studio size. A warm LED strip run along the base of your lower cabinets, right where they meet the floor, makes the whole cabinet block appear to float. The soft glow also acts as a gentle nightlight, guiding you to a glass of water without the brutal glare of overhead lights. Choose a strip with a motion sensor for extra magic.
19. Add a Small Table Lamp on the Far End of the Counter for Cozy Evening Light
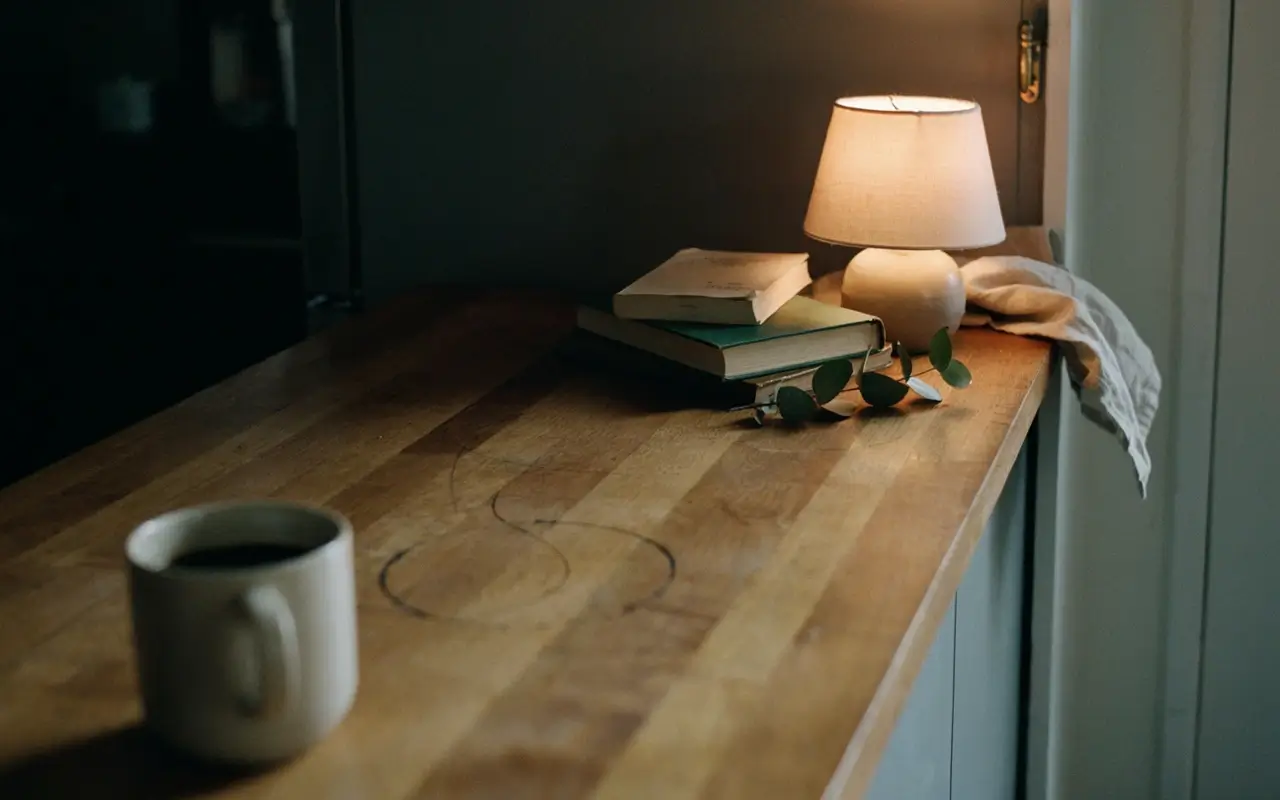
Lamps aren’t just for bedrooms. A petite ceramic or glass lamp placed at the edge of your kitchenette counter, turned on as dusk falls, signals that the cooking shift is over and the unwinding has begun. It’s deeply atmospheric and costs less than a takeout meal when sourced from a local home section. The soft, downward pool of light is what makes the whole studio feel like a home, not a hotel suite.
20. Use a Battery-Operated Motion-Sensor Light Inside a Dark Lower Cabinet
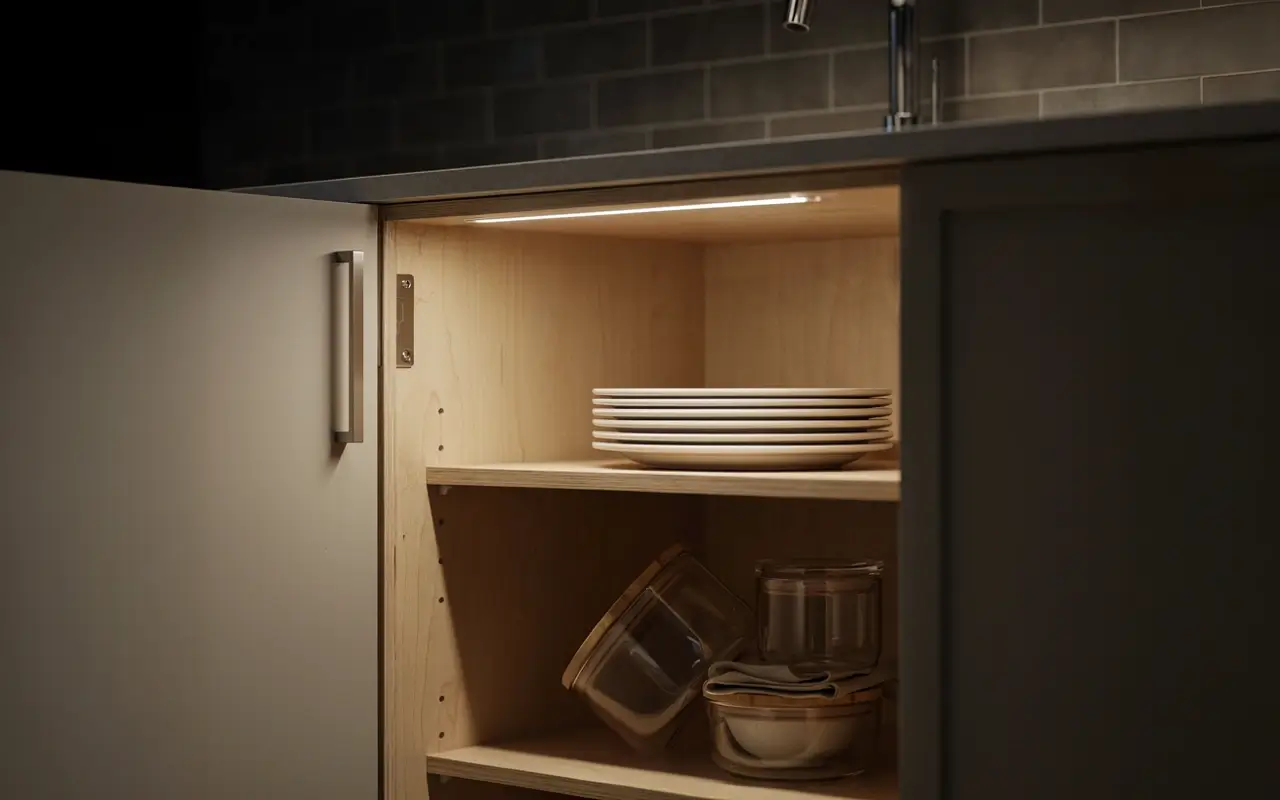
That deep corner cabinet where pots disappear into a black hole? Stick a small, rechargeable motion-sensor bar light inside. Every time you open the door, the space instantly illuminates, making you feel like you have a high-end appliance. It’s absurdly practical and makes grabbing a pan before your morning coffee so much less of a hunt. Look for these at Mandaue Foam or online local stores.
Quick Comparison: Countertop Illusion Materials
| Option | Best For | Key Benefit | Limitation |
|---|---|---|---|
| Wood-grain contact paper | Instant warmth | Budget-friendly, removable | Can peel with heavy water exposure |
| Peel-and-stick marble tiles | Luxe focal wall | Realistic texture, light-reflecting | Needs careful alignment |
| Faux tongue-and-groove wallpaper | Cottage charm | Adds tactile dimension | Pattern can feel busy if not neutral |
How to Get a High-End Look with Contact Paper
To achieve a seamless high-end countertop illusion, follow these steps:
- Clean the surface thoroughly and let it dry completely.
- Measure and cut the contact paper slightly larger than the counter area.
- Peel backing gradually, smoothing with a flat card as you go to push out air bubbles.
Peel-and-stick backsplash tiles vs. paint: Tiles are better for creating a visual focal point that photographs like real stone because they have texture and subtle grout lines. Paint works better when you want a fast, uniform color refresh on a tight budget. The key difference is that tiles add architectural detail, while paint relies on color alone.
Frequently Asked Questions
What is the best color for a small studio kitchenette?
Soft warm whites, muted sage, and light wood tones make a tiny kitchen feel airy and expensive. Avoid dark colors on all surfaces as they can close in the space.
How can I make my condo kitchenette look luxurious without drilling?
Use peel-and-stick marble tiles, adhesive brass hooks, contact paper countertops, and a removable fabric skirt. Swap knobs with existing-hole hardware for an instant facelift.
What type of lighting is best for a tiny kitchen?
Layered warm lighting works best — LED strips under shelves, a small table lamp on the counter, and a soft pendant light. Avoid a single harsh ceiling light.
How do I hide clutter in an open kitchenette?
Use identical glass jars on open shelves, frosted film on glass cabinet inserts, and a rolling pantry cart. Keep only daily essentials visible and store the rest behind closed doors.
Can I install a backsplash in a rental studio in the Philippines?
Yes, use peel-and-stick tile decals or removable wallpaper. They adhere well to clean walls and can be removed without damage, perfect for condo rules.
Conclusion
Your kitchenette doesn’t need to be bigger to be better — it just needs a few gentle, clever edits that honor how you actually live. The Colliers data confirms that studios are shrinking, but that reality doesn’t mean your home has to feel pinched. The most effective transformation I’ve seen isn’t the biggest; it’s the one where someone lines up a few glass jars, swaps a knob, and adds a little lamp that makes them exhale at the end of a long day. Start with one idea that makes you feel something. The rest will follow.
")
")


")
No Comment! Be the first one.